
This topic explains how to export the spreadsheet template used to import the organizational structure, business components, and people to the system. It also specifies the procedures necessary for completing the spreadsheet correctly so that it can be imported without errors.
The spreadsheet includes seven worksheets, two of which do not require completion:
•Info: where information on the spreadsheet is provided, including its version number.
•Instructions: where instructions on how to complete each field are provided.
•Assets: where assets and other information on the organizational structure can be created and edited. This is where you can create assets, define the perimeters and subperimeters they belong to, specify their properties, enter values for any attributes associated with them, and create asset components for each.
•Business Components: where business components can be created and edited. If the spreadsheet with only business components is exported, it will not be possible to associate the business components with other components or assets through the spreadsheet. To do so, the spreadsheet containing the organizational structure must be exported.
•BC Associations: where associations between tactical and strategic business components can be created or removed. This tab is only included in the spreadsheet when the blank template or the organizational structure is exported.
•BC and Asset Associations: where associations between tactical components and assets can be created or removed. This tab is only included in the spreadsheet when the blank template or the organizational structure is exported.
•People: where people from the organization can be registered. The Name and E-mail fields cannot be edited for previously registered people.
Note: The fields in the spreadsheet are case-sensitive.
Once completed correctly, the spreadsheet can be imported.
It is important to note that some information on the organizational structure that can be managed in the system cannot be registered through the spreadsheet. Instead, this information must be included after the template is imported. For example, the following information cannot be registered through the spreadsheet: locations and managers of perimeters; the analysis frequency and mapping criteria for assets; and all fields from the BIA Data and Continuity Requirements tabs for each business component (when the Continuity module and these tabs are enabled).
Before importing the spreadsheet, you can choose to delete all previously registered assets and perimeters in the organizational structure, so that the content of the template will overwrite the existing structure. If these options are not selected, any new information included in the spreadsheet will simply be added to the structure, while existing information updated through the spreadsheet will overwrite the information in the system.
When the spreadsheet is accessed for the first time after being exported, Macros must be enabled; otherwise, you will not be able to edit any information in it. In version 2010 of Microsoft Excel, a banner appears so that they can be enabled. For further details on enabling macros, access http://office.microsoft.com/en-us/excel-help/?CTT=97. Select the version of Excel you are using and locate the topic on macros.
1. Access the Organization module.
2. Select the Export/Import option from the menu.
3. In the Select an option field of the Export Organization tab, select one of the available options and click Export (see figure below).
4. Save the file to your computer and then open it.
When the file is opened, the template is displayed in Microsoft Excel. You can then begin creating the organizational structure in the Assets worksheet (see figure below).

The table below explains how to complete each field from the Assets worksheet. Those preceded by an asterisk are required.
|
Field |
Instructions |
|
ID |
This field is completed automatically and is used to uniquely identify assets. |
|
*Asset Type |
Select the type of asset that is being created from the drop-down list available when the field is clicked. The options are: technology, person, process, or environment, as well as any custom types created in the Object Types section of the Administration module.
Note that for assets previously registered in the system, any changes to this field will be ignored when the spreadsheet is imported. Also note that deleted asset types may appear in the drop-down list of an asset if the deleted type still exists. However, new assets of the deleted type cannot be created. If this field is completed with the name of an asset type that does not exist in the system, the spreadsheet will not be imported and the field will have to be completed with a valid value so the spreadsheet can be imported. |
|
*Asset Path |
Enter the asset’s path in the organizational structure, indicating in which perimeter and any sub-perimeters it is located. Each should be separated by a backslash ("\"). If no perimeters or sub-perimeters exist under the names specified, they will be created. However, empty perimeters and sub-perimeters cannot be created, and they must include at least one asset in order to be created.
For example: if the asset is located under the sub-perimeter "Financial Department" under the perimeter "NY Branch", the field should be completed as follows: NY Branch\Financial Department. |
|
*Asset Name |
Enter a unique name for the asset that is being created. This field accepts a maximum of 400 characters. |
|
Description |
Enter information that describes the asset and helps identify it. |
|
*Relevance |
Specify the degree of importance the asset holds to the organization by selecting one of the following options from the drop-down list: Very Low, Low, Medium, High, and Very High. (The names of these options may vary if they were customized in the Scales section of the Administration module.)
Note that the relevance specified here becomes the R in the PSR metric, which is the main risk metric used by the system. When asset components are analyzed in asset risk projects, they inherit the relevance specified for the asset. |
|
Criticality |
Specify the level of organizational dependence on the asset if occurrences with negative effects on the organization should take place. This is related to the maximum acceptable period of time a certain process can be paralyzed and scores the criticality of this paralysis on a scale from 0 to 100. |
|
*Responsible |
Enter the name and the e-mail of the person previously registered in the Manage People section of the Organization module or on the People worksheet who will be responsible for the asset and for ensuring its information is kept updated. For example: Jane Doyle (jane.doyle@example.com).
By default, this role receives permission to view the organizational structure and run queries, though only considering the assets to which they were assigned. Also keep in mind that the person must be included in the Organization Module Users profile to gain access to the module. |
|
Host Address |
Enter the host address of the target machine, used by default in automated collections for assets whose asset components are associated with technology knowledge bases. This information can be edited before requesting a collection.
Note that this field should only be completed for technology assets. |
|
Credentials |
Enter the name of a set of credentials previously registered in the Credentials section of the Administration module.
Credentials allow collector servers to access the target machines to be analyzed in a certain location (server, network, etc.). These, along with the collector server and host address, allow automated collections to take place. The credentials selected here will be used by default in risk projects to access all the asset’s components.
Note that this field should only be completed for technology assets. |
|
Collector Server |
Enter the name of a collector server previously registered in the Collector Servers section of the Administration module.
Collector servers are responsible for managing collection requests and their results, using the credentials and host addresses specified to access the target machines. The collector server selected here will be used by default in risk projects for this asset’s components.
Note that this field should only be completed for technology assets. |
|
Latitude |
Enter the latitude of the asset's location using a number from -90 to 90, and up to 6 decimal places. This field is required if the Longitude field is completed. |
|
Longitude
|
Enter the longitude of the asset's location using a number from -180 to 180, and up to 6 decimal places. This field is required if the Latitude field is completed. |
|
Location Description |
Enter any relevant information on the asset’s location. |
|
Asset Attributes |
Any asset attributes displayed in the spreadsheet were previously created and published in the Objects and Attributes section of the Administration module. When an attribute does not apply to a certain asset type, any information entered for it will be struck through and ignored when imported. If the attributes are marked as required in the system, they must be completed for the spreadsheet to be imported. Note that if the Dispatch solution is enabled, the Address, Identification, Position, and Type attributes will be required.
These fields should be completed according to the type of attribute, as follows: •Attachment: Files cannot be uploaded or deleted through the spreadsheet, although any files attached through the system will be listed. These will be displayed within brackets separated by semicolons. For example: [file name.pdf];[file name 2.doc].
When creating an asset through the spreadsheet, this field will be imported blank, even if it is marked as required. •Date/Time: The date format should be the same as that configured for the attribute in the system. If the attribute is registered as "Date", the field should contain only the date; if "Time", the field should contain only the time; and if "Date/time", it may contain either one. If only the date will be included, the time will be 0:00; if only the time will be included, the date will be the import date. The date may be in two formats: MM/dd/yyyy or yyyy-MM-dd. The time should be in 24-hour format: HH:mm. •E-mail: E-mails should be entered using a maximum of 100 characters in the following format: username@domain.com. •Formula: This is a read-only field, so it is not possible to insert or edit values. These values will be re-calculated once the spreadsheet is imported. •Image: Image files are attached through the system and cannot be added through the spreadsheet. The files attached through the system will be displayed in brackets and separated by a semicolon, for example: "[image.jpeg];[image2.jpeg]".
When creating an asset through the spreadsheet, this field will be imported blank, even if it is marked as required. •Link: Links should be entered as: http://www.domain.com or \\server\path. •List of Options: Attributes of this type should be completed with the options available for the attribute, separated by semicolons if more than one value is accepted. •Number: This type of attribute uses the decimal separator (“.”) and optionally the comma separator (“,”) to separate thousands. For example, the number 1200.20 should be filled in as 1,200.00. •Outline: This type of attribute should be completed with the entries using a maximum of 100 characters with each separated by semicolons. For example: Entry 1;Entry 2. •Paragraph: This type of attribute should be completed with normal text. •Relationship: This type of attribute can be single or multiple selection and should be completed with the alphanumeric identifier or the path of the objects being associated. If more than one object with the same name has been registered in the system, the paths of the objects cannot be used to create relationships and the system will not allow the spreadsheet to be imported. Note that for multiple selection attributes, the paths or identifiers of the objects must be separated by semicolons (";") and no spaces when completing the cells. The identifier of each object should be preceded by "id:" with no spaces after the tag. The identifier is available through the API and can also be found by inserting the name of the object in the general search field and clicking on the corresponding entry, which will then display the identifier at the end of the URL. For business components, the path is specified as follows: business component level > business component type > business component name. For perimeters, the path is specified as follows: parent perimeter name > perimeter name. For assets, the path is specified as follows: parent perimeter name > subperimeter name > asset name. For other objects, simply enter their names. When the spreadsheet is exported, the list of related objects might be truncated if the maximum number of characters allowed in the cell is exceeded. If the cell is not edited, the spreadsheet will be imported and all existing relationships will be kept. To edit the relationships, the ellipses and brackets must first be removed. Note that, in this case, the new relationships will be imported and any previous ones will be deleted. •Text: This type of attribute should be completed with normal text within any maximum or minimum limits set for it and according to the mask of regular expression if one was set for the field.
For details on creating attributes, see Chapter 17: Administration -> Customizations -> Objects and Attributes. |
|
Asset Components |
In this field, select a knowledge base that will be used to create an asset component. Additional asset components can be created by selecting knowledge bases in the adjacent fields. As in the system, only the latest versions of published knowledge bases can be selected. Keep in mind that previously registered asset components cannot be deleted through this spreadsheet. |
5. Click the Business Components spreadsheet to register new business components (see figure below).

The table below explains how to complete each field from the Business Components worksheet. Those preceded by an asterisk are required.
|
Field |
Instructions |
|
ID |
This field is completed automatically and is used to uniquely identify business components. |
|
*Type |
Select the type of business component that is being created from the drop-down list available when the field is clicked. The options are: Macro-Process, Organizational System, and any custom types created in the Object Types section of the Administration module.
Note that for business components previously registered in the system, any changes to this field will be ignored when the spreadsheet is imported. If this field is completed with the name of a business component type that does not exist in the system, the spreadsheet will not be imported and the field will have to be completed with a valid value so the spreadsheet can be imported. |
|
*Name |
Enter a name for the business component. This field accepts a maximum of 400 characters. Business components can be created under the same name, even if they belong to the same type. |
|
Description |
Enter information that describes the business component and helps identify it. |
|
*Relevance
|
Specify the degree of importance the business component holds to the organization by selecting one of the following options from the drop-down list: Very Low, Low, Medium, High, or Very High. (The names of these options may vary if they were customized in the Scales section of the Administration module.) |
|
* Criticality |
Using a scale from 0 to 100, specify the level of organizational dependence on the business component if occurrences with negative effects on the organization should take place. |
|
*Responsible
|
Enter the name and the e-mail of the person previously registered in the Manage People section of the Organization module or on the People worksheet who will be responsible for the business component and for ensuring its information is kept updated. For example: Jane Doyle (jane.doyle@example.com).
By default, this role receives permission to view the organizational structure and run queries, though only considering the business components to which they were assigned. Also keep in mind that the person must be included in the Organization Module Users profile to gain access to the module. |
|
Business Component Attributes |
Any business component attributes displayed in the spreadsheet were previously created and published in the Objects and Attributes section of the Administration module. When an attribute does not apply to a certain business component type, any information entered for it will be struck through and ignored when imported. If the attributes are marked as required in the system, they must be completed for the spreadsheet to be imported.
These fields should be completed according to the type of attribute, as follows: •Attachment: Files cannot be uploaded or deleted through the spreadsheet, although any files attached through the system will be listed. These will be displayed within brackets separated by semicolons. For example: [file name.pdf];[file name 2.doc].
When creating a business component through the spreadsheet, this field will be imported blank, even if it is marked as required. •Date/Time: The date format should be the same as that configured for the attribute in the system. If the attribute is registered as "Date", the field should contain only the date; if "Time", the field should contain only the time; and if "Date/time", it may contain either one. If only the date will be included, the time will be 0:00; if only the time will be included, the date will be the import date. The date may be in two formats: MM/dd/yyyy or yyyy-MM-dd. The time should be in 24-hour format: HH:mm. •E-mail: E-mails should be entered using a maximum of 100 characters in the following format: username@domain.com. •Formula: This is a read-only field, so it is not possible to insert or edit values. These values will be re-calculated once the spreadsheet is imported. •Image: Image files are attached through the system and cannot be added through the spreadsheet. The files attached through the system will be displayed in brackets and separated by a semicolon, for example: "[image.jpeg];[image2.jpeg]".
When creating a business component through the spreadsheet, this field will be imported blank, even if it is marked as required. •Link: Links should be entered as: http://www.domain.com or \\server\path. •List of Options: Attributes of this type should be completed with the options available for the attribute, separated by semicolons if more than one value is accepted. •Number: This type of attribute uses the decimal separator (“.”) and optionally the comma separator (“,”) to separate thousands. For example, the number 1200 should be filled in as 1,200.00. •Outline: This type of attribute should be completed with the entries using a maximum of 100 characters with each separated by semicolons. For example: Entry 1;Entry 2. •Paragraph: This type of attribute should be completed with normal text. •Relationship: This type of attribute can be single or multiple selection and should be completed with the alphanumeric identifier or the path of the objects being associated. If more than one object with the same name has been registered in the system, the paths of the objects cannot be used to create relationships and the system will not allow the spreadsheet to be imported. Note that for multiple selection attributes, the paths or identifiers of the objects must be separated by semicolons (";") and no spaces when completing the cells. The identifier of each object should be preceded by "id:" with no spaces after the tag. The identifier is available through the API and can also be found by inserting the name of the object in the general search field and clicking on the corresponding entry, which will then display the identifier at the end of the URL. For business components, the path is specified as follows: business component level > business component type > business component name. For perimeters, the path is specified as follows: parent perimeter name > perimeter name. For assets, the path is specified as follows: parent perimeter name > subperimeter name > asset name. For other objects, simply enter their names. When the spreadsheet is exported, the list of related objects might be truncated if the maximum number of characters allowed in the cell is exceeded. If the cell is not edited, the spreadsheet will be imported and all existing relationships will be kept. To edit the relationships, the ellipses and brackets must first be removed. Note that, in this case, the new relationships will be imported and any previous ones will be deleted. •Text: This type of attribute should be completed with normal text within any maximum or minimum limits set for it and according to the mask of regular expression if one was set for the field.
For details on creating attributes, see Chapter 17: Administration -> Customizations -> Objects and Attributes. |
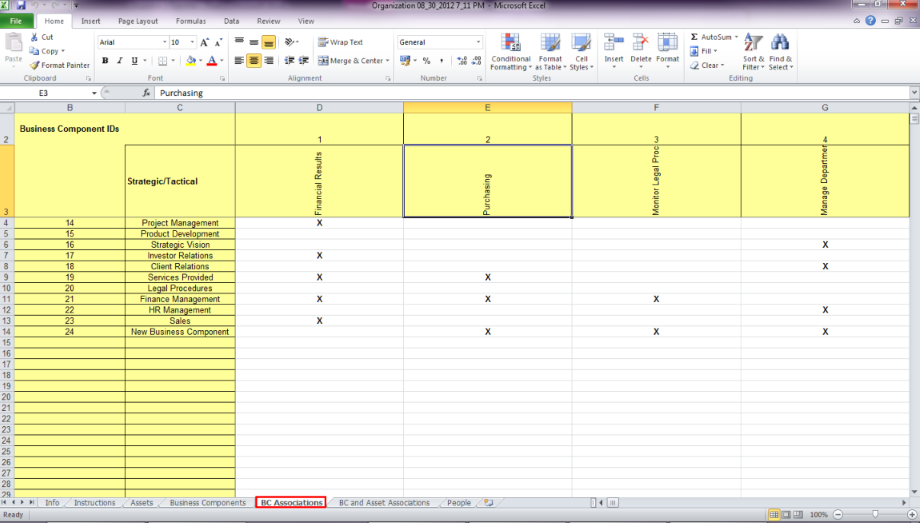
6. Click the BC Associations worksheet to edit the associations between strategic and tactical business components. To do so, mark an "X" (uppercase) in the cell that meets between the tactical component and the strategic component you want to associate. To remove an association, simply delete the "X" (see figure below). Keep in mind that these associations can only be created through this tab, so that if the spreadsheet containing only business components is exported, the user will not be able to edit any associations, as this tab will not be included.
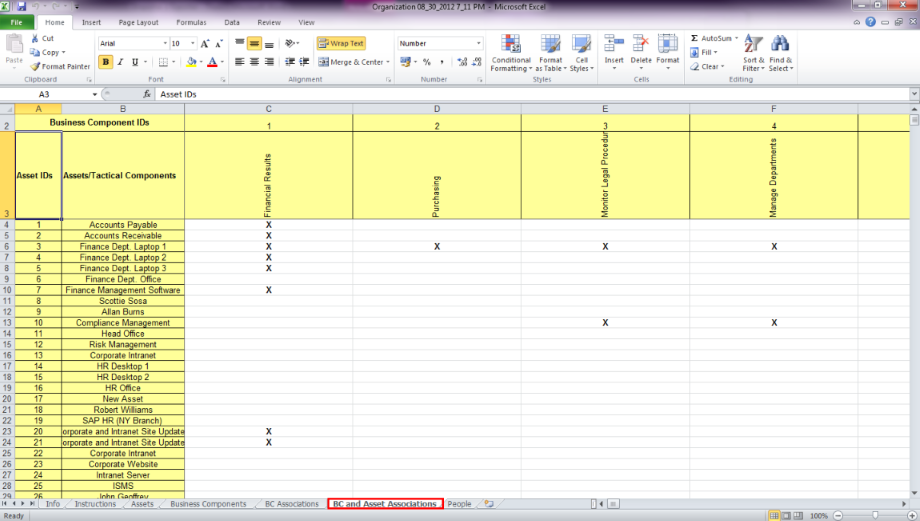
7. Click the BC and Asset Associations worksheet to create associations between assets and tactical business components (see figure below). In the Asset IDs column, select the ID for the asset with which you want to associate a tactical business component, then mark an "X" (uppercase) in the cell that meets between the tactical component and the asset you want to associate. Keep in mind that these associations can only be created through this tab, so that if the spreadsheet containing only business components is exported, the user will not be able to edit any associations, as this tab will not be included.
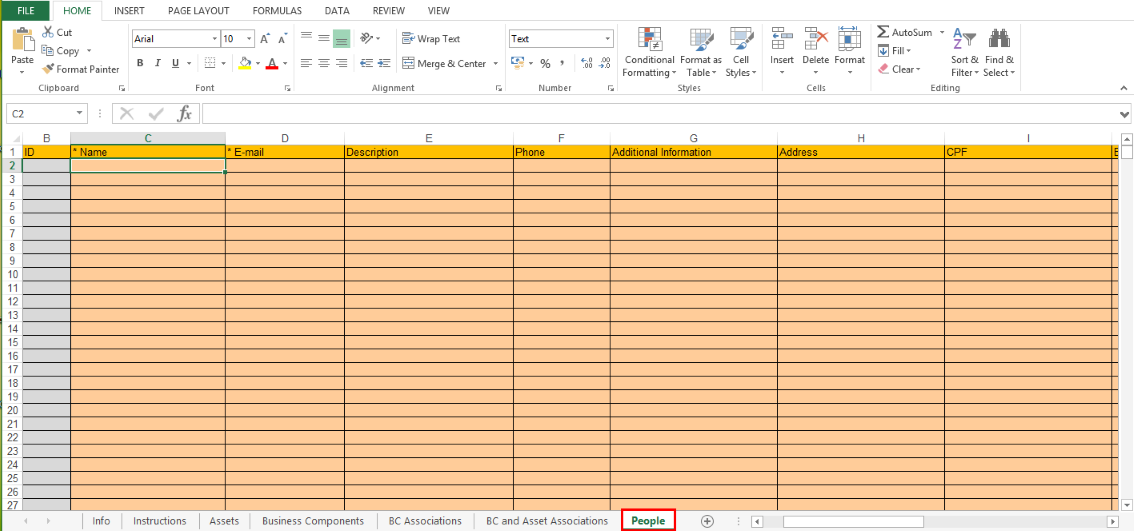
8. Click the People worksheet to register people from the organization (see figure below). Keep in mind that this worksheet only allows new people to be registered and that it does not contain the list of people registered in the system. To do so, the Export only people option must be selected when exporting the spreadsheet template.
The table below explains how to fill in each field from the People worksheet. Those preceded by an asterisk are required.
|
Field |
Instructions |
|
ID |
This field is completed automatically and is used to uniquely identify each person. |
|
*Name |
Enter the name of the person. This field accepts a maximum of 400 characters. If people were exported for editing, their names cannot be edited through the worksheet. |
|
|
Enter the e-mail address of the person being created. This e-mail address will be used to send notifications regarding interviews, assignments, and other activities in the system, so it’s important that a valid e-mail address be provided. E-mail addresses cannot be added or deleted for people previously registered in the system. This field accepts a maximum of 100 characters. E-mail addresses for people already registered in the system cannot be edited. |
|
Description |
Enter any relevant information on the person and their main responsibilities in the organization.
If people were exported for editing, their e-mails cannot be edited through the worksheet. |
|
Phone |
Enter the main contact number for the person. |
|
Additional Information |
Enter any other details on the person that may be useful for identification or contact purposes. This field can also be used to specify which people will be copied on notification e-mails for sent interviews in risk projects. To do so, specify one or more e-mails in the following format: {CC:username@domain.com;username@domain.com}.
In addition, if people are imported to the system through an integration task with an external directory or through a spreadsheet, this information will be in the following format: Imported/Updated – mm/dd/yyyy hh:mm:ss |
|
Person Attributes |
Any person attributes displayed in the spreadsheet were previously created and published in the Objects and Attributes section of the Administration module. If the attributes are marked as required in the system, they must be completed for the spreadsheet to be imported.
These fields should be completed according to the type of attribute, as follows: •Attachment: Files cannot be uploaded or deleted through the spreadsheet, although any files attached through the system will be listed. These will be displayed within brackets separated by semicolons. For example: [file name.pdf];[file name 2.doc].
When creating a person through the spreadsheet, this field will be imported blank, even if it is marked as required. •Date/Time: The date format should be the same as that configured for the attribute in the system. If the attribute is registered as "Date", the field should contain only the date; if "Time", the field should contain only the time; and if "Date/time", it may contain either one. If only the date will be included, the time will be 0:00; if only the time will be included, the date will be the import date. The date may be in two formats: MM/dd/yyyy or yyyy-MM-dd. The time should be in 24-hour format: HH:mm. •E-mail: E-mails should be entered using a maximum of 100 characters in the following format: username@domain.com. •Formula: This is a read-only field, so it is not possible to insert or edit values. These values will be re-calculated once the spreadsheet is imported. •Image: Image files are attached through the system and cannot be added through the spreadsheet. The files attached through the system will be displayed in brackets and separated by a semicolon, for example: "[image.jpeg];[image2.jpeg]".
When creating a person through the spreadsheet, this field will be imported blank, even if it is marked as required. •Link: Links should be entered as: http://www.domain.com or \\server\path. •List of Options: Attributes of this type should be completed with the options available for the attribute, separated by semicolons if more than one value is accepted. •Number: This type of attribute uses the decimal separator (“.”) and optionally the comma separator (“,”) to separate thousands. For example, the number 1200 should be filled in as 1,200.00. •Outline: This type of attribute should be completed with the entries using a maximum of 100 characters with each separated by semicolons. For example: Entry 1;Entry 2. •Paragraph: This type of attribute should be completed with normal text. •Relationship: This type of attribute can be single or multiple selection and should be completed with the alphanumeric identifier or the path of the objects being associated. If more than one object with the same name has been registered in the system, the paths of the objects cannot be used to create relationships and the system will not allow the spreadsheet to be imported. Note that for multiple selection attributes, the paths or identifiers of the objects must be separated by semicolons (";") and no spaces when completing the cells. The identifier of each object should be preceded by "id:" with no spaces after the tag. The identifier is available through the API and can also be found by inserting the name of the object in the general search field and clicking on the corresponding entry, which will then display the identifier at the end of the URL. For business components, the path is specified as follows: business component level > business component type > business component name. For perimeters, the path is specified as follows: parent perimeter name > perimeter name. For assets, the path is specified as follows: parent perimeter name > subperimeter name > asset name. For other objects, simply enter their names. When the spreadsheet is exported, the list of related objects might be truncated if the maximum number of characters allowed in the cell is exceeded. If the cell is not edited, the spreadsheet will be imported and all existing relationships will be kept. To edit the relationships, the ellipses and brackets must first be removed. Note that, in this case, the new relationships will be imported and any previous ones will be deleted. •Text: This type of attribute should be completed with normal text within any maximum or minimum limits set for it and according to the mask of regular expression if one was set for the field.
For details on creating attributes, see Chapter 17: Administration -> Customizations -> Objects and Attributes. |
9. When finished, save the file to your computer.
Note: For details on how to import an organizational structure created through the template, see Chapter 3: Organization -> Export/Import -> How to Import Organizational Information.