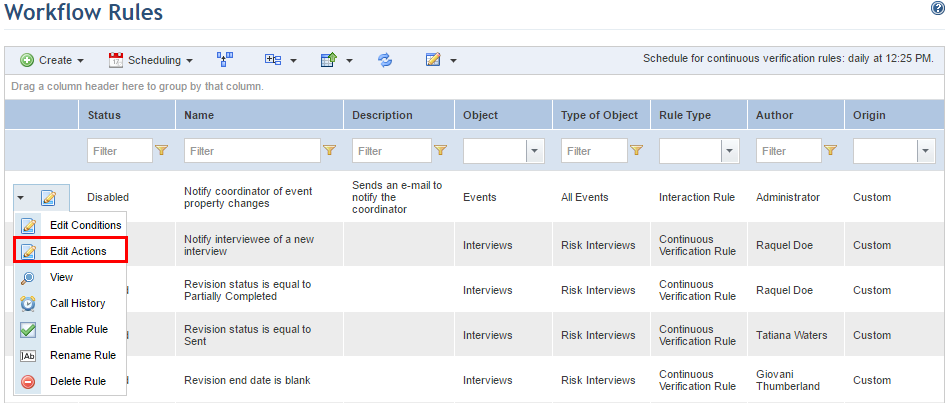
 ) and selecting Edit Actions
next to the rule with the actions you want to edit (see figure below).
) and selecting Edit Actions
next to the rule with the actions you want to edit (see figure below). This topic explains how to create actions for workflow rules of any type. The system performs these actions automatically when the conditions specified in the rule are true, according to the execution option selected when it was created (for example, "Every day" or "Always when creating an object").
The table below describes the actions supported by workflow rules. However, note that the actions available depend on the rule's type and object, as described in Chapter 17: Administration -> Customizations -> Workflow Rules.
|
Available Actions |
Description |
|
Notify via E-mail |
Sends a custom e-mail to people or groups registered in the system, or to external e-mails entered manually. Variables of the object's properties and attributes are available for use in the subject and body of the message, for which the system provides a standard text editor. |
|
Execute HTTP Call |
Executes an action available in an external service by sending data to the URL of this service using the GET or POST methods. Retries can be configured if the call fails the first attempt, as well as the time interval between each of them. Variables for the object's properties and attributes are available for use in the HTTP header and body, with the option to enable basic HTTP authentication so that it does not have to be specified in the header. Note that the history of each rule logs whenever an HTTP call is executed, the entries for which can be deleted automatically after a certain number of days. This deadline can be configured through the Scheduling option in the main list of workflow rules. Keep in mind that HTTP calls are executed asynchronously. |
|
Change Field Value |
Changes the value of a certain property or attribute of the object if the conditions are true. For Workflow events, the Progress tab logs which properties and attributes were updated by workflow rules. |
|
Ignore Other Rule |
Allows other rules to be disregarded when the conditions in the rule being created are met. If the conditions are not met, the actions from the ignored rules will continue to be executed normally. For example, when creating a rule to send an e-mail only to interviewees from projects with a specific author, the default workflow rule for notifying interviewees can be ignored to prevent duplication of the e-mails. |
|
Accept Automatically |
Allows non-implemented controls, vulnerabilities, or non-compliances to be accepted automatically. A justification and a comment must be provided to justify the acceptance. All justifications registered in the Customizations section of the Administration module will be available for selection. |
It is also important to note following behaviors:
•For interview rules:
o When the system executes an interview rule that contains both types of actions, those for ignoring other rules will be executed before those sending e-mail notifications to avoid possible conflicts.
•For object rules:
o If an interaction rule contains two or more different types of actions, the system will first execute the actions to change field values, followed by those to send e-mails, and then those to execute HTTP calls. For example, if a rule contains an action that will change the coordinator of an event, and another that will send an e-mail to this role, the system will first execute the action to edit the field and will then send the e-mail to the new person assigned.
o In actions that change field values, only one action can be created for each property being edited. For example, if a rule contains an action to change the coordinator of an event, it will not be possible to create another action for the Event Coordinator field in the same rule.
o Continuous verification rules created for Workflow events apply only to open events, whereas interaction rules apply to events of any status. In other words, if a continuous verification rule is created to change the relevance of an event from "Very Low" to "High", the rule will make this change in all of the open events, whereas the relevance of any closed or cancelled events will remain "Very Low".
o If a continuous verification rule that was already executed on a chosen date is edited and its conditions or actions are changed, these changes will only take effect on the next day when the system executes the rule again.
1. Access the Administration module.
2. Select Workflow Rules from the Customizations option on the menu.
The system displays the list of workflow rules.
3. To enable the creation of actions for a workflow rule, follow the instructions in Chapter 17: Administration -> Customizations -> Workflow Rules -> How to Create Conditions for a Workflow Rule.
4.
If the rule has already been created, you can edit its actions by clicking
Edit () and selecting Edit Actions
next to the rule with the actions you want to edit (see figure below).
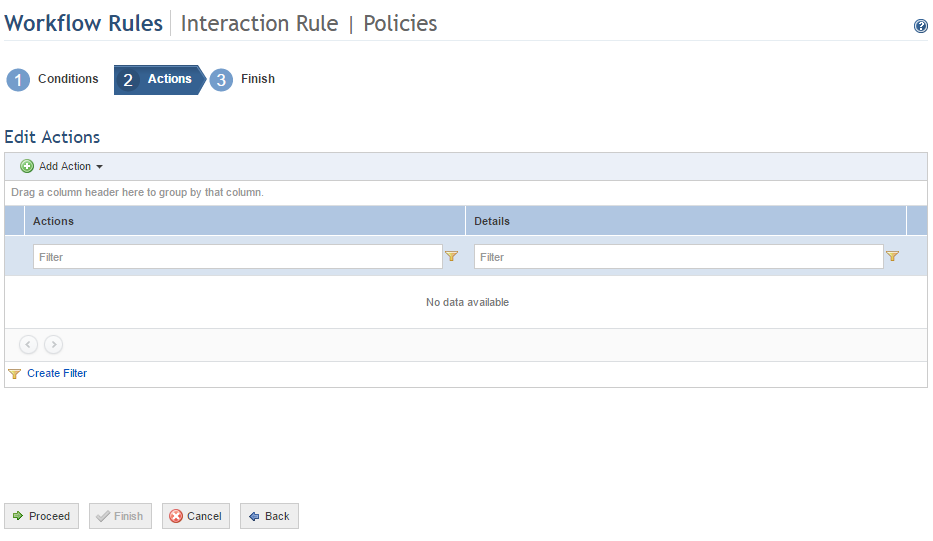
The system displays the Actions step in the wizard for creating workflow rules (see figure below).
5. Click Add Action and select Notify via E-mail to create an action that sends an e-mail notification if the conditions specified in the rule are true.
The system displays an area where the notification can be created (see figure below).
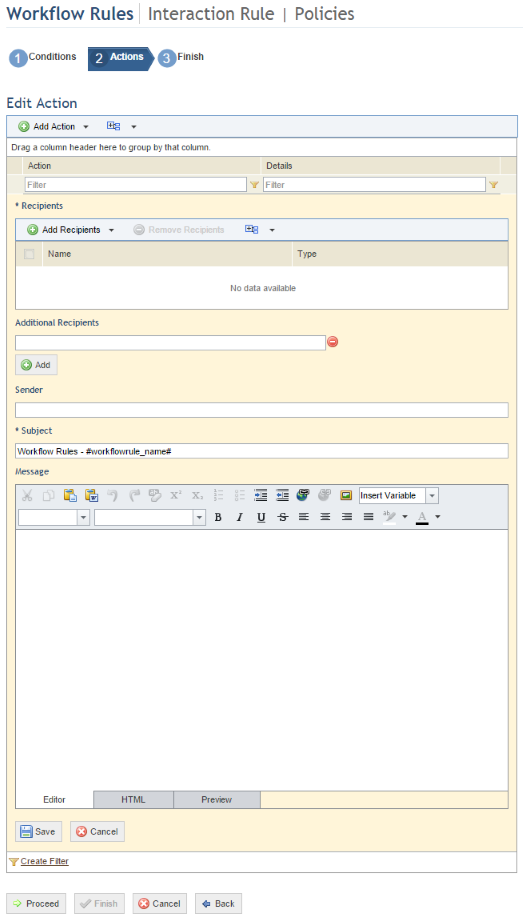
6. In the Recipients section, click Add Recipients and select an option to specify who will receive the notification if the conditions in the rule are met.
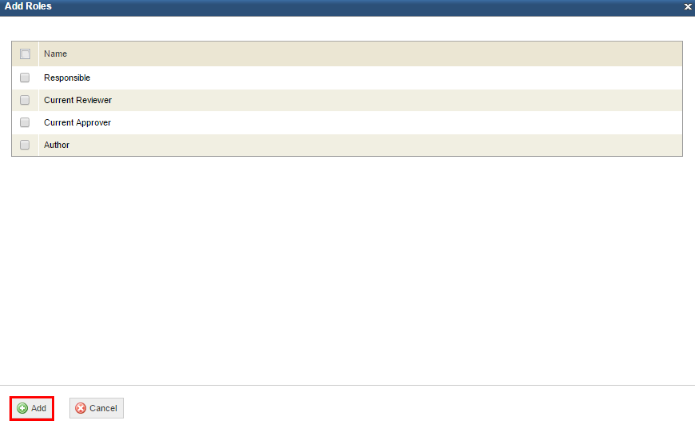
7. Mark the checkboxes next to the groups, people, or roles that will receive the notification in the window that appears and click Add (see figure below).
8. To remove recipients, mark the checkboxes next to each and click Remove Recipients.
9. In the Additional Recipients field, enter the e-mail addresses of any people who will receive a copy of the notification if the conditions in the rule are true. To include additional addresses, click Add. This allows people to be notified even if they are not registered in the system.
10. In the Sender field, enter a valid e-mail address to indicate who is responsible for sending the message.
11. In the Subject field, enter an informative subject line for the e-mail that references the topic addressed in the message. Variables that apply to the topic in question can be included in subject lines. By default, the subject will be "Workflow Rules - {name of workflow rule}".
12. In the Message field, enter the contents of the message that will be used in the body of the e-mail, either through the Editor tab, which provides standard editing features, or the HTML tab. When finished, click the Preview tab to see the final version as it will appear to the user.
You can also add variables for the object's properties and attributes to the message content. Each variable will be replaced with the current value of the corresponding field when the message is sent. For example, if the #event_code# variable is used, the code of the event related to the notification will be shown in the message. To do so, select an option from the drop-down list displayed in the Insert Variable field (see figure below).

The following tables indicate the meaning of each variable available for use in workflow rules for custom objects, events, interviews, projects and policies. Keep in mind that the variables available depend on the type of object selected. Any attributes created for the object in the Objects and Attributes section of the Administration module will also be available for use and will be displayed as #{object name}_{attribute name}#. If the object was provided with the system installation, its default properties will also be available
Custom objects:
|
Variable |
Description |
|
#{object name}_name# |
Indicates the name of the object. |
|
#{object name}_type# |
Indicates the type of the object. |
Events:
|
Variable |
Description |
|
#event_associated_assets# |
Lists the assets associated with the event. |
|
#event_associated_business_components# |
Lists the business components associated with the event. |
|
#event_author# |
Indicates the username of the event’s author. |
|
#event_code# |
Indicates the code generated automatically by the system when the event was created. |
|
#event_coordinator# |
Indicates the person or group assigned as event coordinator. |
|
#event_created_on# |
Indicates the date on which on the event was created. |
|
#event_deadline# |
Indicates the deadline set for the event. |
|
#event_description# |
Lists the description provided for the event. |
|
#event_end_date# |
Indicates the event’s end date. |
|
#event_expected_end_date# |
Indicates the event’s expected end date. |
|
#event_expected_start_date# |
Indicates the event’s expected start date. |
|
#event_first_reviewer# |
Indicates the person or group assigned as first reviewer of the event. |
|
#event_involved_names# |
Indicates the names of the people or groups involved in the event. |
|
#event_latest_progress# |
Indicates the latest progress update provided for the event. |
|
#event_latitude# |
Indicates the event’s latitude. |
|
#event_link# |
Provides a link to access the event. |
|
#event_location_description# |
Lists the description provided for the event’s location. |
|
#event_longitude# |
Indicates the event’s longitude. |
|
#event_origin# |
Indicates the event’s origin – either the Workflow module or the risk or compliance project code in the case of treatment events. |
|
#event_parent# |
Indicates the code for the event’s parent event. |
|
#event_relevance# |
Indicates the event’s relevance score. |
|
#event_responsible# |
Indicates the person or group assigned as responsible for the event |
|
#event_second_reviewer# |
Indicates the person or group assigned as second reviewer of the event. |
|
#event_severity# |
Indicates the event’s severity score. |
|
#event_start_date# |
Indicates the event’s start date. |
|
#event_status# |
Indicates the event’s status (Open, Closed, Cancelled). |
|
#event_third_reviewer# |
Indicates the person or group assigned as third reviewer of the event. |
|
#event_title# |
Indicates the title of the event. |
|
#event_type# |
Indicates the type of event (compliance, risk, generic, or custom). |
|
#event_update_on# |
Indicates the date on which the event was updated. |
|
#event_updated_by# |
Indicates the username of the person who updated the event. |
|
#event_urgency# |
Indicates the event’s urgency score. |
|
#event_usr# |
Indicates the event’s USR score (urgency x relevance x severity). |
|
#event_value# |
Indicates the value specified for the event. |
|
#workflowrule_name# |
Indicates the name of the workflow rule that generated the e-mail notification. |
Interviews:
|
Variable |
Description |
|
#project_code# |
Code of the project in which the interview is being used. |
|
#project_name# |
Name of the project related to the interview. |
|
#project_type# |
Type of project related to the interview (risk project or compliance project). |
|
#project_description# |
Description of the project related to the interview. |
|
#project_leader# |
Name of the leader of the project related to the interview. |
|
#project_uri# |
URI (Uniform Resource Identifier – which can be used as a link, depending on where and how it will be displayed) of the project related to the interview. |
|
#interviewee_name# |
Name of the interviewee. |
|
#interview_code# |
Name of the survey used to generate the interview. |
|
#interview_responsible# |
Person responsible for the survey. |
|
#interview_uri# |
URI (Uniform Resource Identifier – which can be used as a link, depending on where and how it will be displayed) of the interview. |
|
#interview_target# |
Name of the object included in the scope of the project related to the interview. |
|
#reviewer_name# |
Name of the reviewer assigned to review the interview. |
|
#asset_type# |
Type of asset related to the interview. |
|
#asset_name# |
Name of the asset related to the interview. |
|
#asset_responsible# |
Name of the person responsible for the asset. |
|
#asset_description# |
Description of the asset related to the interview. |
|
#asset_relevance# |
Relevance of the asset related to the interview. |
|
#asset_criticality# |
Criticality of the asset related to the interview. |
|
#asset_path# |
Path of the asset related to the interview; that is, the perimeters and subperimeters to which the asset belongs. For example: Perimeter1> Subperimeter1> Asset. |
|
#asset_longitude# |
Longitude of the asset related to the interview. |
|
#asset_latitude# |
Latitude of the asset related to the interview. |
Projects:
|
Variable |
Description |
|
#project_code# |
Indicates the code generated automatically by the system when a project is created. |
|
#project_name# |
Indicates the name of the project. |
|
#project_uri# |
URI (Uniform Resource Identifier - which can be used as a link, depending on where and how it will be displayed) of the project. |
|
#project_leader# |
Name of project leader. |
|
#project_substituteleader# |
Name of substitute project leader. |
|
#project_description# |
Indicates the project description. |
|
#project_additionalinformation# |
Indicates additional project information. |
|
#project_status# |
Indicates the status of the project. |
|
#project_author# |
Indicates the name of the author of the project. |
|
#project_createdon# |
Indicates the date when the project was created. |
|
#project_updatedon# |
Indicates the date when the project was updated. |
|
#project_closedon# |
Indicates the date when the project was closed. |
|
#project_analysisstartedon# |
Indicates the start date of the project analysis phase. |
|
#project_analysisclosedon# |
Indicates the end date of the project analysis phase. |
|
#project_type# |
Indicates the project type. |
Policies:
|
Variable |
Description |
|
#policies_approvers# |
List of approvers assigned to approve the policy. |
|
#policies_audience# |
List of the policy’s audience members. |
|
#policies_currentapprover# |
Name of the approver whose turn it is to approve the policy in the approval workflow. |
|
#policies_currentreviewer# |
Name of the reviewer whose turn it is to review the policy in the revision workflow. |
|
#policies_currentversion# |
Current version of the policy. If the policy is being edited, this version will be "Being Edited". |
|
#policies_description# |
Description of the policy. |
|
#policies_expiration# |
Expiration date of the policy. |
|
#policies_myapprovalsuri# |
URI (Uniform Resource Identifier – which can be used as a link depending on where and how it will be displayed) of the My Approvals section. |
|
#policies_myrevisionsuri# |
URI (Uniform Resource Identifier – which can be used as a link, depending on where and how it will be displayed) of the My Revisions section. |
|
#policies_name# |
Name of the policy. |
|
#policies_propertiesuri# |
URI (Uniform Resource Identifier – which can be used as a link, depending on where and how it will be displayed) of the policy’s properties. |
|
#policies_responsible# |
Person assigned as responsible for the policy. |
|
#policies_reviewers# |
List of reviewers assigned to review the policy. |
|
#policies_statements# |
List of statements in the policy. |
|
#policies_status# |
Status of the policy (Under Approval, Approved, Approval Requested, Being Edited, Rejected, Under Revision, Revision Requested, Published, or Cancelled). |
13. When finished, click Save. If you want to quit the operation, click Cancel.
14. Click Add Action and select Change Field Value to create an action that changes the value of a certain field if the conditions specified in the previous step are true.
The system displays an area where a field can be selected and a new value for it can be specified (see figure below).

15. Under Field, select the property or attribute that will be modified if the conditions set for the rule are true. Next, specify the new value for the property in the fields that are enabled, which will vary depending on the property selected.
Note: Any applicable custom attributes created for the object in the Objects and Attributes section of this module will be available as field options. If the rule is being created for a custom object, only List of Options (single selection), Paragraph, and Text attributes will be listed. If the rule is being created for Workflow events, the following types of attributes will be available: Date/Time, List of Options, Number, Paragraph, and Text.
Note 2: An attribute may have been set as a required field in the object; however, this configuration will not prevent the rule from changing the value of the field. For example, the value of a required attribute can be changed to blank through this action, which could be problematic. For details, see Chapter 17: Administration -> Customizations -> Objects and Attributes.
16. When finished, click Save. If you want to quit the operation, click Cancel.
17. Click Add Action and select Accept Automatically to create an action that automatically accepts a non-implemented control, vulnerability, or non-compliance identified in a risk or compliance project.
18. In the Justification field, select a justification for why the non-implemented control, vulnerability, or non-compliance will be accepted. All justifications registered in the Customizations section of this module will be available for selection. If the justification selected for an action is deleted, the rule will be disabled and highlighted in red in the list of rules so that you can select a valid justification.
19. In the Comment field, enter additional information explaining why the risks will be accepted, using a maximum of 10,000 characters (see figure below).

20. When finished, click Save to save the action. If you want to quit the operation, click Cancel.
21. Click Add Action and select Ignore Other Rule to create an action that disregards another rule when the conditions in the rule being edited are met.
The system displays an area where the rules to be ignored can be added (see figure below).
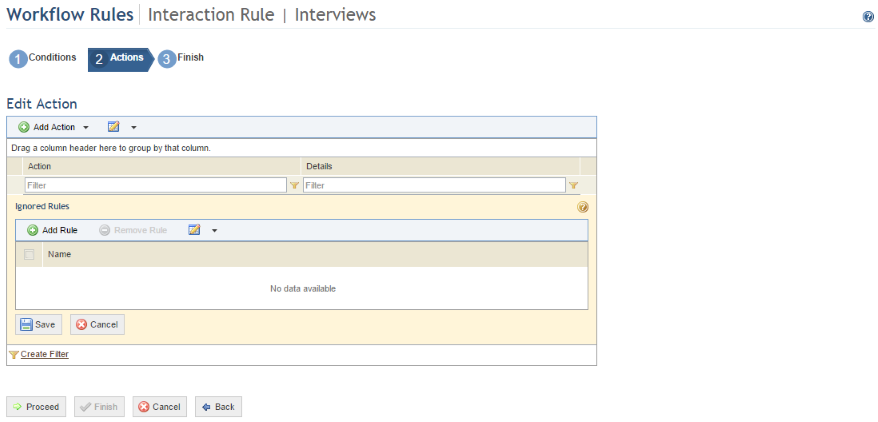
22. Click Add Rule to include a rule that will be ignored.
23. Mark the checkboxes next to the rules you want to add and click Add Rule (see figure below).
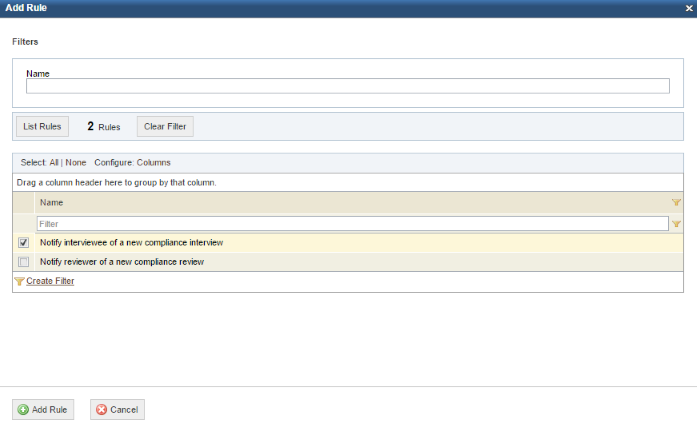
24. If you want to remove any added rules, mark the checkboxes next to each rule and click Remove Rule.
25. When finished, click Save to save the action. If you want to quit the operation, click Cancel.
26. Click Add Action and select Execute HTTP Call to create an action that executes an HTTP call, allowing actions to be executed outside of the system.
The system displays an area where the fields to create a call can be completed (see figure below).
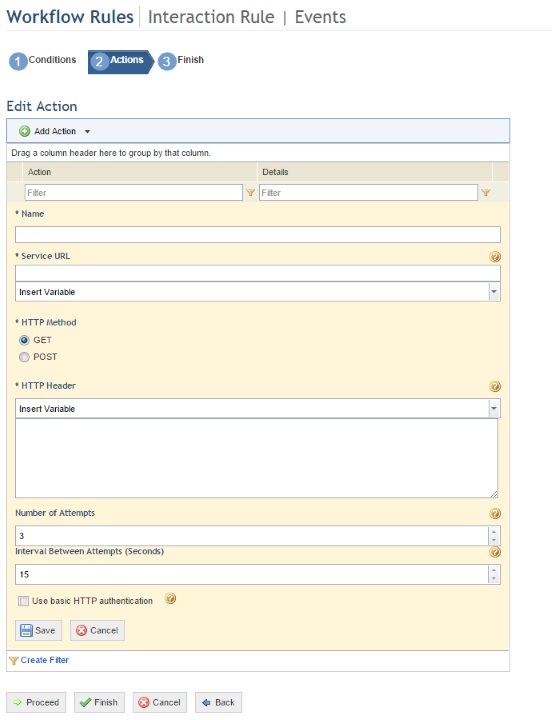
27. In the Name field, indicate a name to describe the action using a maximum of 100 characters.
28. In the Service URL field, provide the URL of the external application that will be called. You can also enter parameters in this field to send data to the server. To do so, select the parameters from the Insert Variable field. All default and custom attributes of the object selected will be available as variables.
29. In the HTTP Method field, select the request method through which the data will be sent to the server. You can choose between the GET method, which uses the service URL itself and the HTTP header to send this data, or the POST method, which also allows additional data to be sent through the HTTP Body field.
Note: The GET method is recommended for requests that do not change the status of the external server, like a search or a query. The POST method can be used to change information in the external server, such as completing a form, registering new information, or sending data that exceeds the size limit allowed for the GET method.
30. In the HTTP Header field, enter the information that will be sent to the external service. You can enter variables for the object's properties by selecting them in the Insert Variable field.
31. If the POST method was selected, the HTTP Body field will be available, where you can enter any additional information that will be sent to the external service. You also can add predefined variables by clicking Insert Variable.
32. In the Number of Attempts field, you can define the number of attempts to execute the call should the service be down or if it is not executed for another reason. This field accepts values between 0 and 3.
33. In the Interval Between Attempts (Seconds) field, you can define the time interval, in seconds, between each attempt to execute a call. This field accepts values between 5 and 60.
34. Mark the Use basic HTTP authentication checkbox to use basic authentication to access the external service. Note that this option should not be selected if the authentication credentials are specified through an authorization header in the HTTP Header field. Otherwise, an error will occur when the call is executed.
35. If you selected the Use basic HTTP authentication option, the Access Credentials field will appear. Enter the username, password, and password confirmation to access the service in the Access Account, Access Password, and Password Confirmation fields, respectively.
36. When finished, click Save to save the action. If you want to quit the operation, click Cancel.
37. Click Proceed to continue. To return to the previous step, click Back.
The system displays the Finish step, which displays the properties of the rule being created (see figure below).
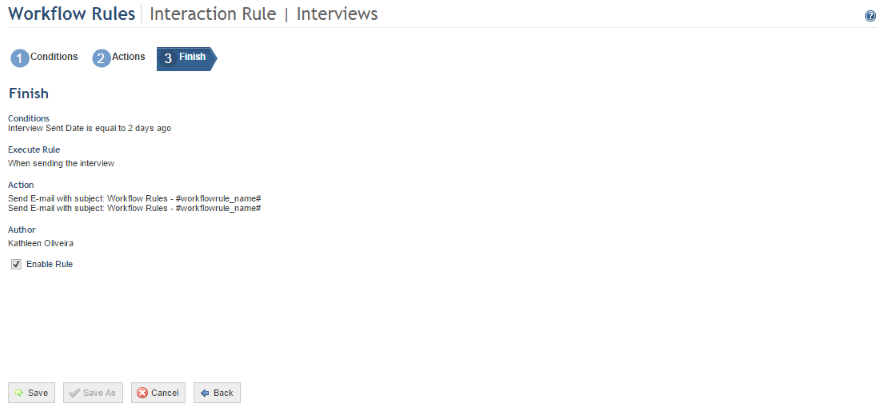
38. Unmark the Enable Rule checkbox if you do not want to enable the rule. By default, it will be enabled.
39. Click Save to save the rule. If you want to quit the operation, click Cancel. To return to any of the previous steps in the wizard, click Back.
When Save is clicked, the system displays a window where you can enter a name and description for the rule (see figure below).
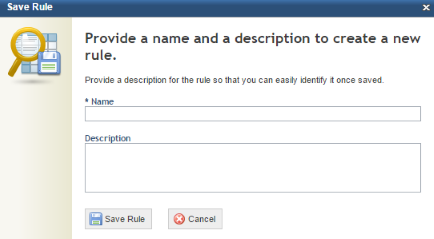
40. In the Name field, enter a name that identifies the purpose of the rule using a maximum of 150 characters.
41. In the Description field, describe the main features of the rule.
42. When finished, click Save Rule. If you want to quit the operation, click Cancel.
The system displays a success message.