1. Access the Administration module.
2. Select Authentication Policy from the Access Control option on the menu.
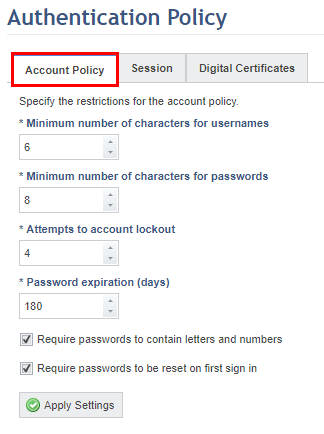
The system displays a screen with the Account Policy tab selected, where the policy for user accounts and passwords can be edited (see figure below).
3. Determine a value for the Minimum number of characters for usernames field. This field is required. The system requires a minimum of 5 characters for usernames, but you can increase this minimum if necessary.
Note: If the system is integrated with Active Directory, the minimum limit of characters for usernames will be one character.
4. Determine the value for the Minimum number of characters for passwords field. This field is required. The system requires a minimum of 5 characters for passwords, but you can increase this minimum if necessary.
5. Determine a value for the Attempts to account lockout field. This field is required. It controls the number of attempts the user is allowed to try to enter a valid password for their username. After this limit is reached, the user’s account will be blocked. This feature lowers the possibility of unauthorized access through brute force attacks. By default, the system blocks accounts after four invalid login attempts.
Note: Once an account is blocked, the access account
status will display the Blocked icon ( ) on the list of system users. For
details on unblocking the access account, see Chapter 17: Administration ->
Access Control -> Manage Users -> How to Manage a System Access
Account. Regardless of the configuration of this parameter, users included
in the Global Administrators profile will not have their access accounts blocked
due to invalid login attempts. They will then always be able to access the
system and unblock other user accounts when necessary.
) on the list of system users. For
details on unblocking the access account, see Chapter 17: Administration ->
Access Control -> Manage Users -> How to Manage a System Access
Account. Regardless of the configuration of this parameter, users included
in the Global Administrators profile will not have their access accounts blocked
due to invalid login attempts. They will then always be able to access the
system and unblock other user accounts when necessary.
6. Determine how many days user passwords will be valid through the Password expiration (days) field. This field is required. By default, the system sets passwords to expire every 180 days.
7. Mark the Require passwords to contain letters and numbers checkbox to require system users to create passwords with a minimum level of complexity.
Note: The use of weak passwords consisting only of numbers or few characters, for example, facilitates deduction or discovery through brute force techniques. Through the Minimum number of characters for passwords and Require passwords to contain letters and numbers parameters, users can be required to choose more complex passwords, thus increasing the level of security.
8. Mark the Require passwords to be reset on first sign in checkbox to require system users to change their password the first time they login. This setting can be configured here for all users, or it can be configured individually for each account. For details on configuring this for individual accounts, see Chapter 17: Administration -> Access Control -> Manage Users -> How to Manage a System Access Account.
9. When finished configuring the account policy, click Apply Settings.
The system displays a success message.
10. Click the Session tab (see figure below).
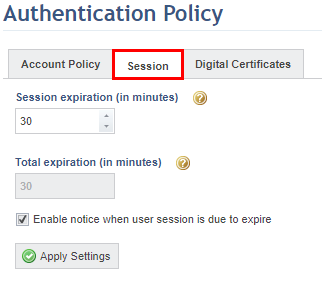
11. In the Session expiration (in minutes) field, enter the number of minutes at which user sessions will expire. The default time is set to 30 minutes. The minimum time respects the value configured for the "clock skew" in the web.config file, located in the system installation folder. The value in this field can be less than the default value, but cannot be less than the value set for the "clock skew".
12. The Total expiration (in minutes) field displays the time at which the session will actually expire. This field displays the sum of the value of the Session expiration (in minutes) field and the time configured for the "SessionUpdateIntervalThresholdInMinutes" key in the web.config file, located in the system installation folder. If no value is set for the "SessionUpdateIntervalThresholdInMinutes" key, the total expiration time is equal to the session expiration time.
Note: The expiration time configured here does not apply to the Continuity module and the Integration, Intelligence, Events, and Dispatch solutions. Because they are integrated with the system through an API, the expiration time for them must be configured through the Authorized Applications option. For details, see Chapter 17: Administration -> Integrations -> Authorized Applications -> How to Register an Authorized Application.
13. Mark the Enable notice when user session is due to expire checkbox if you want a pop-up to be displayed when a session is due to expire.
14. Click Apply Settings.
The system displays a success message.
15. Click the Digital Certificates tab (see figure below).
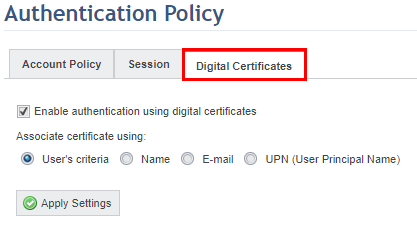
16. Mark the Enable authentication using digital certificates checkbox to allow users to sign in to the system using digital certificates. If enabled, additional options appear where you can decide how certificates will be associated with users, either by the criteria set for each user account individually, by name, by e-mail address, or by their usernames (UPN).
Note 1: The User’s criteria option is selected by default, and thus the functionality will be only be enabled for users once a criterion is specified for each account in the Manage Users section of the Administration module. Similarly, the criterion for associating digital certificates for each account by default will be to use the option configured in this section. In this case, digital certificates will not be associated and this mode of authentication will not be available. This is useful if, for instance, you want to allow only certain users for which criteria was configured to login using digital certificates.
Note 2: Once authentication with digital certificates is enabled, some additional configurations are necessary. For details, see Appendix -> Additional Configurations for Authentication Using Digital Certificates.
17. When finished, click Apply Settings.
The system displays a success message.