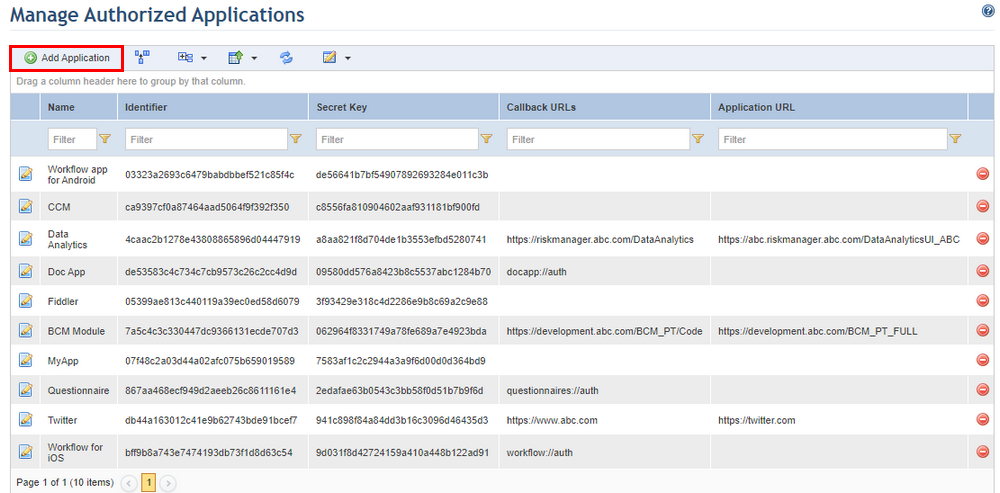
This topic explains how to include an application in the list of authorized applications. A routine will then be created between the application and the system, allowing various features from the system to be accessed.
1. Access the Administration module.
2. Select Authorized Applications from the Integrations option on the menu.
3. In the Manage Authorized Applications section, click Add Application (see figure below).

The system displays the Basic Configurations tab, where information on the application to be registered should be entered (see figure below).
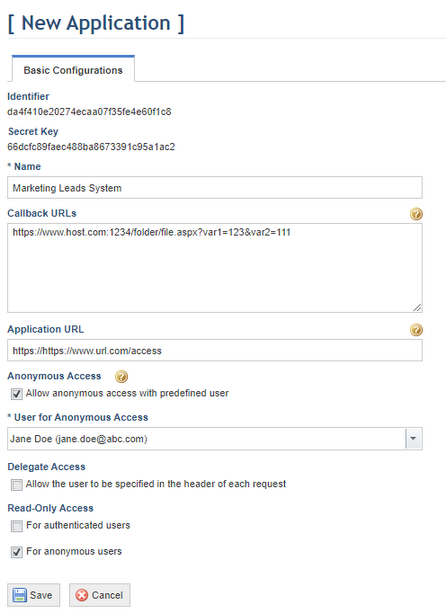
Note: The Identifier and Secret Key fields are completed automatically when an application is being registered. This information is then used to identify the application during the authorization process.
4. In the Name field, enter a name to identify the authorized application using up to 100 characters.
5. In the Callback URLs field, list the addresses where the authorized application will receive callback data from the system. Enter one address per line and do not use punctuation to separate each.
6. In the Application URL field, provide the address through which the system can access the application.
7. Mark the Allow anonymous access with predefined user checkbox from the Anonymous Access field if you do not want to require application users to be registered in the system. By allowing anonymous access, there will be no traceability for users who make changes or register inappropriate content in the system.
8. If you allowed anonymous access, the User for Anonymous Access field is displayed. A system user must be selected to represent the application in question, who will then be responsible for all activities related to the authorized application. Note that this person must be included in the appropriate access profiles to gain access to the modules and solutions where the features to be selected further ahead are located.
9. The Delegate Access field is for Modulo’s internal use and should be left unchecked.
10. In the Read-Only Access section, mark the For authenticated users checkbox to prevent application users who access the system through authentication from making any changes to the database. When this option is selected, these users will have read-only access to all system objects.
11. Still in the Read-Only Access section, mark the For anonymous users checkbox to prevent application users who access the system anonymously from making any changes to the database. When this option is selected, these users will have read-only access to all system objects.
12. When finished, click Save. If you want to quit the operation, click Cancel.
The system displays a success message and enables new tabs where further information on the authorized application can be provided.
13. Click the Available Features tab to select the features the application will be allowed to access (see figure below).
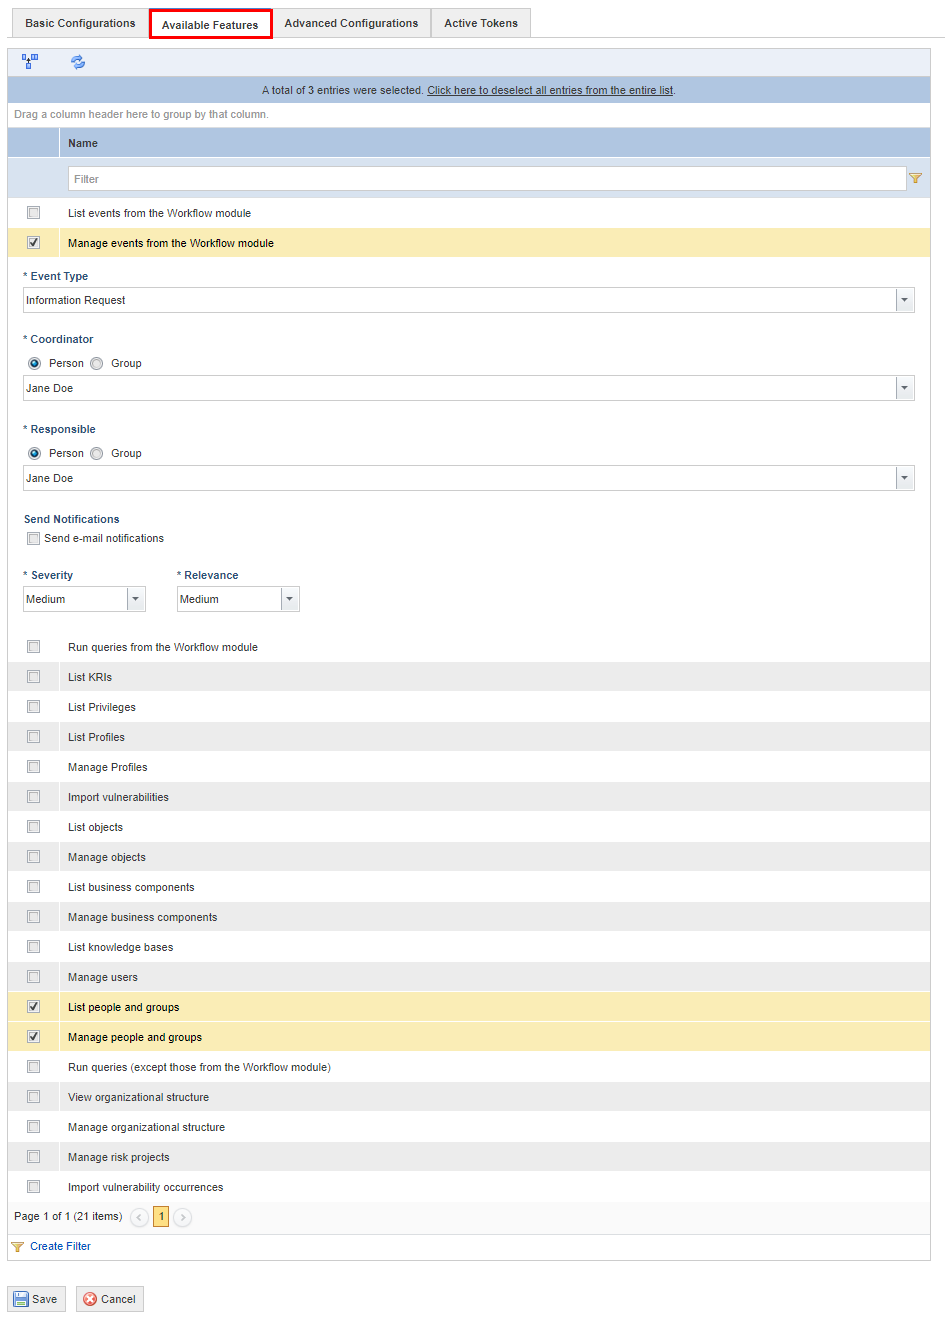
14. Mark the checkboxes next to the features that you want to allow the application to access. The features available and the explanations on how to complete any additional configurations (when necessary) are described below:
•List events from the Workflow module
•Manage events from the Workflow module. This feature has additional configurations which are listed in the table below:
|
Field |
Description |
|
*Event Type |
Select the type of event that will be applied to all events originating from this application. These can be generic events or any other custom type created in the Object Types section of the Administration module. An event’s type can be changed after the event has been created to any other type except for risk and compliance events. |
|
*Coordinator |
Select the person or group that will be assigned as coordinator for all events originating from the authorized application. Coordinators can be reassigned at any time. This role receives permission to create child events, view events, edit all properties of events, as well as update, close, or cancel events to which they were assigned. Keep in mind that this person or group must also be included in the Workflow Module Users profile to gain access to the module. |
|
*Responsible |
Select the person or group that will be assigned as responsible for all events originating from the authorized application. The person or group responsible for events can be reassigned at any time. This role receives permission to create child events, view events, edit general properties of events, as well as update, close, or cancel events to which they were assigned. Keep in mind that this person or group must also be included in the Workflow Module Users profile to gain access to the module. |
|
Send Notifications |
If you want to allow notifications to be sent regarding these events, mark the Send e-mail notifications checkbox. In order for notifications to be sent via e-mail, the message service must be configured in the Message Service section of the Administration module; message templates regarding events must be enabled in the Message Templates section of the Administration module; and a valid e-mail address must have been provided for people in the Manage People section of the Organization module. Notification messages regarding events also appear in the Notifications section of the Home module. |
|
*Severity |
Specify the severity (S) for all events originating from the authorized application, which is the impact these events will have on the organization if these issues are not resolved. This is scored on a five-level scale, with: 1 – Very Low, 2 – Low, 3 – Medium, 4 – High, and 5 – Very High. |
|
*Relevance |
Specify the relevance (R) for all events originating from the authorized application, which is scored on a five-level scale, with: 1- Very Low, 2 – Low, 3 – Medium, 4 – High, and 5 – Very High |
Note: The title and urgency score for these events must be provided by the authorized application.
•Run queries from the Workflow module
•List KRIs
•List privileges
•List profiles
•Manage profiles
•Import vulnerabilities
•List objects
•Manage objects
•List business components
•Manage business components
•List knowledge bases
•Manage users
•List people and groups
•Manage people and groups
•Run queries (except those from the Workflow module)
•View organizational structure
•Manage organizational structure
•Manage risk projects
•Import vulnerability occurrences
Note: The unique identifier assigned to each feature is used by the Support team to identify errors in the API and is available as a hidden column option that can be included by using the Configure Columns function.
15. When finished, click Save. If you want to quit the operation, click Cancel.
The system displays a success message.
16. Click the Advanced Configurations tab to specify some additional features related to the authentication process (see figure below).
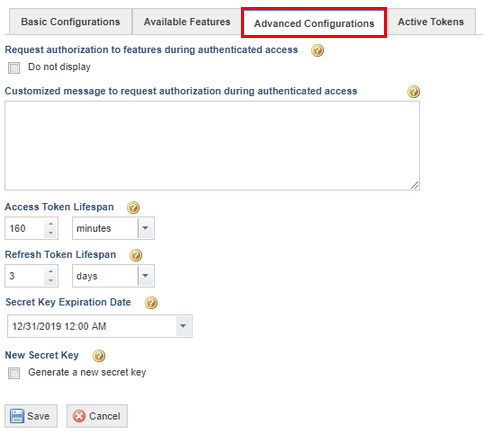
17. In the Request authorization to features during authenticated access section, mark the Do not display checkbox if you do not want the authorization screen requesting access to the features to be displayed. In this case, the system will trust the application and grant access to the selected features.
18. If you choose to show this authorization screen with the list of features, you can enter a customized message in the Customized message to request authorization during authenticated access field. This message will be displayed instead of the default list of features in the screen to authorize the application’s access to the system (see figure below).
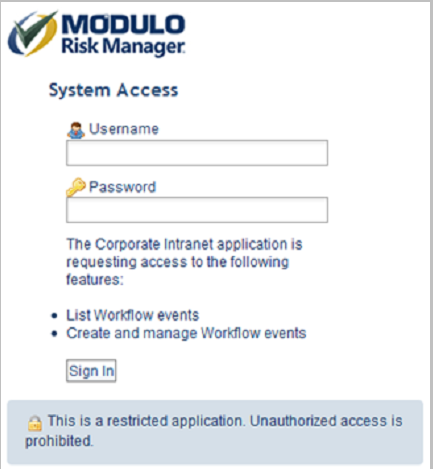
19. In the Access Token Lifespan section, specify the validity period for access tokens issued by the system. An access token is used to grant access to API features to authorized applications. For security reasons its lifespan should be short, since it is sent in all calls to the API and can be used to access all API operations in the name of the user who has access to them. Anonymous access tokens will have this same lifespan, which by default is set to one day. Note that for the Continuity and Data Analytics modules and the Integration, Intelligence, Events, and Dispatch solutions, if the time specified in this field is less than the session expiration time configured in the Authentication Policy section, the access token lifespan will be used as the time reference for session expiration.
20. In the Refresh Token Lifespan section, specify the validity period for refresh tokens issued by the system. A refresh token is used to obtain a new access token once it has expired. This lifespan should be higher because when it expires the user will have to grant permission to the application again, for access to be possible through the user's name. Refresh tokens are not used in anonymous access. By default, the lifespan is set to 180 days.
21. In the Secret Key Expiration Date field, enter the date and time on which the secret key of the application will expire. Applications with expired secret keys will not be able to access system features. If you do not want the secret key to expire, leave this field blank.
22. In the New Secret Key field, mark the Generate a secret key checkbox to generate a new secret key and invalidate the previous one. Only applications with the new secret key will be able to access system features.
23. When finished, click Save. If you want to quit the operation, click Cancel.
The system displays a success message.
24. Click the Active Tokens tab to view the list of users with active tokens, if the token is an access token or a refresh token, the date on which the most recent one was issued, the expiration date, and the IP address from which the request for the token originated (see figure below). Note that a single user may have more than one access token associated with their account if they accessed the system through the API using, for example, two different mobile devices.
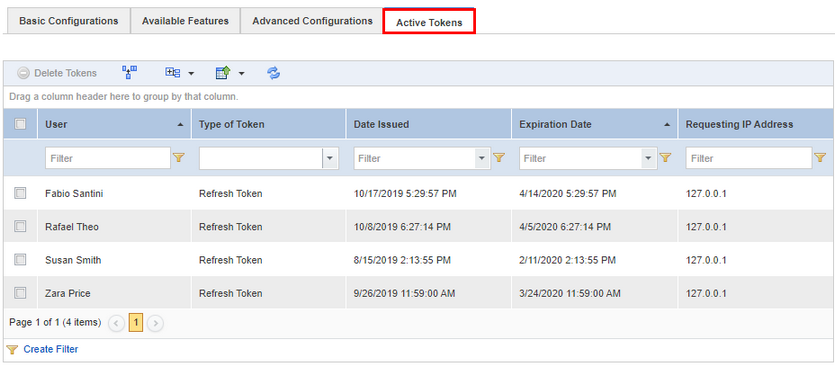
25. To delete the tokens associated with a user, mark the checkbox next to the user and click Delete Tokens. Note that in this case the user will need to again enter credentials to gain access to system features.
The system requests confirmation to delete the tokens (see figure below).
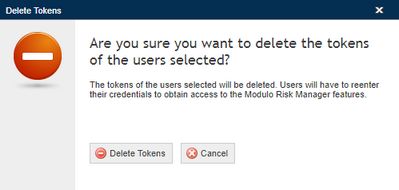
26. Click Delete Tokens to confirm. If you want to quit the operation, click Cancel.
The system displays a success message.
27. Click the List Applications link in the upper right corner to return to the main list of authorized applications.