This topic explains how to export the template used to import plans and procedures to the system and also provides orientation on completing the spreadsheet correctly so that it can be imported without errors.
1. Access the Continuity module.
2. In the Plans section, click Manage Plans.
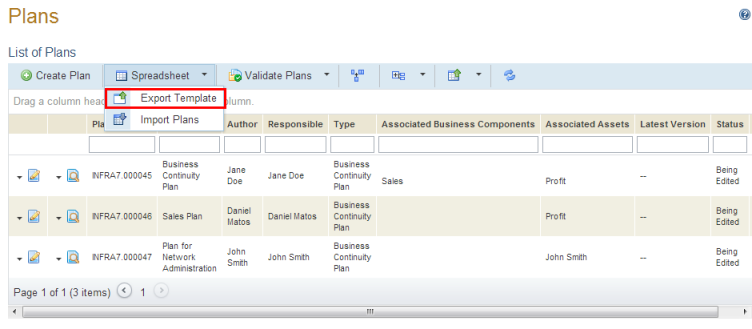
The system displays the list of plans registered in the system.
3. To export the spreadsheet template where plans and procedures can be registered, click Spreadsheet and then Export Template (see figure below).
4. Save the file to your computer and open it.
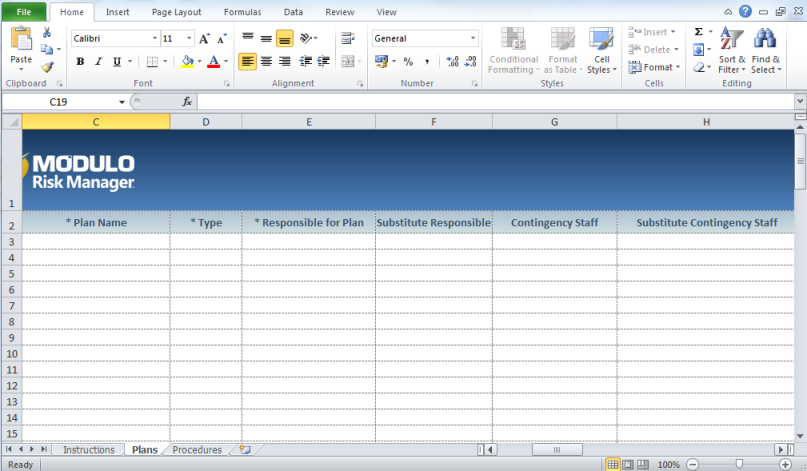
When the file is opened, the template is displayed in Microsoft Excel.
When accessing the spreadsheet for the first time after it is exported, the macros must be enabled; otherwise, you will not be able to edit any information in it. In the 2010 Microsoft Excel version, a banner appears so that they can be enabled. For further details on enabling macros, access http://office.microsoft.com/en-us/excel-help/?CTT=97. Select Excel and enter "macros" in the search field. Select the version of Excel you are using and locate the topic on macros.
The file includes three tabs: the Instructions tab, which contains information on how to complete the template, and the Plans and Procedures tabs, where the properties and attributes of plans and procedures can be provided (see figure below).
The table below explains how to complete each field from the Plans tab. Fields preceded by an asterisk are required.
|
Field |
Instructions |
|
ID |
The ID of each plan is automatically generated when the spreadsheet is imported to the system. When existing plans are exported for editing, their IDs are displayed in this field in cells disabled for editing. This field should not be completed or edited, and any changes made to it will be ignored by the system. |
|
* Plan Name |
Enter a name to identify the new plan using a maximum of 100 characters. |
|
* Type |
Select the type of plan being created in the list displayed when a cell in this column is clicked. The types available include default types and any custom types created in the Object Types section of the Administration module. Note that when the list of existing plans is exported for editing, any deleted plan types will be displayed in the list of available types if there are still plans associated with them. However, new plans cannot be created with deleted types. A plan's type cannot be changed through the spreadsheet. |
|
* Responsible for Plan |
Enter the name of the person with their e-mail in parentheses or the name of the group that will be responsible for the plan. The group name must be preceded by an asterisk. For example: John Smith (jsmith@abc.com) or *Sales. |
|
Substitute Responsible |
Enter the name of the person with their e-mail in parentheses or the name of the group that will be assigned to replace the person responsible for the plan, if necessary. The group name must be preceded by an asterisk. For example: John Smith (jsmith@abc.com) or *Sales. |
|
Contingency Staff |
Enter the name of the person with their e-mail in parentheses or the name of the group that will be responsible for executing the plan. The group name must be preceded by an asterisk. For example: John Smith (jsmith@abc.com) or *Sales. To enter more than one member of the contingency staff, use a semicolon (";") and a space. |
|
Substitute Contingency Staff |
Enter the name of the person with their e-mail in parentheses or the name of the group that will be responsible for replacing the contingency staff, if necessary. The group name must be preceded by an asterisk. For example: John Smith (jsmith@abc.com) or *Sales. To enter more than one member of the substitute contingency staff, use a semicolon (";") and a space. |
|
Plan Expiration Date (Days) |
Enter the expiration date for the plan, in days. Note that expired plans can be edited and published, but their expiration dates will be displayed in red in the Expiration Date column in the list of plans. |
|
Execution Time (Hours) |
Enter the estimated time, in hours, for the plan to be executed. This estimate must take into account the time required to activate the plan and execute all of its associated procedures. The plan's execution time must be less than the highest MTPD and RTO values of the objects for which the plan is being prepared. |
|
Description |
Enter any relevant information that describes the scope of the plan and the activation criteria. |
|
Objective |
Enter the main objective of the plan according to the business components and assets for which the plan is being prepared. |
|
Associated Assets |
Enter the names and paths of the assets you want to associate with the plan, exactly as they were registered in the Organization module. To enter more than one asset, use a semicolon (";") and a space. For example: perimeter name\asset name; perimeter name\subperimeter name\asset name. If the asset is not uniquely identified, an error will be displayed and the spreadsheet will not be imported.
|
|
Associated Business Components |
Enter the level, type, and name of the business components you want to associate with the plan, exactly as they were registered in the Organization module. To enter more than one business component, use a semicolon (";") and a space. For example: component level\component type\component name; component level\component type\component name.
|
|
Associated Plans |
Enter the IDs of each plan that you want to associate with the plan. To enter more than one ID, use a semicolon (";") and a space. Note that plans created through the spreadsheet cannot be associated with other plans until they are imported and published. |
|
Associated Procedures |
Enter the ID of each procedure you want to associate with the plan. To enter more than one ID, use a semicolon (";") and a space. To disassociate a procedure from a plan, simply delete the associated ID. To associate a procedure created through the spreadsheet that has not yet been imported, use the temporary ID generated automatically in the spreadsheet. |
|
Plan Attributes: |
Listed below are explanations on how to complete each type of attribute created for plans in the Administration module. Note that certain attributes may apply to all types of plans or only to specific types. Values entered for attributes not applicable to the type of plan being created will be ignored and will not prevent the spreadsheet from being imported. If the attributes are marked as required in the system, they must be completed for the spreadsheet to be imported.
These fields should be completed according to the type of attribute, as follows: •Attachment: This type of attribute should not be completed or edited. Any files attached through the system will be listed here. They will be displayed in brackets and separated by a semicolon and a space. For example: [name of file.pdf]; [name of file2.doc].
When creating a plan through the spreadsheet, this field will be imported blank, even if it is marked as required. •Date/Time: Specify a value for this type of attribute by entering a date or a time. If the attribute is registered as "Date", the field should contain only the date and, if it is registered as "Time", it should contain only the time. If the attribute is registered as "Date/Time", the date must be entered before the time. If only the date is entered for the attribute, the time, by default, will be set to 0h:00min, and if only the time is entered, the date, by default, will be set to the day the spreadsheet was imported. The date may be in two formats: MM/DD/YYYY or YYYY-MM-DD. The time must be in 24-hour format: hh:mm tt. •E-mail: Specify a value for this type of attribute by entering an e-mail. E-mails must be in the name@domain.com format and should respect the limit of 100 characters. •Formula: This type of attribute should not be completed or edited. It displays a read-only value that was calculated according to the formula specified for the attribute. The final value will only be updated when the spreadsheet is imported back to the system. •Link: Specify a value for this type of attribute by entering a link in the following format: http://www.domain.com or \\server\path. •List of Options (single selection): Specify a value for this type of attribute by entering one of the available options for this field. •List of Options (multiple selection): Specify a value for this type of attribute by entering the available options for this field, separated by a semicolon (";") and a space. •Number: Specify a value for this type of attribute by entering a number. This type of attribute uses a period as a decimal separator (".") and, optionally, a comma (",") to indicate thousands. For example, the number 1200.20 should be entered as "1,200.20". •Paragraph: Specify a value for this type of attribute by entering plain text. •Text: Specify a value for this type of attribute by entering plain text, respecting both the regular expression mask set for the field (when applicable) and the minimum and maximum character limits. |
The table below explains how to complete each field from the Procedures tab. Fields preceded by an asterisk are required.
|
Field |
Instructions |
|
ID |
The ID of each procedure is automatically generated when the spreadsheet is imported to the system. When existing procedures are exported for editing, their IDs are displayed in this field in cells disabled for editing. This field should not be completed or edited, and any changes made to it will be ignored by the system. |
|
* Procedure Name |
Enter a name to identify the new procedure. This field accepts a maximum of 100 characters. |
|
* Responsible |
Enter the name of the person with their e-mail in parentheses or the name of the group that will be responsible for the procedure. The group name must be preceded by an asterisk. For example: John Smith (jsmith@abc.com) or *Sales. |
|
Execution Time (Hours) |
Enter the estimated time, in hours, for the procedure to be completed. This field accepts decimal places. |
|
Description |
Enter detailed information on the steps for executing this procedure and the people responsible for executing it. When exporting the spreadsheet, this field will be truncated if its content exceeds the limit of 32,767 characters. If the cell is not edited, the spreadsheet will be imported and the description will be kept. |
|
Procedure Attributes |
Listed below are explanations on how to complete each type of attribute created for procedures in the Administration module. If the attributes are marked as required in the system, they must be completed for the spreadsheet to be imported.
These fields should be completed according to the type of attribute, as follows: •Attachment: This type of attribute should not be completed or edited. Any files attached through the system will be listed here. They will be displayed in brackets and separated by a semicolon and a space. For example: [name of file.pdf]; [name of file2.doc].
When creating a procedure through the spreadsheet, this field will be imported blank, even if it is marked as required •Date/Time: Specify a value for this type of attribute by entering a date or a time. If the attribute is registered as "Date", the field should contain only the date and, if it is registered as "Time", it should contain only the time. If the attribute is registered as "Date/Time", it may contain both, and if only the date is entered for the attribute, the time, by default, will be set to 0h:00min, and if only the time is entered, the date, by default, will be set to the day the spreadsheet was imported. The date may be in two formats: MM/DD/YYYY or YYYY-MM-DD. The time must be in 24-hour format: hh:mm. •E-mail: Specify a value for this type of attribute by entering an e-mail. E-mails must be in the name@domain.com format and should respect the limit of 100 characters. •Formula: This type of attribute should not be completed or edited. It displays a read-only value that was calculated according to the formula specified for the attribute. The final value will only be updated when the spreadsheet is imported back to the system. •Link: Specify a value for this type of attribute by entering a link in the following format: http://www.domain.com or \\server\path. •List of Options (single selection): Specify a value for this type of attribute by entering one of the available options for this field. •List of Options (multiple selection): Specify a value for this type of attribute by entering the available options for this field, separated by a semicolon (";") and a space. •Number: Specify a value for this type of attribute by entering a number. This type of attribute uses a period as a decimal separator (".") and, optionally, a comma (",") to indicate thousands. For example, the number 1200.20 should be entered as "1,200.20". •Paragraph: Specify a value for this type of attribute by entering plain text. •Text: Specify a value for this type of attribute by entering plain text, respecting both the regular expression mask set for the field (when applicable) and the minimum and maximum character limits. |
5. When finished, save the file to your computer.
Note: For details on how to import plans and procedures created through the spreadsheet, see Chapter 11: Continuity -> Export/Import Plans and Procedures -> How to Import Plans and Procedures.