1. Access the Administration module.
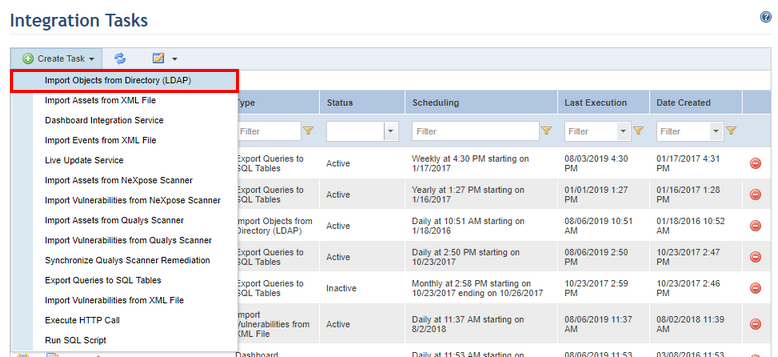
2. Select Integration Tasks from the Integrations option on the menu.
3. In the Integration Tasks section, click Create Task.
4. Select the Import Objects from Directory (LDAP) option from the list that appears (see figure below).
The system displays the form required to create the new task (see figure below).
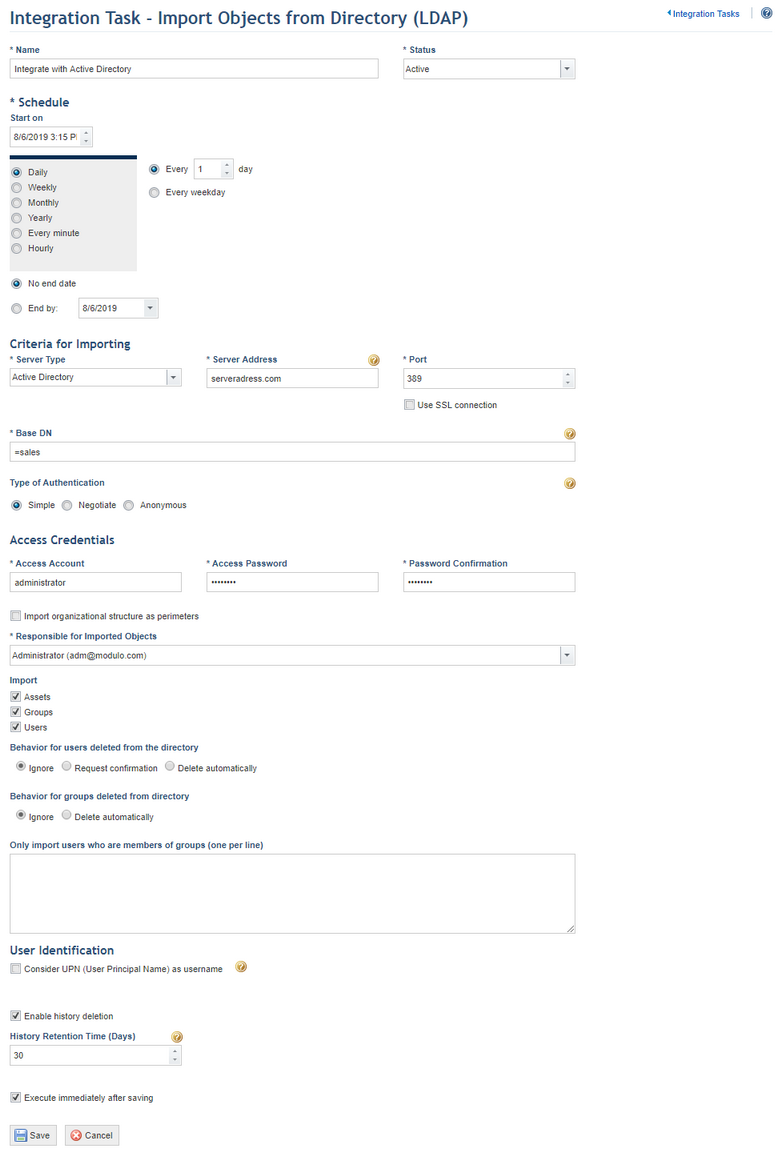
5. In the Name field, enter a name to identify the new integration routine.
6. In the Status field, determine the status of the new task. If you select Active, the routine will be activated immediately after it is created. If you select Inactive, the routine will be created but will not function until it is enabled.
7. You can create a schedule for the integration routine in the Schedule section. In the Start on field, enter a start date and time for the integration routine. Next, select one of the options (Daily, Weekly, Monthly, Yearly, Every minute, Hourly), to determine the frequency with which the task will be executed. The task can also be set to run only on weekdays or on weekends as well. In addition, it can be configured to have no end date by clicking the No end date option or configured to end by a certain date by completing the End by field. Note that some integration tasks may take more time to be executed than the option selected, which may result in performance problems.
8. In the Criteria for Importing section, valid account information must be entered to access the LDAP server. Specify the type of server from the Server Type combo box from which data will be imported, which can be Active Directory, Apache DS, or Novell eDirectory.
9. In the Server Address field, enter the domain name or IP address for the LDAP server where information will be collected. The address should not be preceded by the prefix “LDAP://”. For example: ad.example.com or 10.22.1.1.
10. In the Port field, enter a number to indicate the host port. By default it is set to 389.
11. Mark the Use SSL connection checkbox if you want to require a secure connection.
12. In the Base DN field, enter the base DN for the subtree to synchronize. Do not include spaces between commas. For example: ou=test,ou=sales,ou=melbourne,dc=ad,dc=example,dc=com.
13. In the Type of Authentication field, select the type of authentication to be used to connect to the LDAP server. Select Simple to send the credentials to access the LDAP server in clear text. Select Negotiated if Microsoft Negotiate Security Support Provider should be used during the connection. Select Anonymous if the connection should be made without sending credentials.
14. In the Access Account field, enter the username from the account at the domain which the system will use for the LDAP database import routine. This user must have permission to run LDAP queries on this server.
15. In the Access Password field, enter the password from the account at the domain which the system will use for the LDAP database import routine.
16. In the Password Confirmation field, reenter the password entered in the previous step. These credentials will be encrypted in the database.
17. Mark the Import organizational structure as perimeters checkbox if you want the task to include this information. If left unmarked, all items from the LDAP server are imported to a generic perimeter in the system (name: Imported [mm/dd/yyyy hh:mm:ss tt]). If marked, all imported items are organized in the system into this same generic perimeter with sub-perimeters created based on the names of the OUs (Organizational Unit). Neither people nor groups of people from a domain can be imported as assets.
18. Select a person to be responsible for the information imported from the Responsible for Imported Objects combo box.
19. Mark the checkboxes next to the objects you want to import, which include users, assets, and groups.
Note 1: Only technology assets will be imported and created. These can be moved to other perimeters as necessary and they will not be imported again to their original perimeter. However, if you delete one, it will be imported again on the next integration unless it is also deleted from the directory.
Assets can also be imported from a Qualys or NeXpose inventory through separate integration tasks. If the assets registered in the scanner are the same assets registered in the external directory being integrated with the system, we recommend that only assets from the scanner be imported to the organizational structure. If you also create an integration task to import assets from Qualys or NeXpose, they will be duplicated in the system.
This integration creates new users registered in the directory, but will not update existing users in the system. For example, if in the directory you edit information on a user who has already been imported to the system, the changes will not be reflected in the system when the integration routine is next executed. In the case of groups already imported to the system, users included in the group in the directory will also be included in the system. Note that people or groups imported from a directory through this integration task may not have had e-mail addresses specified for them. It’s important to provide valid e-mail addresses for them later so that they can receive system notifications.
When a person is created in the directory and the system under the same name and username, a new user will not be created in the system when the integration routine is executed. However, when a user is created in the directory and the system with the same name and different usernames, there will then be two users in the system under the same name, with different usernames. When a group is created in the directory and in the system under the same name, there will then be two groups in the system under the same name when the integration routine is executed. The group created in the directory will show as being synchronized in the list of groups of people in the Organization module.
Note 2: The following key can be added to the AppSettings section of the app.config file to define that a specific attribute should be used as the username of the imported users:
<add key="LdapUsernameAttribute" value="attribute_name" />
In this key, "attribute_name" represents the name of the attribute that will be used as the username. If this key is not added, the system will use the attribute specified in the directory (or UPN, in the case of Active Directory), as specified in the integration task.
20. In the Behavior for users deleted from the directory section, select an option to define how users deleted from the LDAP server will be handled in the system database. There are three options available:
•Ignore: Disregards deletions made on the LDAP server, meaning that people deleted in the directory will remain registered in the system. Note that when this option is selected, deleted users belonging to groups of people in the system will remain registered, but will be removed from their respective groups.
•Request confirmation: Disregards deletions made on the LDAP server, displaying instead an alert in the Manage Users section. In this case, the person assigned as responsible for the imported objects will receive a notification in the Home module and must delete each user manually in the Pending User-Related Tasks section of this module. For details, see Chapter 17: Administration -> Access Control -> Manage Users -> How to Manage Pending User-Related Tasks. Note that when this option is selected, deleted users belonging to groups of people in the system will remain registered until manually deleted, but will be automatically removed from their respective groups.
•Delete automatically: Automatically applies all deletions made on the LDAP server and replicates them in the system database.
21. In the Behavior for groups deleted from directory section, select an option to define how groups deleted from the LDAP server will be handled in the system database. There are two options available:
•Ignore: Disregards deletions made on the LDAP server, meaning that the groups of people deleted in the directory will remain registered in the system.
•Delete automatically: Automatically applies all deletions made on the LDAP server and replicates them in the system database.
22. To only import users who belong to certain groups from the directory, enter the name of each group you want to import under the Only import users who are members of groups field. Enter one group name per line and do not separate the groups by commas or semicolons. In this case, these groups will also be imported to the system.
Note: The system validates the names of each group before importing their members. Users will not be imported if the name of one or more groups specified in the task is wrong or if a group does not exist. This means that all groups must be valid for the task to be executed.
23. If you selected Active Directory as the server type, the User Identification section will be enabled. Mark the Consider UPN (User Principal Name) as username checkbox if you want to allow users from more than one domain to log in to the system using their UPN – for example, login@completedomain.com. This prevents repeated usernames from more than one domain from conflicting. If left unmarked, users will log in to the system using their usernames. Note that this option cannot be changed once the task is saved.
24. Mark the Enable history deletion checkbox if you want the system to automatically delete the execution history of the integration task after a certain number of days.
25. In the History Retention Time (Days) field, enter the number of days after which the history will be deleted. Note that the automatic deletion of the history deletes all of the task execution entries except for the most recent one.
26. Mark the Execute immediately after saving checkbox if you want the system to execute the task once it is saved. For subsequent executions the system follows the schedule set for the task.
27. When finished, click Save. If you want to quit the operation, click Cancel.
The system displays a success message.