This section explains how to edit a REST query in the Integration module, as well as manage its audience. Through the audience feature, access to queries can be restricted.
Once people or groups are included in the audience of a REST query, audience members will be able to view the query in the Manage REST Queries section of the Integration module, as well as in Queries section of the Home module. In addition, a REST query is used as a data source for a aggregated queries or configured as a layer for the integration map, audience members will be able to view this query in the results of any aggregated queries to which it was added, and will also be able to view the layer generated by it on the integration map. Note that you will only be able to view the REST queries of which you are author or an audience member, and that only the author of the query can edit or delete it.
For details on using REST queries to assemble aggregated queries, see Appendix -> Configurations for Aggregated Queries. For details on how to configure a REST query as a layer for the integration map, see Appendix -> Layers for the Integration Map.
1. Access the Integration module.
2. Click the Aggregated Queries option.
3. In the Aggregated Queries section, click Manage REST Queries.
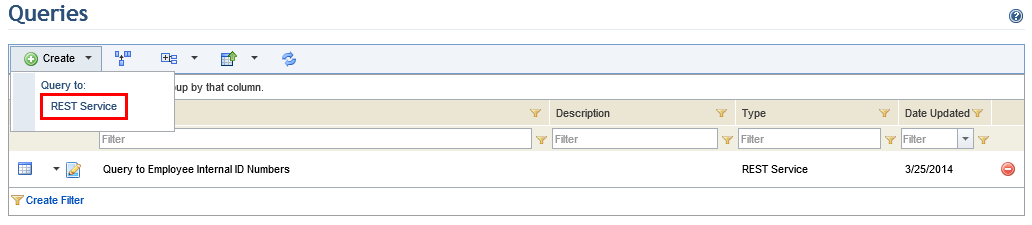
4. In the list of queries, click Create and select REST Service (see figure below).
The system displays a screen where the query can be registered (see figure below).
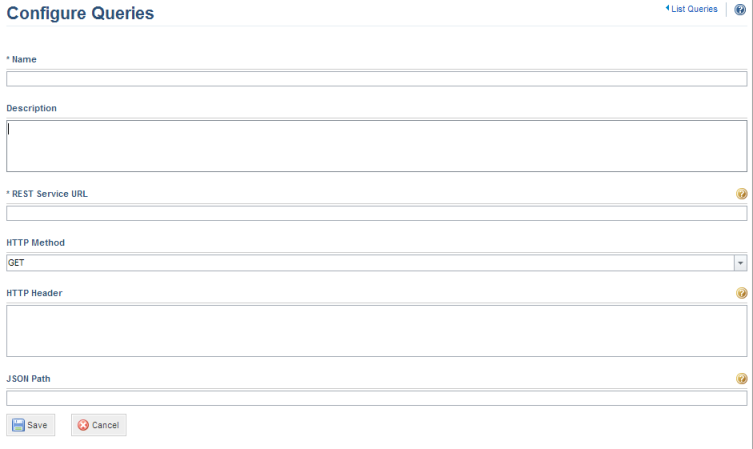
5. In the Name field, enter a name to identify the query using a maximum of 50 characters.
6. In the Description field, provide a description for the query using a maximum of 5,000 characters.
7. In the REST Service URL field, enter the address of the service. Through this URL, you will be able to send parameters using the following format: http://www.service.com?parameter={value}&secondparamter={value2}. These parameters appear as fields for filtering the results of the query when it is executed.
8. In the HTTP Method field, define whether the method to be used will be GET or POST.
9. In the HTTP Header field, enter the HTTP header used to send additional information to the service. For example, through the header you can provide a token for a service that requires authentication as follows: authtoken: {token}.
10. In the JSON Path field, enter the JSON path to be used to extract part of the response provided by the service. For example, to extract all authors from a response that contains a list of books and their respective authors, the JSON path would be: $.books[*].author.
11. When finished click Save. If you want to quit the operation, click Cancel.
The system displays a success message.