1. Access the Dispatch solution.
2. Click Manage Calls.
3. Click Create Call to access the form for creating calls or wait until the system receives a new call, in which case the form will be opened automatically.
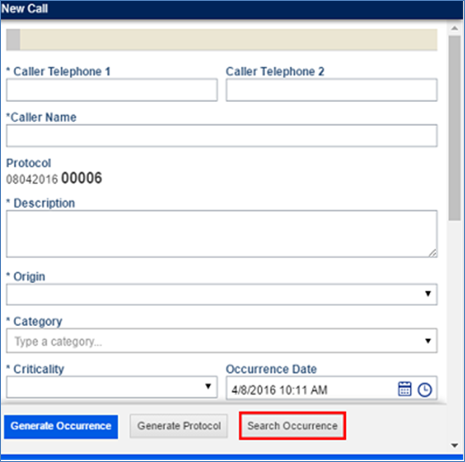
4. In the New Call window, click Search Occurrence (see figure below).
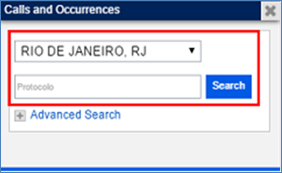
5. In the Calls and Occurrences window, select the city and state where the incident occurred from the drop-down list that appears.
6. In the next field, enter the protocol number of the call or occurrence and click Search (see figure below).
The system displays the results of the search below the fields. If the search fields are not completed, all calls and occurrences will be listed.
7. To search calls and occurrences by their characteristics, click Advanced Search. Additional fields will be displayed where you can enter information on a call or occurrence to filter the search (see figure below). The more filters are used, the stricter the search will be.
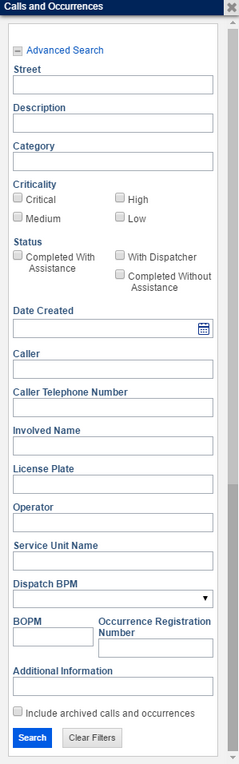
8. In the Street field, enter the address of the occurrence.
9. In the Description field, enter the description provided for the call or occurrence.
10. In the Category field, select the category that indicates the nature of the call or occurrence by typing its name or code.
11. In the Criticality and Status fields, mark the checkboxes that indicate the criticality level and the current status of the call or occurrence. Note that more than one checkbox can be marked.
12. In the
Date Created field, enter the date when the call was created using the
following format: mm/dd/yyyy. Alternatively, you can click Calendar
( ) to select a date.
13. In the Caller field, enter the name of the person who called to report the incident.
14. In the Caller Telephone Number field, enter the telephone number of the person who called to report the incident. This field will search both the first and second phone number provided for the caller.
15. In the Involved Name field, enter the name of one of the people involved.
16. In the License Plate field, enter the license plate number of one of the vehicles involved.
17. In the Operator field, enter the name of the operator who registered the call.
18. In the Service Unit Name field, enter the name of the service unit associated with the occurrence. All occurrences that are or were associated with this unit will be included in the results.
19. In the Dispatch BPM field, select the BPM that received the dispatch request. This field only applies to occurrences.
20. In the BOPM field, enter the BOPM registered by the dispatcher when completing the dispatch request for the occurrence.
21. In the Occurrence Registration Number field, enter the occurrence registration number provided by the dispatcher when completing the dispatch request.
22. In the Additional Information field, enter any additional information provided by the dispatcher when completing the dispatch request for the occurrence. Mark the Include archived calls and occurrences checkbox to include in the search the calls and occurrences that have been archived after being closed for more than 7 days.
Note: The number of days is defined in the SQL script that is run in the Run SQL Script task in the Administration module. The script to archive the calls and occurrences uses the @daysBeforeArchivingFinalizedCallsAndOccurrences parameter, as in the following example:
use [{riskmanager}];
declare @daysBeforeArchivingFinalizedCallsAndOccurrences as int = 7;
23. When finished, click Search. To remove all filter criteria, click Clear Filters. If Search is clicked without defining any filters, the complete list of calls and occurrences will be displayed.
The system displays the list of calls and occurrences according to the filters defined. The list is sorted by date and criticality level, with the latest and most critical calls and occurrences listed first.
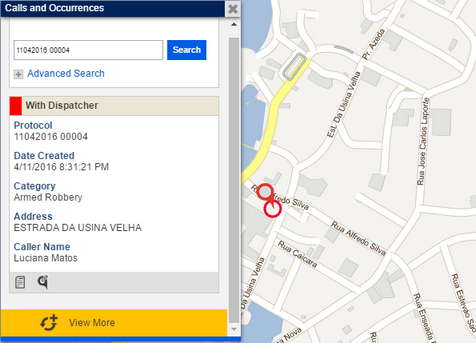
24. To view it on the map, in the Calls and Occurrences window, click the call or occurrence you want to locate on the map. Keep in mind that only open occurrences ("With Dispatcher" status) can be plotted on the map.
The system plots the object selected on the map and marks its icon in red (see figure below).