1. Access the Risk module.
2. Select the List Projects option from the Projects section.
3. In the List of Projects section, click Edit next to the project containing the asset component for which you want to request an automated collection.
4. Click the Analysis tab.
5. Click Automated Collections.
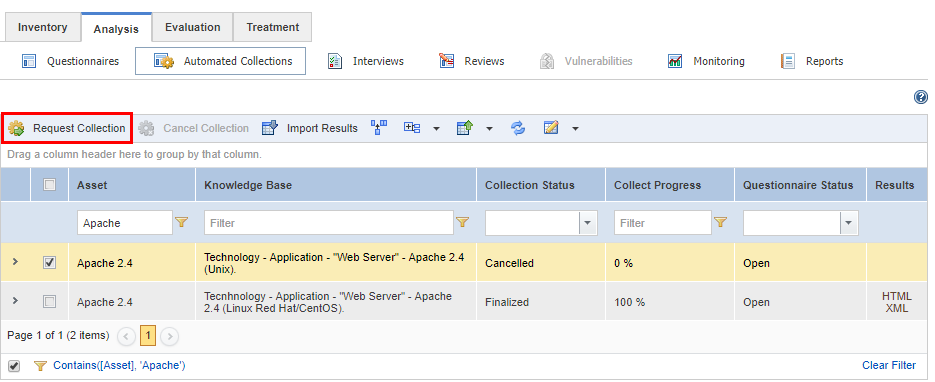
6. Mark the checkboxes next to the collections you want to request and click Request Collection (see figure below).
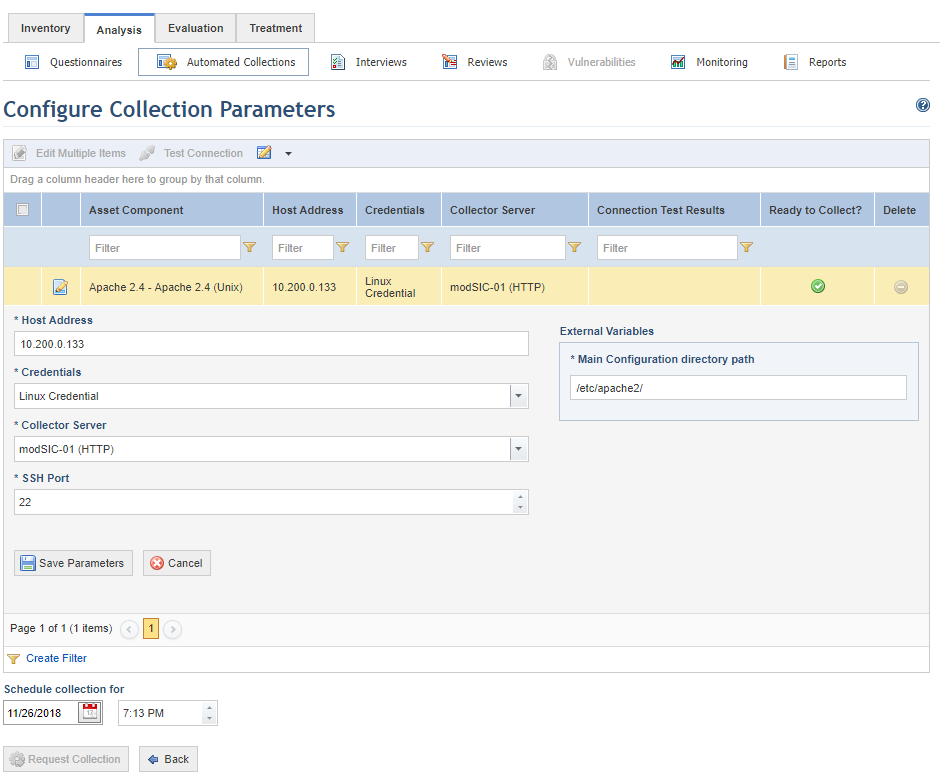
7. In the area that appears, click Edit next to a collection to specify the host address for the target machine, the credentials to be used to access its operating system, the collector server to be used, and, in some cases, the port (see figure below). If this information was specified for assets in the Organization module, it will automatically be filled out here.
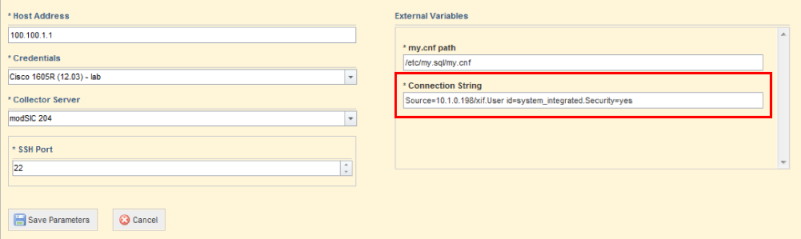
Note 1: If there are external variables registered in the OVAL code, they will appear here in new fields and should be completed before you request the collection (see figure at the end of the note). Certain knowledge bases for databases provided by Modulo, for example, may request a connection string and/or the path to the DBMS configuration file as an external variable. The information entered in the Connection String field is not stored by the system. It is inserted into the OVAL variable, encrypted, and then sent, along with all the other collection data, to the collector server if the modSIC service installed on the server was configured to accept transmissions via HTTPS.
In addition to the connection string for the MySQL database shown in the figure below, some other examples of connection strings for remote collection in databases are:
MS SQL Server
Server=<IP address>;Database=<database name>;User Id=<admin user of database>;Password=<user password>;
PostgreSQL Server
Server=<IP address>;Port=<TCP port>;Database=<database name>;User Id=<admin user of database>;Password=<user password>;
ORACLE Database
Data Source=(DESCRIPTION=(CID=GTU_APP)(ADDRESS_LIST=(ADDRESS=(PROTOCOL=TCP)(HOST=<IP address>)(PORT=<TCP port>)))(CONNECT_DATA=(SID=<instance name>)(SERVER=DEDICATED))); User Id=<admin user of database>;Password=<user password>;
When Linux or Unix-based systems, applications, or services are analyzed, the SSH Port field will be displayed where you can enter the number of the port to be used by the collector server to remotely access the target machine. By default, the system completes this field with port number 22.
Note 2: To connect to Windows machines that are outside the domain, such as a local machine, the UAC filter for local accounts must be disabled by creating the following DWORD registry entry and setting its value to 1:
[HKLM\SOFTWARE\Microsoft\Windows\CurrentVersion\Policies\System] LocalAccountTokenFilterPolicy
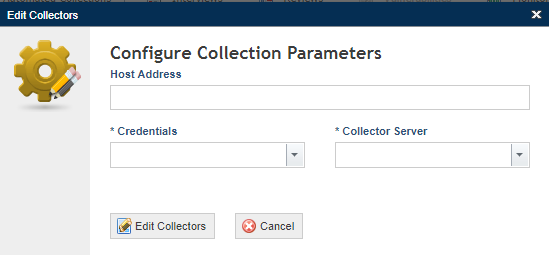
Note 3: To edit the collection parameters for multiple asset components at once, mark the checkboxes next to those you want to edit and click Edit Multiple Items, then fill out the fields in the pop-up window that appears (see figure below).
8. In the Host Address field, enter the host address of the target machine to be analyzed.
9. In the Credentials field, select a previously registered set of credentials. These will be used by the collector server to access the target machine and must be registered in advance in the Administration module.
10. In the Collector Server field, select a collector server previously registered in the Administration module. The collector server will access and scan the target machine and return the results to the system. It is important to note that only validated, online servers will be available for selection.
11. Click Edit Collectors to save the parameters entered for the asset component selected. If you want to quit the operation, click Cancel.
The system displays a success message.
Note: The checkboxes next to each asset component are used to select multiple components for simultaneous editing and not to specify which ones to collect, as all components shown on this page will be collected. If you do not want to collect a certain asset component on the list, click Delete next to it to delete it from the list and exclude it from the collection.
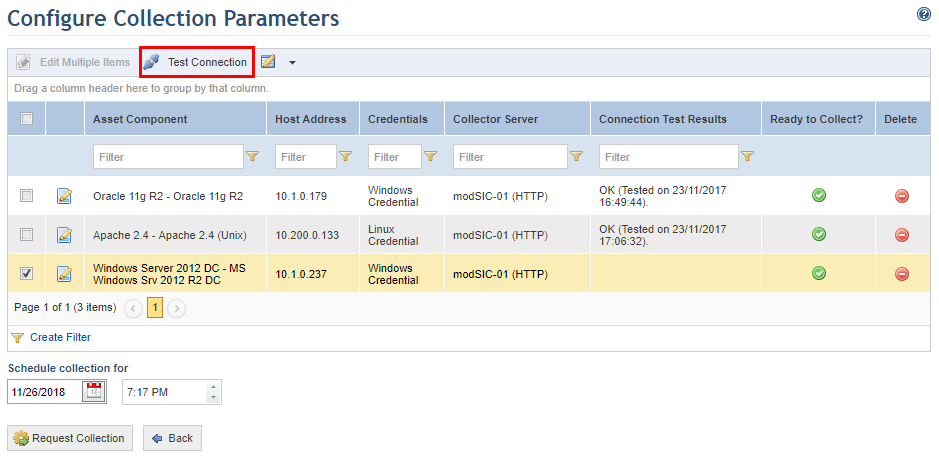
12. To test the connection between the collector server and a target machine before sending a collection request, mark the checkbox next to the asset component you want to test and click Test Connection (see figure below).
13. Set the date and time at which the collection should be started under the Schedule collection for field once the collection parameters are configured for each asset component.
14. Select the asset components ready to be collected and click Request Collection to send the request. If you want to quit and return to the previous page, click Back.
The system displays a window with instructions to help ensure that the collection is successful and to confirm the request (see figure below).
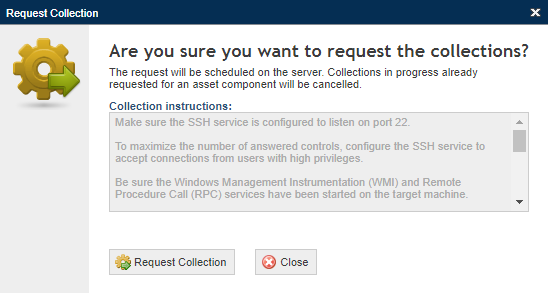
15. Ensure that the instructions have been followed and click Request Collection to confirm the request. If you want to quit the operation, click Cancel.
The system displays a success message and, if no errors are detected, displays the asset component with its collection status as "Collection Scheduled". Some collections may be quick while others may take longer to complete. You can track the progress of the collection in real time and see the collection’s progress percentage in the Collection Progress column.
Note: The possible statuses of an automated collection are:
•Failed: occurs when a collection request is sent but a communication failure takes place between the system and the collector server, or between the collector server and the asset to be collected. In this case, no information was collected and a new collection request must be sent.
•Collection Scheduled: occurs when it was requested successfully through the system and has already been started by the collector server. In this case, another collection cannot be sent until it is cancelled or its status has changed.
•Finalized: occurs when the collection was executed all the way through. The results of the collection will be enabled and shown in HTML and XML format and the controls will either have been automatically answered or evidence of the collection can be shown in them.
•Cancelled: occurs when you manually cancel the collection through the system.
•Partially Collected: occurs near the end of the collection process while the system is being updated with the collected information. This process should take no longer than ten minutes. Otherwise, an error may have occurred when the script was being executed. In this case, although some information was collected, a new request must be sent, since it is not possible to restart the collection from the point at which the error occurred.
•Not Requested: occurs when the project enters the analysis phase after the inventory phase; that is, when items are added to the scope of a new project that uses a knowledge base that supports automated collections and no request for a collection has been sent yet.