This topic explains how to create a call in the system for a related incident.
Calls are requests for assistance from agencies that can dispatch units to the call location. Operators can register a call by providing the caller’s phone number and the address of the incident, as well as information that will classify the call in respect to its origin, category, and criticality. Once the required fields are completed, you can either generate an occurrence for the call and request a dispatch from a group, or, if no dispatch is required, simply save the call in the database, generating a protocol number for it. For information on how to request dispatches, see Chapter 13: Dispatch -> Manage Calls -> How to Generate Occurrences and Request Dispatches.
Keep in mind that in installations that are integrated with a private branch exchange (PABX) telephone system, the window to register a call will be automatically opened, with the number of the caller already completed. For more information on this integration, get in touch with your account manager.
1. Access the Dispatch solution.
2. Click Manage Calls.
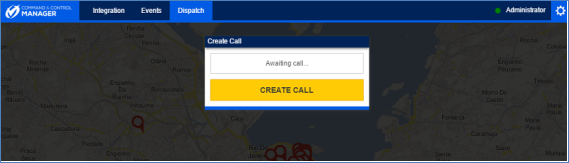
The system displays a window where a new call can be created (see figure below). If a telecommunications system was integrated with the system, the window to create a new call will be opened automatically when a phone call is received. New phone calls are accepted only after a dispatch request has been made or a protocol number has been generated for the last call.
To create a call without waiting for a phone call, click Create Call.
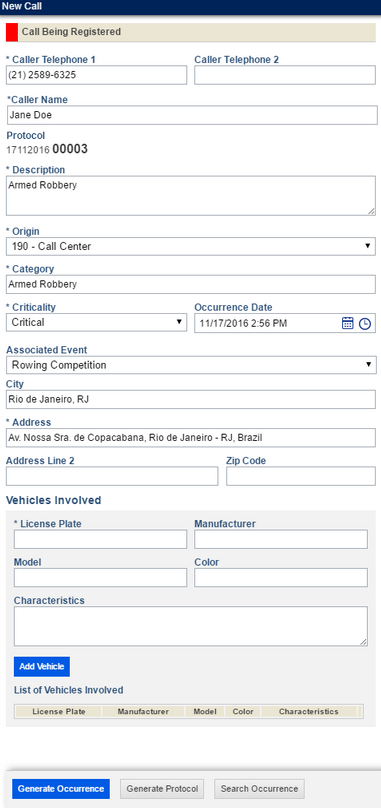
The system displays a new window where you can enter the data for the call (see figure below). On the map, red pins are plotted for previously registered occurrences.
Note: A protocol number is generated for the call, based on the current date and the order of registration of the call for that day, as follows: DDMMYYYY XXXXX.
In the Caller Telephone 1 field, enter the phone number of the person who called to report the incident. If the solution is integrated with a PABX system, this field will be already completed.
In the Caller Telephone 2 field, enter an alternative phone number for the person who called to report the incident.
In the Caller Name field, provide the name of the person who called.
In the Description field, enter a description of the incident using up to 2,000 characters.
In the Origin field, indicate the origin of the call by selecting the corresponding option, as registered in the Call Origins section of this solution.
In the Category field, select a category for the call, which is used to indicate its nature (for example, fire, robbery, traffic incident, etc.). You can search for a category by entering its name or code. All categories created in the Call Categories section of this solution will be available for selection. If a default criticality score was defined for the category selected, it will be automatically suggested for the Criticality field below. Note that some categories may not require an address for the call, such as those that report commendation or complaints. When these categories are selected, the required address fields will become optional.
In the Criticality field, select the level of criticality of the call. Keep in mind that the criticality level is used to order the calls throughout the lists in this solution, with the calls with the highest criticality level appearing first to ensure a prompt response.
In the Occurrence Date field, enter the date and time
when the incident occurred. By default, this field is completed with the current
date and should be completed in the following format: mm/dd/yyyy hh:mm tt.
Alternatively, you can click Calendar ( ) and Time (
 ) to select the date and time. Keep
in mind that the system does not allow future dates to be selected.
) to select the date and time. Keep
in mind that the system does not allow future dates to be selected.
In the Associated Event field, select one of the events listed to associate it with this call. All associated events created in the Customizations section of this solution will be listed.
Note: Calls and occurrences with associated events are
displayed on the map with the indicator ( ) above their icons to make it
easier to identify.
) above their icons to make it
easier to identify.
In the City field, enter the name of the city and the state acronym where the incident occurred and select the corresponding option from the drop-down list that appears. The system can only locate the latitude and longitude of the call being created and plot it on the map accordingly.
Note 1: The system can only create calls in locations for which there is an option in the drop-down list in the fields for defining the address.
Note 2: The city and state displayed by default can be defined in the following key in appSettings in the web.config file:
<add key="DefaultCity" value="Cambridge, MA"/>
In the District field, enter the name of the district where the incident occurred and select the corresponding option from the drop-down list that appears. The system will only locate the address on the map if an available option is selected from the list.
Note 1: As the address fields are completed, the system will zoom into the location of the incident.
Note 2: The District, Sub-District, Reference and Number fields can be enabled or disabled in the system configuration file.
In the Sub-district field, further specify the district where the incident occurred.
In the Address field, provide the address where the incident occurred by entering the street name and then selecting the corresponding option from the drop-down list that appears.
A green pin is plotted on the map indicating the location of the call. This pin can then be dragged and dropped to a new position, allowing you save the new location of the call (see figure below).
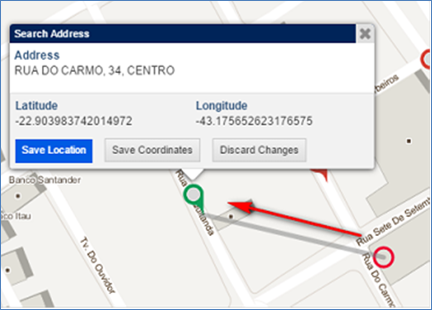
Note: If the pin is dragged to an unknown address, the system will use the closest known location within a 100-meter radius, by default. This value can be configured in the web.config file for the application, as shown below.
<add key="Geocoding:Digicade:ReverseDistanceTolerance" value="100" />
Click Save Location to change the address of the call in its properties and on the map. Click Save Coordinates if you only want to save the new latitude and longitude of the pin on the map, but keep its old address. To cancel, click Discard Changes.
The system saves the changes as indicated.
If you did not save the new location through the map, in the Number field, enter the street number where the incident occurred.
In the Address Line 2 field, enter any additional information on the address, such as the apartment number, using up to 200 characters.
In the ZIP Code field, enter the ZIP code of the incident address.
In the Reference field, specify a point of reference for the location of the incident using up to 200 characters.
To add a vehicle involved in the incident, enter its license plate in the License Plate field of the Vehicles Involved section. This field is required.
In the Manufacturer field, enter the manufacturer of the vehicle involved.
In the Model field, enter the model of the vehicle involved.
In the Color field, enter its color.
In the Characteristics field, enter any additional information on the vehicle's physical characteristics to help identify it.
Click Add Vehicle.
The system validates if the vehicle is included in the blacklist and, if not, displays a success message and information on the vehicle involved in the List of Vehicles Involved section.
To remove vehicles from the list of vehicles involved, click
Remove ( ) next to their names.
Note: Only the fields completed here will appear in the call report.
When finished, click Generate Occurrence to generate an occurrence for the call in the Manage Dispatches section and assign a dispatch group to it. If this is not necessary, click Generate Protocol to end the call and save it in the system.
If Generate Occurrence is clicked, the system loads an area where you can generate an occurrence for the call. For details, see Chapter 13: Dispatch -> Manage Calls -> How to Generate Occurrences and Request Dispatches.
At this point, you can click Edit Call to reopen the form for editing the call and change any of its properties, including its address, if necessary. To save your changes, click Generate Occurrence again.
The system saves the changes and displays the call at the new location, when applicable.
When Generate Protocol is clicked, the system displays a pop-up window where you can confirm the completion of the call (see figure below).
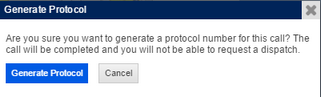
Click Generate Protocol to complete the call and confirm the operation. If you want to quit the operation, click Cancel.
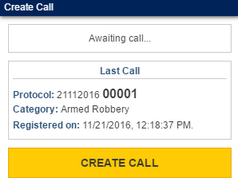
The system displays a success message. The call creation window is displayed with the protocol number, the category, and the call registration date (see figure below).