This topic explains how to register an SMTP server used by the system to deliver e-mails. By default, the SMTP server is configured for the computer on which the system is installed (local host).
1. Access the Administration module.
2. Select Message Service from the Settings option on the menu.
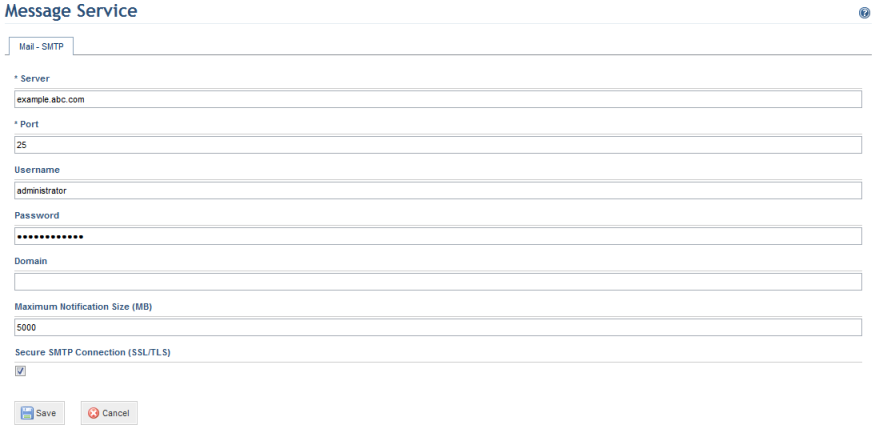
The system displays a screen where the SMTP server data can be registered (see figure below).

3. In the Server field, enter the NetBIOS (Network Basic Input/Output System), FQDN (Fully Qualified Domain Name) name, or the IP address of the SMTP server that will be used by the system.
4. In the Port field, enter the TCP (Transmission Control Protocol) port that will be used by the SMTP server to deliver e-mails. By default, the SMTP service uses the TCP 25 port.
5. If the SMTP server requires authentication to send e-mails, fill in the Username and Password fields with valid credentials to authenticate in the server.
6. In the Domain field, enter the name of the domain that will validate the credentials to access the SMTP server. This field is optional and will only be necessary if the credentials for accessing the SMTP server are part of an LDAP domain, such as Active Directory.
7. In the Maximum Notification Size (MB) field, specify the maximum size allowed for notification messages. As reports can be sent via e-mail, a minimum of 1 MB is recommended.
8. Mark the Secure SMTP Connection (SSL/TLS) checkbox if you want to use a secure SMTP connection to send messages.
9. When finished, click Save. If you want to quit the operation, click Cancel.
The system displays a success message.