 ) next to the service unit you want
to associate with a dispatch request (see figure below). This feature is only
enabled for service units with the "Available" status.
) next to the service unit you want
to associate with a dispatch request (see figure below). This feature is only
enabled for service units with the "Available" status. This topic provides orientation on managing service units through the Police Cars tab. Through this tab, you can view the list of all the service units registered in the system, filter the list by status, associate service units with dispatch requests, temporarily remove them, and mark them as available. Police cars can also be associated with dispatch requests through the Occurrences tab, where dispatch requests are displayed instead of service units.
Keep in mind that the association of a service unit with a dispatch request starts the process of dispatching a unit to aid in an occurrance. Some previous configurations are necessary so that service units can be managed through the map. For more information, see Appendix -> Additional Configurations for the Dispatch Solution -> How to Configure Service Units. For details on assigning people to service units, see Chapter 13: Dispatch -> Police Car Assignment -> How to Manage People Assigned to Police Cars.
The Occurrences and Police Cars tabs can be enlarged and opened in a separate window. This allows more dispatch requests and service units to be viewed and managed at once and also provides a full view of the map, which can be very useful for users that operate the system with more than one monitor. For more information, see Chapter 13: Dispatch -> Manage Dispatches -> How to Dispatch and Manage Service Units through the Occurrences Tab.
1. Access the Dispatch solution.
2. Click Manage Dispatches.
3.
In the Police Cars tab, click Associate () next to the service unit you want
to associate with a dispatch request (see figure below). This feature is only
enabled for service units with the "Available" status.
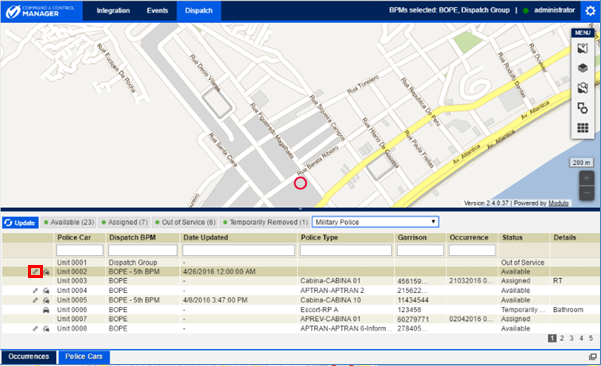
Note: Only the service units belonging to the BPMs selected for the section will be displayed in the main list. The list of units can be filtered by entering information in the text box filters available in each column, by status or by type. To filter by status, select one of the available status above the list of entries. The green dot next to the status name indicates that the service units with that status are being displayed. Note that, instead of displaying the asset types configured for service units, the field listing the types of service units displays the names of the service unit layers, as registered in the MapQueriesConfig.xml file for the application.
The system displays a window where you can select the dispatch request that will be associated with the service unit (see figure below).
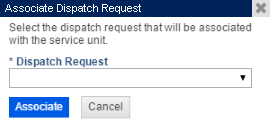
4. In the Dispatch Request field, select the dispatch request you would like to associate. Dispatch requests are listed by their protocol numbers, followed by the names of the BPMs responsible for them, in parentheses.
Note: You will only be able to view here the service units and dispatch requests from the groups that you have selected for the Manage Dispatches section. For more information on selecting dispatch groups, see Chapter 13: Dispatch -> Manage Dispatches -> How to Dispatch and Manage Service Units through the Occurrences Tab.
5. Click Associate to associate the police car with the dispatch request. If you want to quit the operation, click Cancel.
The system displays a success message and the status of the service unit is changed to "Assigned", with the pin on the map changed to red. Requests with assigned units have the "Dispatched" status.
6.
To temporarily remove a unit, click Temporarily Removed ( ) next to it on the main list. This
may be useful if the unit is not available to be dispatched for a brief period.
Only units with the "Available" status can be removed.
) next to it on the main list. This
may be useful if the unit is not available to be dispatched for a brief period.
Only units with the "Available" status can be removed.
The system displays a window where you can remove the unit temporarily. The name of the unit and the number of the identification document of each person in the unit’s garrison are displayed.
7. Select the reason for removing the unit in the Reason for Removal field (see figure below).
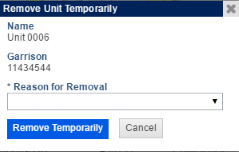
8. Click Remove Temporarily to remove the unit. If you want to quit the operation, click Cancel.
The system displays a success message and the status of the service unit is changed to "Temporarily Removed". In addition, the pin representing the unit on the map turns blue. The Time Removed column starts counting the time from the moment the service unit is removed.
9.
To indicate that a removed service unit is available again, click
Available ( ) next to the service unit in the
main list. This option is only displayed for service units with the "Temporarily
Removed" status.
) next to the service unit in the
main list. This option is only displayed for service units with the "Temporarily
Removed" status.
The system displays a success message and the status of the service unit is changed to "Available", with its pin displayed in green on the map.
Note: You can zoom in on the location of a service
unit and plot it on the map by clicking its name in the main list. When the name
of a unit is selected, the map will be centralized on its current location and a
red circle will appear around its icon to highlight it on the map. However, for
the icon of the service unit to be displayed, it is necessary to first enable
the layer of service units through the Layers ( ) option on the side menu.
10. To view a service unit plotted on the map, click its name in the main list.
11. On the map, click the icon of the service unit to view information on it.
The system displays a pop-up with information on the unit (see figure below).
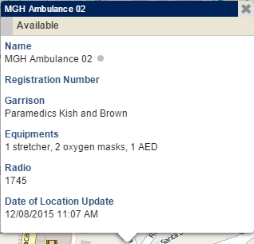
Note: Some fields will only be displayed depending on the status of the service unit. The Acting Subgroup field will only be displayed if completed in the Manage Assets section of the Organization module for the asset that represents the unit. In addition, if the asset representing a service unit is deleted from the Organization module, the service unit will be removed from the main list and will no longer be able to be associated with a dispatch request.