 ) to open available windows.
 This section explains how to edit occurrences generated for calls. Keep in mind that occurrences can only be edited in the Manage Dispatches section.
1. Access the Dispatch solution.
2. Click Manage Dispatches.
3.
In the side menu of the map, click Windows () to open available windows.
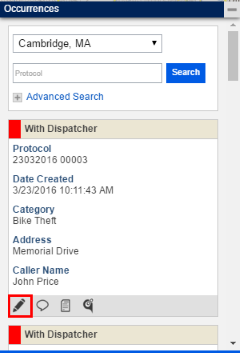
4. In the Occurrences window, use the search features available to locate the occurrence you want to edit.
5.
Click Edit ( ) below the occurrence you want to
edit (see figure below). You can also access this feature through the
Occurrences tab. Only occurrences with the "With Dispatcher" status can
be edited.
) below the occurrence you want to
edit (see figure below). You can also access this feature through the
Occurrences tab. Only occurrences with the "With Dispatcher" status can
be edited.
6.
You can also edit the occurrence through the map. To do so, locate and click its
icon and then click Edit () (see figure below).
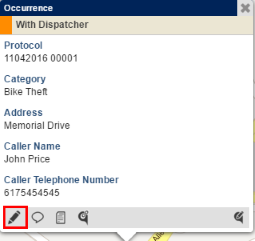
The system displays a window where the occurrence can be edited. Additional fields not available during the call creation will be enabled here.
7. To register information on a person who is involved in the incident, select the person’s gender in the Gender field of the People Involved section. This field is required.
8. In the Involved Type field, define if the person is the Author, Victim, or Witness of the incident. This field is required.
9. In the Name field, enter the name of the person involved using up to 50 characters.
10. In the ID Type field, select the type of identification document provided by the person involved. All ID types created in the Customizations section of this solution will be available for selection. This field is required if the ID Number field is completed.
11. In the ID Number field, enter the number of the identification document. This field is required if the ID Type field is completed.
12. In the Issuing Agency field, enter the name of the agency that issued the identification document.
13. In the Description of Person field, specify the person's physical characteristics to help identify them using up to 200 characters.
14. Click Add Involved.
The system validates if the person added is included in the blacklist and, if not, displays a success message and information on the person in the List of People Involved section.
15. To remove
people from the list of people involved, click Remove ( ) next to their name.
16. In the Attachments section, click Choose Files, select the file you want to add to the occurrence, and click Open. Note that more than one file can be attached at the same time. In the Description field, enter a description for the attachment using a maximum of 100 characters. Click Attach File when finished. The attachments added will be listed in the List of Attachments section. Each file cannot exceed 10 MB in size, and must be in .mp3, .mp4, .mpg, .mpeg, .3gp, .3gpp, .bmp, .gif, .jpeg, .jpg, .ico, or .png format.
The system displays a success message.
17. To remove
files from the list of attachments, click Remove () next to their name.
The system displays a success message.
18. Make the necessary changes and click Save. To view information on how to complete each field, see Chapter 13: Dispatch -> Manage Calls -> How to Register Calls.
19. If you edit the occurrence through the Occurrences tab, additional options will be available to end the associated dispatch request, transfer it, and view any operating procedures registered for its category and dispatch group. For more information on these features, see Chapter 13: Dispatch -> Manage Dispatches -> How to End Dispatch Requests, How to Transfer Dispatch Requests, and How to View Operating Procedures.
20. To change the location of the occurrence, click its icon on the map.
21. In the
window that appears, click Change Location ( ) in the lower right corner.
The system displays a new window for changing the location of the occurrence and allows you to drag and drop the occurrence to a new position on the map (see figure below).
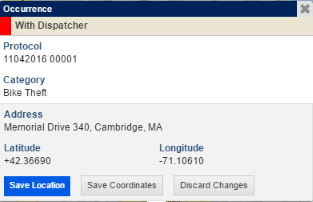
22. Click Save Location to change the address of the call in its properties and on the map. Click Save Coordinates if you only want to save the new latitude and longitude of the pin on the map, but keep its old address. To cancel, click Discard Changes.
The system displays a success message.