This topic provides orientation on managing service units. This includes how to associate and disassociate service units from occurrences, as well as update the status of each. You will be able to select the dispatch groups of which you are a member, and view the occurrences with the dispatch requests sent to them. Some of the same features available for service units in the Occurrences tab are also available in the Police Cars tab, where services units can be viewed in a list and managed directly. For more information, see Chapter 13: Dispatch -> Manage Dispatches -> How to Manage Service Units through the Police Cars Tab.
Keep in mind that the association of a service unit indicates that the unit has been dispatched to the location of the occurrence (en route). You can associate several service units with a single occurrence, but a service unit can only be associated with one occurrence at a time. The progress of each dispatch is controlled by field events, which are added to the occurrence to indicate the status of the service unit assigned. The Dispatch Time column in the list of occurrences displays the total time during which a service unit was associated with a request. For example, when a service unit is associated, the time starts to be recorded and pauses when the last unit is disassociated. If a service unit is associated again with the occurrence, the time will continue to be counted from when it was paused, and will stop again when the last unit is disassociated or marked as unavailable.
Some previous configurations are necessary so that service units can be managed through the map. For more information, see Appendix -> Additional Configurations for the Dispatch Solution -> How to Configure Service Units.
When a dispatch is requested from a dispatch BPM (group of people in the Organization module), all the dispatchers who are members and who have selected that BPM will view the request and may answer it. By default, the occurrences are ordered in the list by criticality and by the date of the request, where the occurrences with the oldest and most critical dispatch requests appear first. You may sort the occurrences by other fields, such as by address or status, after clicking the name of the column you would like the list to be sorted by.
The menu that contains the Occurrences and Police Cars tabs can be enlarged and opened in a separate window. This allows more dispatch requests and service units to be viewed and managed at once and also provides a full view of the map, which can be very useful for users that operate the system with more than one monitor.
1. Access the Dispatch solution.
2. Click Manage Dispatches.
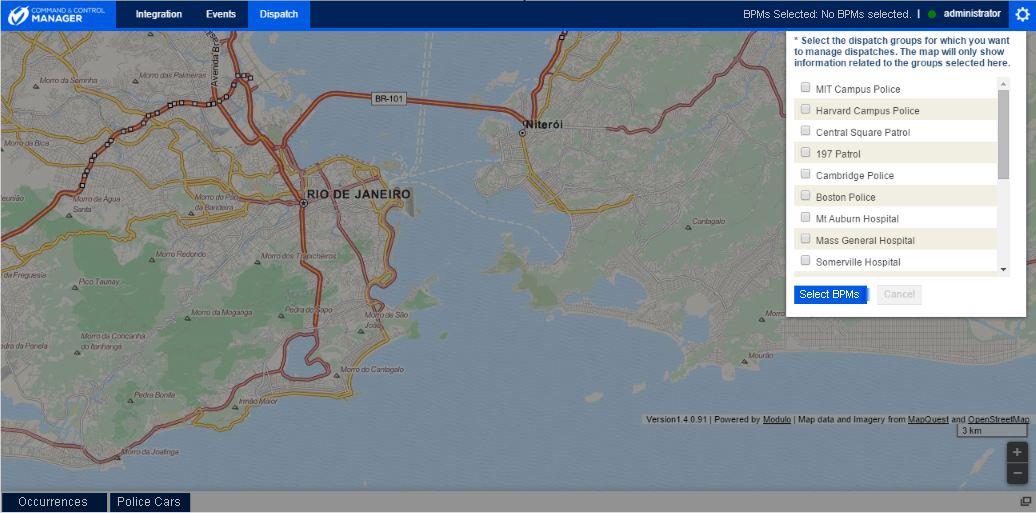
If no BPMs (dispatch groups) have been selected, a window will appear where you may select the BPMs for which you want to manage dispatches (see figure below). For BPMs to be displayed here, they must be registered in the Manage Groups of People section of the Organization module, with the "IsDispatchGroup" tag entered in the Additional Information field of each group. Those in the Global Administrators profile will view all BPMs, while other users will only view those of which they are a member. Keep in mind that, although you will only be able to view and manage the dispatch requests sent to the BPMs selected here, all the occurrences related to the BPMs of which you are a member will be available in the Occurrences window, regardless of your selection.
3. Mark the checkboxes next to the BPMs for which you want to manage dispatch requests and click Select BPMs to confirm. If you want to quit the operation, click Cancel. You may select up to fifteen groups or mark all groups. Your selection can be changed later.
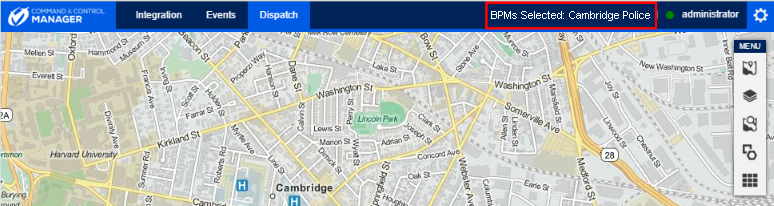
The system plots the occurrences related to the BPMs selected on the map and loads the occurrences in the Occurrences tab. The names of the BPMs selected are listed in the upper bar menu.
4. To change your group selection, click the names of the groups selected and repeat the previous step (see figure below).
Note: To open the Occurrences and Police
Cars tabs in a separate window, click the New Window button ( ) in the bottom right corner of the
screen.
) in the bottom right corner of the
screen.
5.
In the Occurrences tab, click Associate Service Unit ( ) next to the occurrence with which
you want to associate a service unit (see figure below). Note that only
occurrences with the "Awaiting Completion" and "Pending" status can be
associated with service units.
) next to the occurrence with which
you want to associate a service unit (see figure below). Note that only
occurrences with the "Awaiting Completion" and "Pending" status can be
associated with service units.

The system displays the Associate Service Unit window, where you can search for service units and associate them with the dispatch request (see figure below).
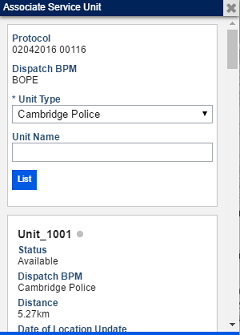
6. In the Unit Type field, select the type of service unit you would like to search for. This field is required. Note that, instead of displaying the asset types configured for service units, this field displays the names of the service unit layers, as registered in the MapQueriesConfig.xml file for the application.
7. In the Unit Name field, enter the name of a service unit, exactly as registered in the Organization module, to search the list by its name.
8. When finished, click List.
The system displays the list of service units, which is organized by proximity, listing the 10 service units closest to the occurrence. For each unit, its current status and distance to the occurrence location are displayed. If any default attributes for assets representing service units are completed in the Attributes tab of the Organization module, they will also be displayed here. The Date of Location Update field displays the date and time when the location of the service unit was updated. This field can be manually completed for the asset in the Organization module or, if the solution is integrated with a GPS tracking service, it will be automatically completed when the system receives the coordinates for the location. A circle is displayed next to the name of each service unit. If its location has been updated in the last five minutes, the circle will be colored green, whereas if it has not been recently updated, the color will be grey.
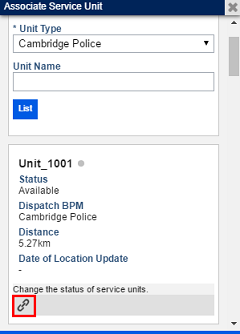
9.
Click Associate ( ) below the service unit you
want to associate with the dispatch request (see figure below). Only service
units with the "Available" status can be associated.
) below the service unit you
want to associate with the dispatch request (see figure below). Only service
units with the "Available" status can be associated.
The system displays a success message and the Service
Unit ( ) icon appears next to the dispatch
request in the Assigned Units column. The status of the occurrence is set
to "Dispatched", while the status of the service unit is changed to "Assigned".
In addition, the dispatch is recorded in the occurrence report, with its status
as "In Progress".
) icon appears next to the dispatch
request in the Assigned Units column. The status of the occurrence is set
to "Dispatched", while the status of the service unit is changed to "Assigned".
In addition, the dispatch is recorded in the occurrence report, with its status
as "In Progress".
10. Click the
icon for the service unit (  ) in the Assigned Units
column to view information on the service unit and continue managing the
dispatch.
) in the Assigned Units
column to view information on the service unit and continue managing the
dispatch.
Note: An acronym is displayed next to the icon for the service unit in the Assigned Units column to indicate its status. The acronyms and their values are: RT (En Route), SI (Started Displacement to the Intermediate Location), SS (Started Displacement to the Police Station), AL (Arrived at Location), AI (Arrived at the Intermediate Location), and AS (Arrived at the Police Station).
The system displays a window where field events can be added to the service unit to indicate its status (see figure below).
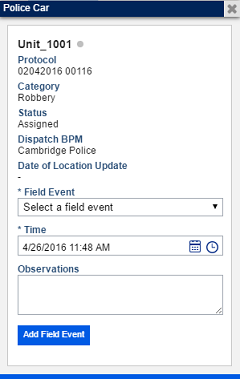
11. In the Field Event field, select one of the available options to update the status of the service unit. The options are: Accepted, Arrived at the Occurrence Location, Arrived at the Intermediate Location, Arrived at the Police Station, Completed Assistance, Started Displacement to the Intermediate Location, Started Displacement to the Police Station, and Removed.
12. Click Add Field Event to update the service unit.
The system displays a success message. If the "Removed" field event was selected, the unit is disassociated from the occurrence. All updates are logged in the occurrence report.
Note: If the asset representing a service unit is
deleted from the Organization module while it is not associated with an
occurrence, the service unit will be automatically removed from the list of
available units and will no longer be able to be associated with an occurrence.
However, if the asset is deleted while a dispatch is in progress, the service
unit will be marked with the Deleted Service Unit ( ) icon next to the occurrence in the
Assigned Units column. In addition, the "deleted" tag will be displayed
next to its name and the status of the dispatch will be set to "Cancelled". The
unit will continue to be listed next to the occurrence, until the occurrence is
completed.
) icon next to the occurrence in the
Assigned Units column. In addition, the "deleted" tag will be displayed
next to its name and the status of the dispatch will be set to "Cancelled". The
unit will continue to be listed next to the occurrence, until the occurrence is
completed.