1. Access the Administration module.
2. Select Integration Tasks from the Integrations option on the menu.
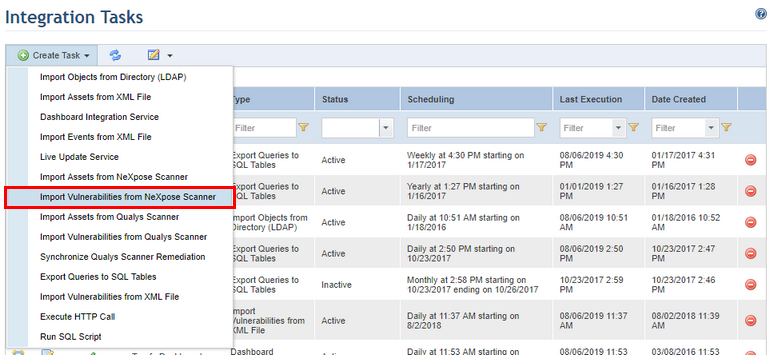
3. In the Integration Tasks section, click Create Task.
4. Select the Import Vulnerabilities from NeXpose Scanner option from the list that appears (see figure below).
The system displays the form that must be completed to create the new task (see figure below).
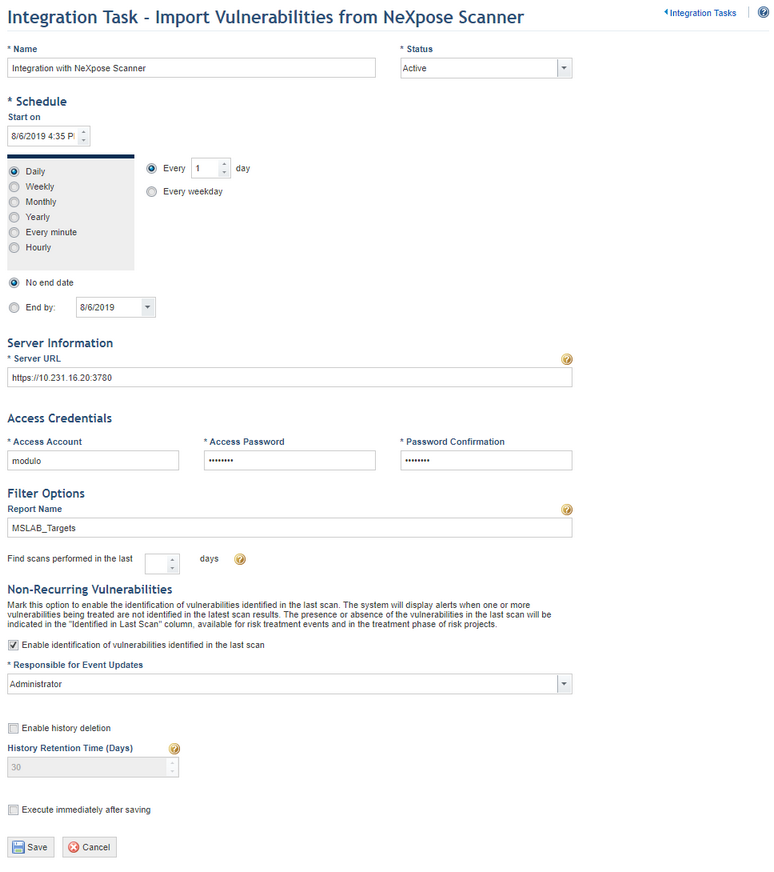
5. In the Name field, enter a name to identify the new integration routine.
6. In the Status field, determine the status of the new task. If you select Active, the routine will be activated immediately after it is created. If you select Inactive, the routine will be created but will not function until it is enabled.
7. You can create a schedule for the integration routine in the Schedule section. In the Start on field, enter a start date for the integration routine. Next, select one of the options (Daily, Weekly, Monthly, Yearly, Every minute, Hourly), to determine the frequency with which the task will be executed. The task can also be set to run only on week days or on weekends as well. In addition, it can be configured to have no end date by clicking the No end date option or configured to end by a certain date by completing the End by field. Note that some integration tasks may take more time to be executed than the option selected, which may result in performance problems.
8. In the Server Information section, enter the URL of the NeXpose server where the scanned information to be imported is located under the Server URL field.
9. In the Access Credentials section, valid account information must be provided to access the NeXpose server. These credentials will be encrypted in the database. In the Access Account field, enter the username for the account to access the NeXpose interface. In the Access Password field, enter the password for the NeXpose user account and reenter it in the Password Confirmation field. Note that only the vulnerabilities to which this user has access will be imported.
10. In the Filter Options section, you can specify the job name in the Scan Name field so that only NeXpose reports matching the name specified will be imported. This field works with a CONTAINS operator.
11. To indicate that only scans performed from a certain time period be imported, enter the number of days in the Find collections performed in the last x days field. This value cannot be greater than the time limit set for vulnerabilities to expire, configured in the Obsolete Elements section of this module. Only reports with dates that fit the time limit entered here will be imported, and any others will be disregarded. If this field is left blank, all reports generated within the time limit configured in the Obsolete Elements section will be imported.
12. In the Non-Recurring Vulnerabilities section, mark the Enable identification of vulnerabilities in the last scan checkbox if you want the system to display notifications when a vulnerability that was imported through the task being created and later sent to treatment is not found in a subsequent execution of this task. These notifications will appear in the risk project through which the vulnerability was sent to treatment, in the Home module for the user that was assigned as project leader, and in the Progress and Associations tabs of the event created to treat the vulnerability.
13. The progress of events will be updated if the vulnerabilities being treated were not identified in the most recent scan results. In the Responsible for Event Updates field, select a system user to be listed in the Updated By field in the Progress tab for this type of event update.
14. Mark the Enable history deletion checkbox if you want the system to automatically delete the execution history of the integration task after a certain number of days.
15. In the History Retention Time (Days) field, enter the number of days after which the history will be deleted. Note that the automatic deletion of the history deletes all of the task execution entries except for the most recent one.
16. Mark the Execute immediately after saving checkbox if you want the system to execute the task once it is saved. For subsequent executions the system follows the schedule set for the task.
17. When finished, click Save. If you want to quit the operation, click Cancel.
The system displays a success message.