1. Access the Administration module.
2. Select Integration Tasks from the Integrations option on the menu.
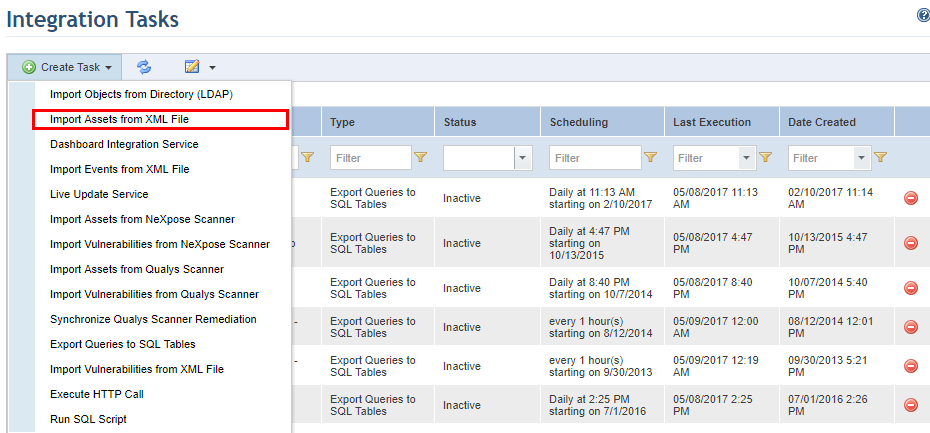
3. In the Integration Tasks section, click Create Task.
4. Select the Import Assets from XML File option from the list that appears (see figure below).
The system displays the form that must be completed to create the new task (see figure below).
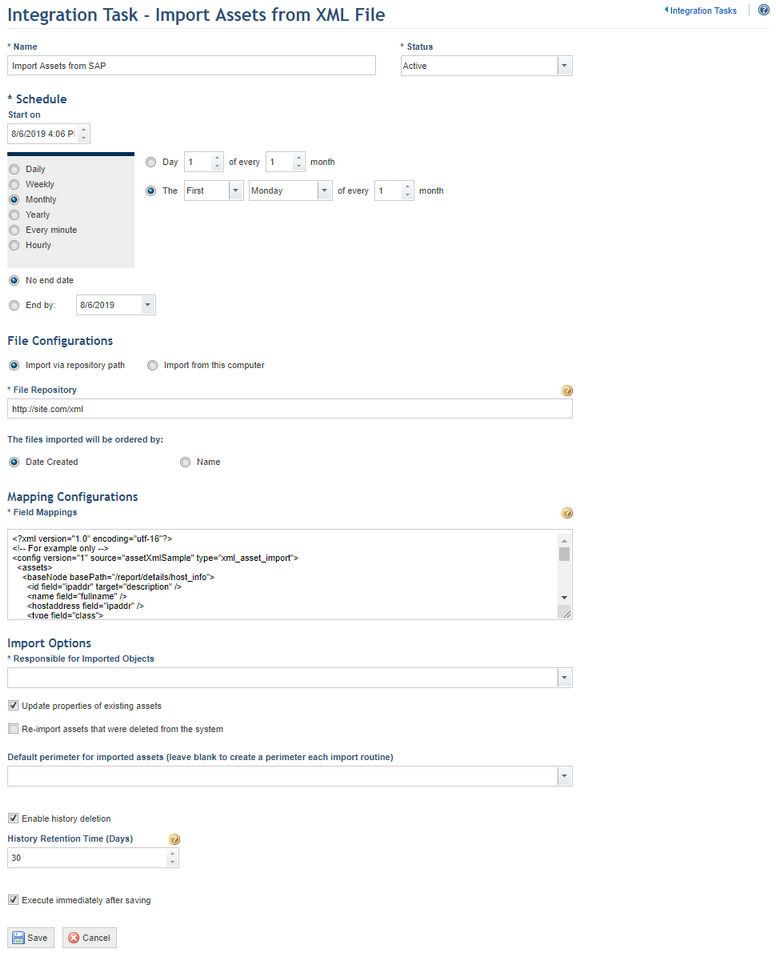
5. In the Name field, enter a name to identify the new integration routine.
6. In the Status field, define the status of the new task. If you select Active, the routine will be activated immediately after it is created. If you select Inactive, the routine will be created but will not function until it is enabled.
7. You can create a schedule for the integration routine in the Schedule section. This step is only applicable if you want to import XML files located in a remote repository. You can skip this step if you want to import XML files directly from your computer, since in this case the task will be executed immediately after being saved. In the Start on field, enter a start date for the integration routine. Next, select one of the options (Daily, Weekly, Monthly, Yearly, Every minute, Hourly), to determine the frequency with which the task will be executed. The task can also be set to run only on weekdays or on weekends as well. In addition, it can be configured to have no end date by clicking the No end date option or configured to end by a certain date by completing the End by field. Note that some integration tasks may take more time to be executed than the option selected, which may result in performance problems.
8. In the File Configurations section, select the Import via repository path option to import XML files that are located in a remote repository, such as a folder on the server or an online file.
9. In the File Repository field, enter the complete path of the repository in which the XML files to be imported are located. This field can be completed with a directory on the server where Modulo Risk Manager is hosted or a remote directory. It is important to ensure that this path is accessible by the service responsible for the integration. In other words, make sure that it is not blocked by firewalls or other devices.
10. Mark the Date Created option so that files are imported according to their creation date, from oldest to most recent. To order the files according to their names when they are imported, mark the Name option. In this case, you can change the names of the files to create a sequence, for example 001_name.xml, 002_name.xml, and so on.
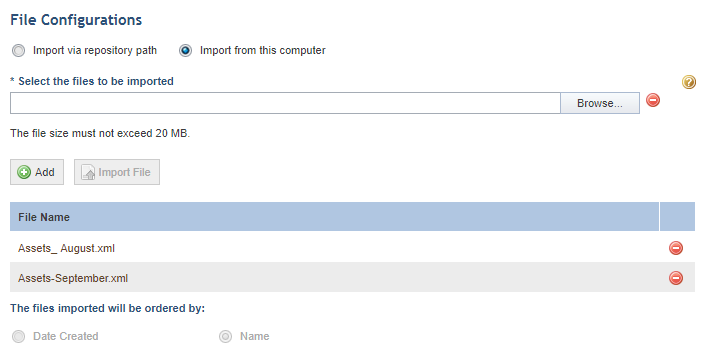
11. Again in the File Configurations section, select the Import from this computer option if you want to import XML files that are stored on the computer where the integration task is being created.
12. In the Select the files to be imported field, click Browse and select the XML files that contain the assets you want to import. The size of each file must not exceed 20 MB.
13. After selecting the files, click Import File.
The files are displayed in a list below (see figure below).
14.
To delete a file, click Delete ( ) next to its name.
15. The Name option is selected by default for the The files imported will be ordered by field. This ensures that the XML files located on your computer will be imported in alphabetical order.
16. In the Mapping Configurations section, provide the XML code that will allow the integration service to understand the structure of the XML files and establish a correspondence between the properties of the assets in the file and the properties and attributes of the assets in the system. To ensure unique identification of the imported assets, one of the objects in the XML file must be mapped to the ID field. For more information on mappings, see Appendix -> Mappings for Importing Assets from XML Files.
17. In the Import Options section, select a system user to be responsible for assets imported to the system through this integration task in the Responsible for Imported Objects field. Note that this user will not be assigned if a valid person was defined as responsible in the mappings.
18. Mark the Update properties of existing assets checkbox if you want the assets imported through this integration task to be updated with the latest information from the files. This will overwrite any changes you make to all properties of imported assets each time the integration task is executed. If this checkbox is not marked, the properties of the assets that were previously imported will not be updated, but the new assets will be imported.
19. Mark the Import previously deleted assets checkbox if you want the previously imported assets that had been deleted from the system or whose identifiers were changed to be recreated in the system. If this option is marked, the assets that are still available in the file will be recreated the next time the task is executed.
20. In the Default perimeter for imported assets field, you can select a parent or child perimeter to be the default location for all imported assets. If left blank, a new perimeter will be created each time the integration task is executed named "Imported from {source} [date + time imported]".
21. Mark the Enable history deletion checkbox if you want the system to automatically delete the execution history of the integration task after a certain number of days.
22. In the History Retention Time (Days) field, enter the number of days after which the history will be deleted. Note that the automatic deletion of the history deletes all of the task execution entries except for the most recent one.
23. Mark the Execute immediately after saving checkbox if you want the system to execute the task once it is saved. For subsequent executions, the system follows the schedule set for the task.
24. When finished, click Save. If you want to quit the operation, click Cancel.
The system displays a success message.