1. Access the Administration module.
2. Select Integration Tasks from the Integrations option on the menu.
3. In the Integration Tasks section, click Create Task.
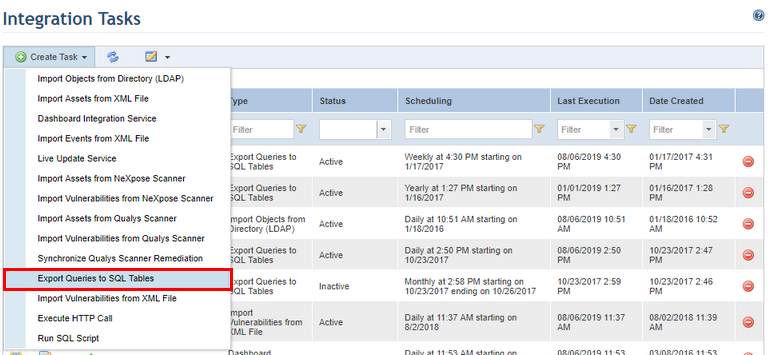
4. Select the Export Queries to SQL Tables option from the list that appears (see figure below).
The system displays the form that must be completed to create the new task (see figure below).
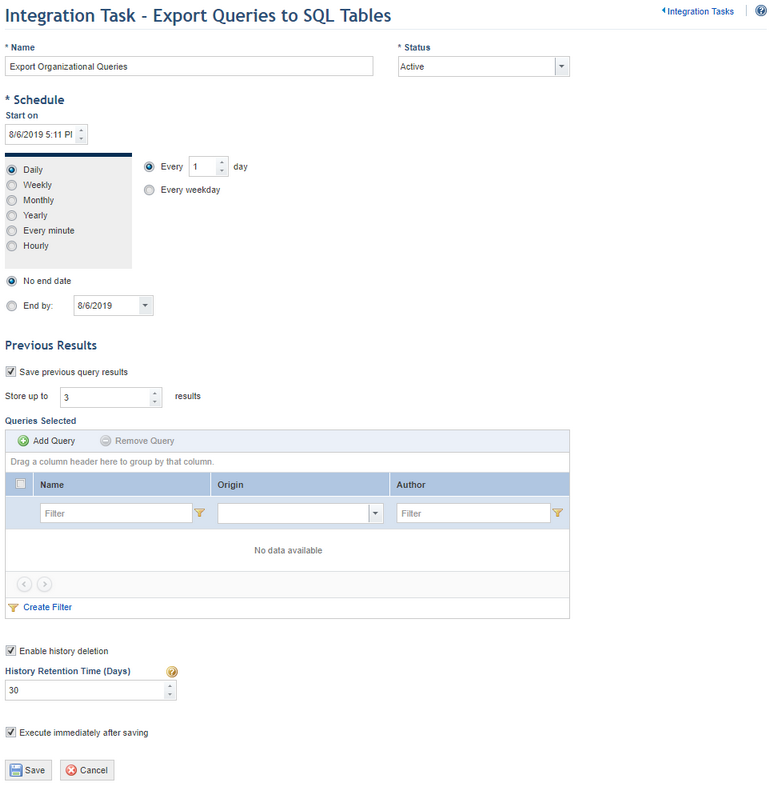
5. In the Name field, enter a name to identify the new integration routine using up to 400 characters.
6. In the Status field, determine the status of the new task. If you select Active, the routine will be activated immediately after it is created. If you select Inactive, the routine will be created but will not function until it is enabled.
7. You can create a schedule for the integration routine in the Schedule section. In the Start on field, enter a start date for the integration routine. Next, select one of the options (Daily, Weekly, Monthly, Yearly, Every minute, Hourly), to determine the frequency with which the task will be executed. The task can also be set to run only on weekdays or on weekends as well. In addition, it can be configured to have no end date by clicking the No end date option or configured to end by a certain date by completing the End by field. Note that some integration tasks may take more time to be executed than the option selected, which may result in performance problems.
8. In the Previous Results section, mark the Save previous query results checkbox to prevent new results from overwriting previous ones. In this case, the older query results will be stored in addition to the latest results once the task is executed, for as many times as it is specified. This means that if a query includes an asset in the scope and the task is executed three times, the SQL table for the query will contain three entries for the same asset. In this case, the "ExportDate" column of the table will indicate the date and time of when the integration task was executed, so you can tell apart the results. This feature is useful if you want to create charts and reports showing historical series.
9. In the Store up to # results field, select the number of past query results you want to store. If the task is executed more times than the number set here, this field will limit the results so that only the latest ones are considered. For example, if this field is configured to store up to two results and the task is executed three times, the latest result from the task will overwrite the first one and the table will only display query results from the second and third time the task was executed.
10. In the Queries Selected section, click Add Query to select the queries you want to export.
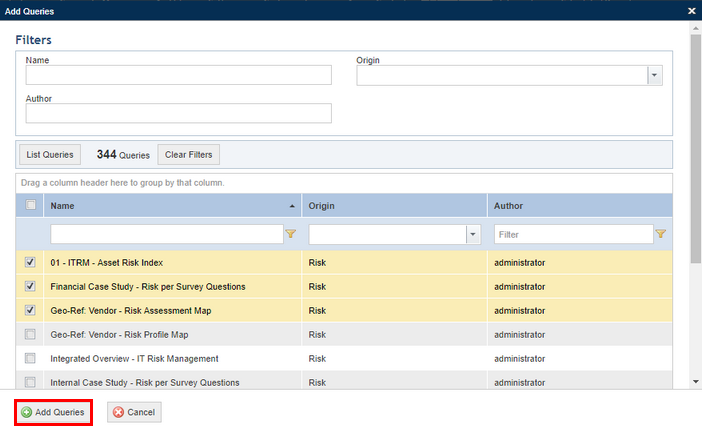
11. In the window that appears, mark the checkboxes next to the queries you want to include in this routine and click Add Queries (see figure below). If you want to quit the operation, click Cancel. Note that all types of queries created by all users from the ERM solution and from the Organization, Risk, Compliance, Workflow and Administration modules will appear as available for selection.
12. Mark the Enable history deletion checkbox if you want the system to automatically delete the execution history of the integration task after a certain number of days.
13. In the History Retention Time (Days) field, enter the number of days after which the history will be deleted. Note that the automatic deletion of the history deletes all of the task execution entries except for the most recent one.
14. Mark the Execute immediately after saving checkbox for the system to execute the task once it is saved. For subsequent executions, the system follows the schedule set for the task.
15. When finished, click Save. If you want to quit the operation, click Cancel.
The system displays a success message.