1. Access the Administration module.
2. Select Integration Tasks from the Integrations option on the menu.
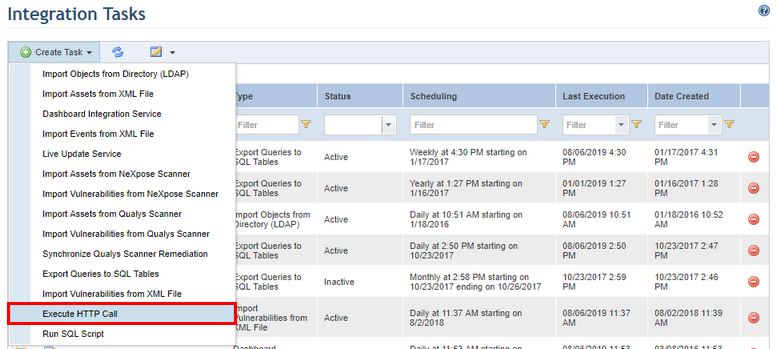
3. In the Integration Tasks section, click Create Task.
4. Select the Execute HTTP Call option from the list that appears (see figure below).
The system displays the form required to create the new task (see figure below).
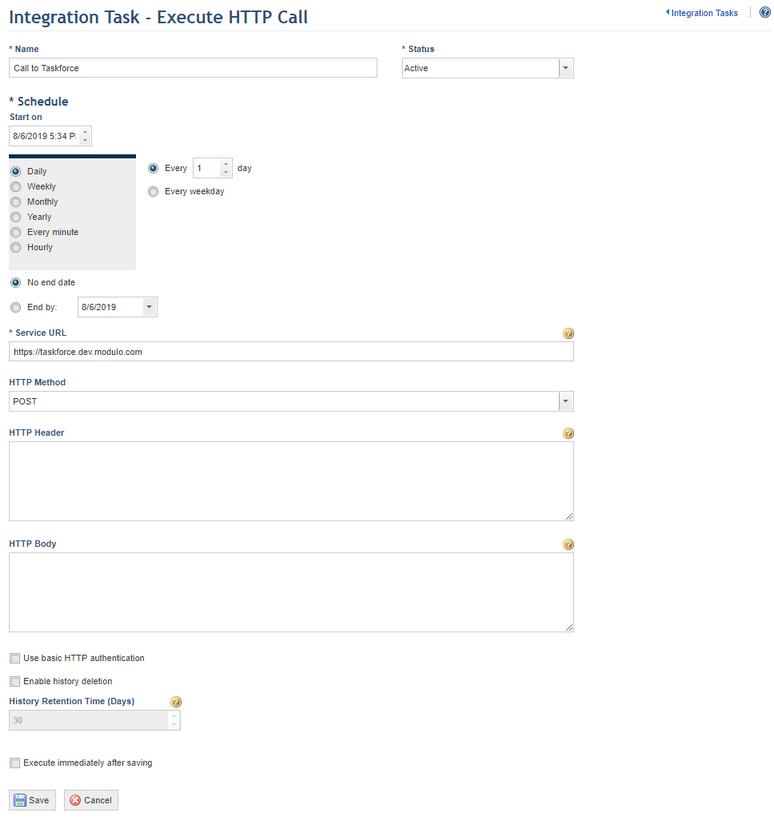
5. In the Name field, enter a name to identify the new integration routine.
6. In the Status field, determine the status of the new task. If you select Active, the routine will be activated immediately after it is created. If you select Inactive, the routine will be created but will not function until it is enabled.
7. You can create a schedule for the integration routine in the Schedule section. In the Start on field, enter a start date for the integration routine. Next, select one of the options (Daily, Weekly, Monthly, Yearly, Every minute, Hourly), to determine the frequency with which the task will be executed. The task can also be set to run only on week days or on weekends as well. In addition, it can be configured to have no end date by clicking the No end date option or configured to end by a certain date by completing the End by field. Note that some integration tasks may take more time to be executed than the option selected, which may result in performance problems.
8. In the Service URL field, enter the URL of the REST service representing the service address. Parameters can be sent in the following format: http://www.service.com?parameter={value}&anotherparameter={value 2}. This field is required.
9. In the HTTP Method field, choose one of the available request methods to enable communications with the server.
10. In the HTTP Header field, enter a header to send any additional information to the service. For example, you can specify the character sets that are acceptable in the response by using the Accept-Charset field or specify the user agent using the User-Agent field.
11. Mark the Use basic HTTP authentication checkbox if you want to use basic authentication to access the service. Note that this option cannot be marked if authentication credentials have been specified through an Authorization header in the HTTP Header field, otherwise an error will occur when the task is executed.
12. In the Access Credentials area that appears, enter the client’s username, password, and password confirmation in the Access Account, Access Password, and Password Confirmation fields, respectively.
13. Mark the Enable history deletion checkbox if you want the system to automatically delete the execution history of the integration task after a certain number of days.
14. In the History Retention Time (Days) field, enter the number of days after which the history will be deleted. Note that the automatic deletion of the history deletes all of the task execution entries except for the most recent one.
15. Mark the Execute immediately after saving checkbox for the system to execute the task once it is saved. For subsequent executions the system follows the schedule set for the task.
16. When finished, click Save. If you want to quit the operation, click Cancel.
The system displays a success message.