 )
(see figure below).
)
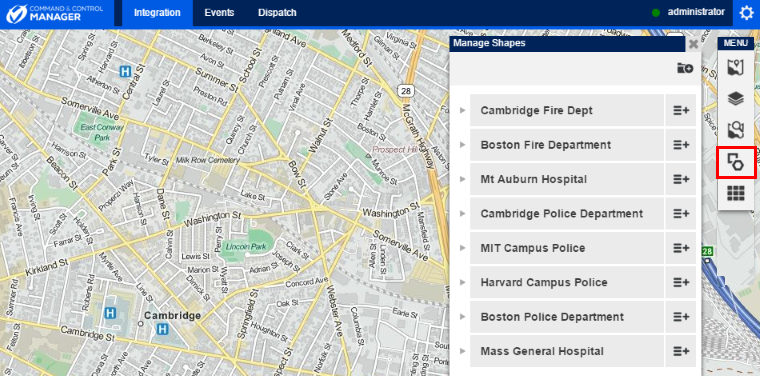
(see figure below).This section explains how to draw and manage shapes to be displayed on the map. These shapes can be of different types (line, polygon, circle, or rectangle) and can be used to outline specific areas or routes, for example. An outline and background color can be defined for each shape, as well as a name and the opacity level.
Shapes are stored in folders in the Manage Shapes window. A folder can have up to four levels of subfolders, with each folder containing any number of subfolders and shapes. Both folders and shapes can only be edited and deleted by their authors. However, you can create new folders and shapes under a folder of which you are not the author.
Each shape can be enabled and disabled for display individually, with no limit as to the number of shapes that can be enabled simultaneously. The author can define whether the shapes will be public, so other users may view them, or private, so they are disabled to other users. Note that the map must be refreshed to see changes made by other users.
1. Access the Integration module, the Events solution, or the Dispatch solution.
2. Click Integration Map, View Event and Activity Map, Manage Calls, Manage Dispatches, or Monitoring.
3.
In the side menu to the right, click Manage Shapes ()
(see figure below).
4.
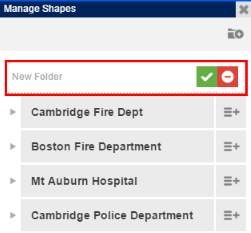
To create a new folder of shapes, click Create Folder ( )
in the upper right corner of the Manage Shapes window.
)
in the upper right corner of the Manage Shapes window.
5.
Enter the name of the new folder using up to 20 characters and click Save
( ). Folders by the same author must be
created under unique names, however folders from different authors may have the
same name. If you want to quit the operation, click Cancel (
). Folders by the same author must be
created under unique names, however folders from different authors may have the
same name. If you want to quit the operation, click Cancel ( )
(see figure below).
)
(see figure below).
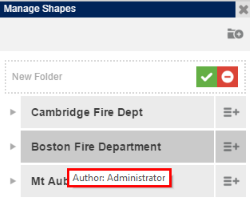
The system displays a success message.
Note: The tooltip for each folder displays its author’s name (see figure below).
6.
To edit or delete the folder or to create new content in it, click Menu
( ) next to its name in the Manage
Shapes window (see figure below). Keep in mind that you can only edit,
rename, and delete folders of which you are author.
) next to its name in the Manage
Shapes window (see figure below). Keep in mind that you can only edit,
rename, and delete folders of which you are author.
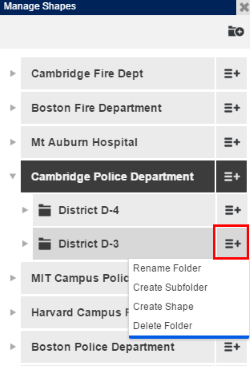
Note: All users with access to this feature can create shapes and subfolders in any folder. If a folder you registered contains a subfolder or shape created by another user, you will not be able to delete it until those are removed by their author.
7.
To rename a folder, select the Rename Folder option, enter a new name for
the folder using up to 20 characters, and click Save ().
If you want to quit the operation, click Cancel ().
8.
To create a subfolder in the folder selected, select Create Subfolder,
enter the name of the new folder using up to 20 characters, and click
Save (). Subfolders by the same author must
be created under unique names, however subfolders from different authors may
have the same name. If you want to quit the operation, click Cancel
().
9. When the Create Shape option is selected, a window is displayed where information on the new shape can be provided (see figure below).
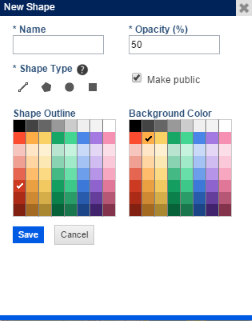
10. In the Name field, enter a name to identify the shape using up to 20 characters. Shapes by the same author must be created under unique names, however shapes from different authors may have the same name.
11. In the Opacity (%) field, enter the percentage of transparency the shape will have against the map.
12. In the Shape Type field, select the type of shape to be created (line, polygon, circle, or rectangle). Note that the shape type cannot be changed once saved. After the type is defined, the system enables the drawing tool on the map.
13. Mark the Make public checkbox if you want other users to be able to locate and view the shape on the map. If this checkbox is left unmarked, the shape will remain listed in the Manage Shapes window, but will be disabled for all users, except its author. Keep in mind that shapes can only be edited and deleted by their authors.
14. In the Shape Outline field, select the color for the outline of the shape.
15. In the Background Color field, select the color to fill the shape.
16. To begin drawing the shape, mouse over its starting point on the map and follow the instructions that appear (see figure below). You can click and drag the points that appear to edit the shape, if necessary.
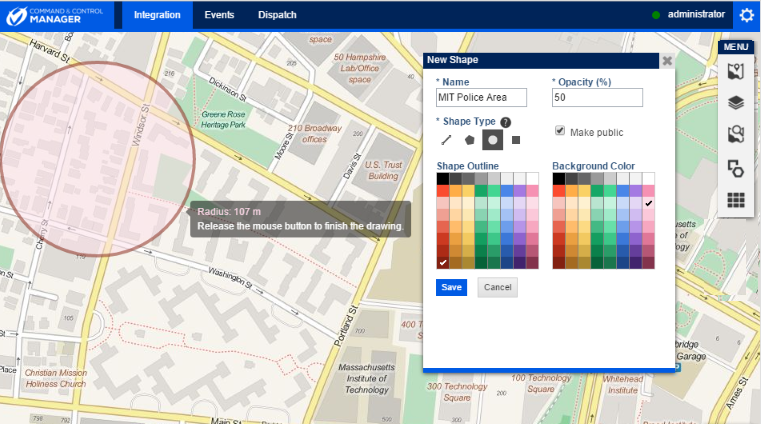
17. When finished, click Save. If you want to quit the operation, click Cancel.
The system displays a success message and the shape is displayed in the corresponding folder in the Manage Shapes window. Note that you can see the name of the user who created the shape by hovering the mouse over its name in the window.
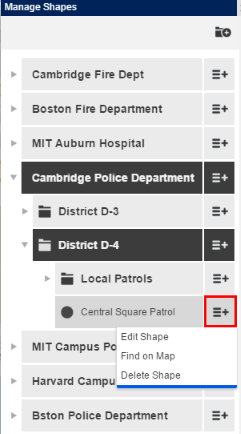
18. To enable or disable the shape for display, click its name in the Manage Shapes window. Enabled shapes are shown in blue in the window, disabled shapes in gray.
19. To edit,
locate, or delete the shape, click Menu ()
next to its name in the Manage Shapes window and select the
respective option (see figure below).
20. To edit the shape, select the Edit Shape option, make the necessary changes in the window that appears and click Save. If you want to quit the operation, click Cancel. Note that the location, size, and perimeter of the shape itself can be edited on the map by clicking and dragging the shape and its outline until it reaches the desired location and size.
The system displays a success message.
21. To delete the shape, select the Delete Shape option, and, in the pop-up that appears, click Delete Shape to confirm (see figure below). If you want to quit the operation, click Cancel.
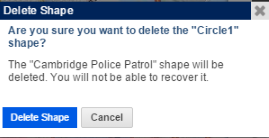
The system displays a success message.