This topic explains how to use the Assets section from the Organization module to create and edit assets. Note that assets must always be created within perimeters.
1. Access the Organization module.
2. Select Manage Assets from the Assets option on the menu.
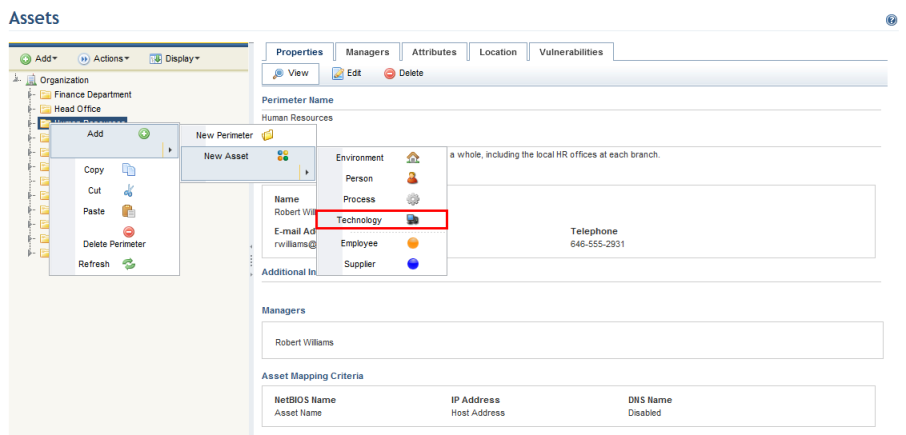
3. In the Assets section, right-click the perimeter or sub-perimeter in which you want to create an asset, click Add, select the New Asset option, and select the type of asset you want to create (see figure below).
Note: Custom asset types created in the Administration module are also available for selection here.
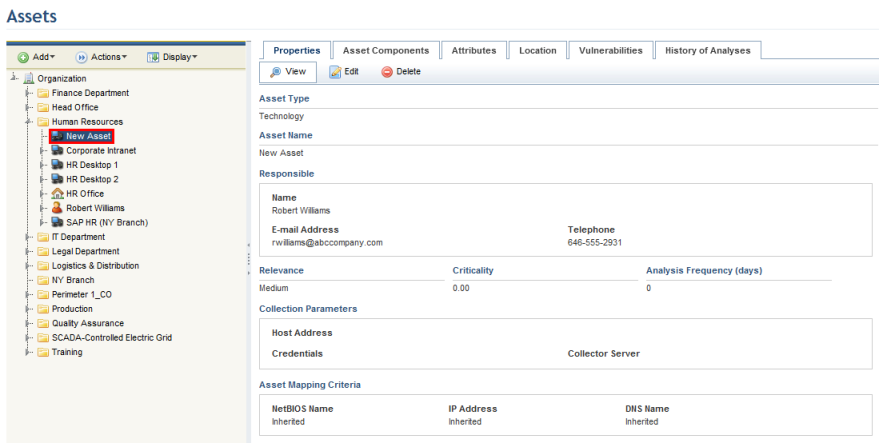
The system displays the new asset in the organizational structure (see figure below) and automatically completes some information. By default, the name of the new asset will be "New Asset", and the person assigned as responsible for it will be responsible for the perimeter in which it was created.
4. To edit the asset, click Edit in the Properties tab.
The system displays an area where its properties can be edited (see figure below).
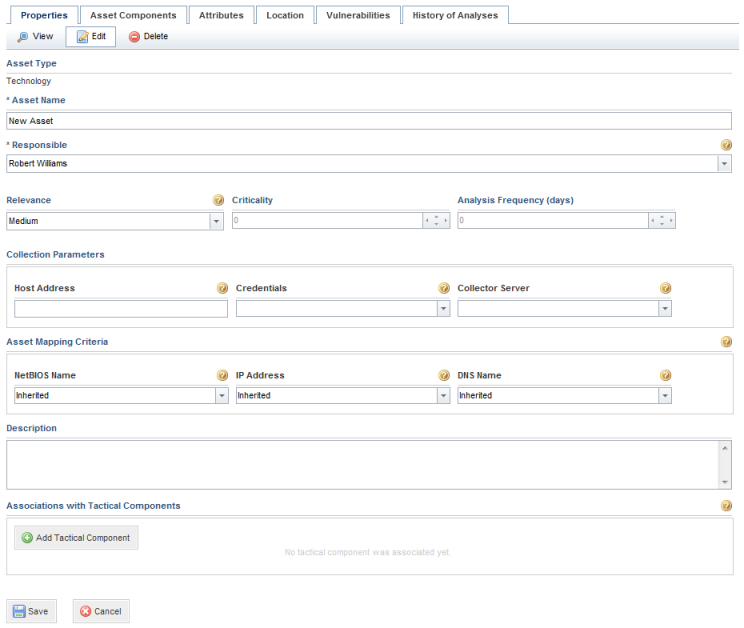
5. In the Asset Name field, enter a name for the asset using up to 400 characters.
6. In the Responsible field, select someone previously registered in the system that will be responsible for the asset. This person will be responsible for ensuring that the assets under their responsibility are being monitored in terms of their risks and compliance with requirements internal and external to the organization. By default, this role receives permission to view the organizational structure and run queries, though only considering the assets to which they were assigned. Also keep in mind that the person must be included in the Organization Module Users profile to gain access to the module.
7. In the Relevance field, select the level of importance of the asset to the organization’s business. This is scored on a five-level scale: Very Low, Low, Medium, High, and Very High. By default, the relevance is scored as Medium when an asset is created. This field is important as this information is used to generate risk metrics for the asset. The names of these options may vary if they were customized in the Scales section of the Administration module.
8. In the Criticality field, select the organization’s level of dependence on the asset, if it is needed during a crisis, on a scale of 0 (low) to 100 (high).
9. In the Analysis Frequency (days) field, set the frequency with which asset risk analyses should be performed in terms of the number of days.
10. In the Collection Parameters section, specify the host address for the asset in the Host Address field. This field is optional and is only displayed for technology assets whose components will be associated with technology knowledge bases that support automated collections. This information will be used by default if an automated collection is scheduled for one of the asset’s components, and can be edited before the request for the collection is sent.
11. In the Collection Parameters section, select a set of credentials (previously registered in the Credentials section of the Administration module) in the Credentials field. This field is optional and is only displayed for technology assets whose components will be associated with technology knowledge bases that support automated collections. This information will be used by default when scheduling an automated collection for the asset’s components, and can be edited before the request for the collection is sent.
12. In the Collection Parameters section, select a collector server (previously registered in the Administration module) in the Collector Server field. This field is optional and only displayed for technology assets whose components will be associated with technology knowledge bases that support automated collections. This information will be used by default when scheduling an automated collection for the asset’s components, and can be edited before the request for the collection is sent.
13. In the Asset Mapping Criteria section, you can specify which information from which fields in the system will be used to map the technology asset with the corresponding machine analyzed by vulnerability scanners. The system can use three pieces of information to correctly match a vulnerability identified by a scanner for a certain machine with the corresponding asset in the system: the NetBIOS name, the IP address, and the DNS name. In some cases, all three must be matched so a vulnerability can be attributed to the correct asset, while in others one is enough to identify it. These fields are optional, are only displayed for technology assets, and should only be completed if vulnerabilities will be imported and mapped to assets through integration tasks or manually through the spreadsheet.
14. In the NetBIOS Name field, you can specify which information from which field will be used to map the NetBIOS name identified for the target machine by the scanners to its corresponding asset in the system. The options are:
•Inherited: the asset will inherit the mapping criteria specified for the parent perimeter. By default, perimeters are configured to map the NetBIOS name through the asset’s name.
•Disabled: this option disables attempts at mapping through the NetBIOS name, which helps reduce system resource use if you are sure the asset can be correctly matched through the IP address or the DNS name alone.
•Asset Name: the asset will be mapped by its name. In this case, the asset’s name in the system must be identical to its NetBIOS name in the scanners.
•Host Address: the asset will be mapped via information entered in the Host Address field. In this case, the asset’s NetBIOS name in the scanners must be identical to the information entered in the Host Address field.
•Technology asset attributes: aside from the above options, this list will also contain the names of any text attributes created for technology assets in the Administration module. In this case, the NetBIOS name will be mapped via information entered for the asset attribute selected. The information entered in the attribute field must then be identical to its DNS name in the scanners.
15. In the IP Address field, you can specify which information from which field will be used to map the IP address identified for the target machine with its corresponding asset in the system. The options are:
•Inherited: the asset will inherit the mapping criteria specified for the parent perimeter. By default, perimeters are configured to map the IP address via information entered in the Host Address field.
•Disabled: this option disables attempts at mapping through IP addresses, which helps reduce system resource use if you are sure the asset can be correctly matched through the NetBIOS or DNS names alone.
•Asset Name: the asset will be mapped by its name. In this case, the asset’s name in the system must be identical to its IP address in the scanners.
•Host Address: this option maps the asset via information entered in the Host Address field. In this case, the asset’s IP address in the scanners must be identical to the information entered in the Host Address field.
•Technology asset attributes: aside from the above options, this list will also contain the names of any text attributes created for technology assets in the Administration module. In this case, the IP address will be mapped via information entered for the asset attribute selected. The information entered in the attribute field must then be identical to its IP address in the scanners.
16. In the DNS Name field, you can specify which information from which field will be used to map the DNS name identified for the target machine with assets in the system. The options are:
•Inherited: the asset will inherit the mapping criteria specified for the parent perimeter. By default, perimeters are configured to disable mapping via DNS names.
•Disabled: this option disables attempts at mapping through DNS names, which helps reduce system resource use if you are sure the asset can be correctly matched through the NetBIOS name or IP address alone.
•Asset Name: the asset will be mapped by its name. In this case, the asset’s name in the system must be identical to its DNS name in the scanners.
•Host Address: this option maps the asset via information entered in the Host Address field. In this case, the asset’s DNS name in the scanners must be identical to the information entered in the Host Address field.
•Technology asset attributes: aside from the above options, this list will also contain the names of any text attributes created for technology assets in the Administration module. In this case, the DNS name will be mapped via information entered for the asset attribute selected. The information entered in the attribute field must then be identical to its DNS name in the scanners.
17. In the Description field, enter a description for the asset in question.
18. In the Associations with Tactical Components section, click Add Tactical Component to associate tactical components with the asset. These associations will be reflected in the Business Components section of this module.
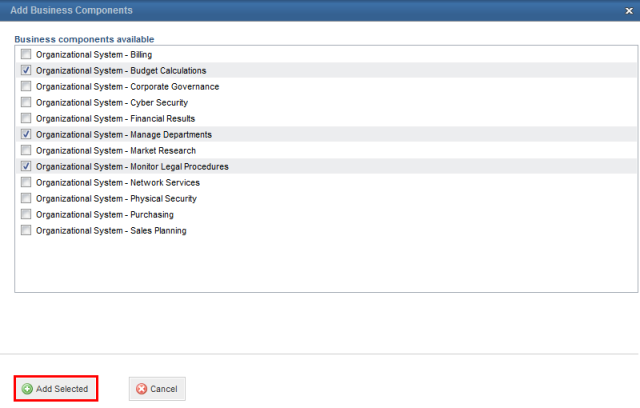
19. In the window that appears, mark the checkboxes next to the tactical business components you want to associate with the asset and click Add Selected (see figure below).
20. To remove associations between tactical business components and assets, click Remove next to the tactical component you want to remove.
21. When finished, click Save. If you want to quit the operation, click Cancel.
The system displays a success message.