This section provides orientation on how to make the necessary configurations for service units.
Service units correspond to assets in the system representing mobile units that can be dispatched to the location of an incident, such as a police car or an ambulance. These can be associated with occurrences and managed through the map in the Dispatch solution. For service units to be available in the system, you must first make the necessary configurations. These include registering assets in the Organization module, creating an asset query that will be used as a data source for the layer of service units in the map, configuring the layer in the XMl file, and granting permission to the query for those who need to view service units in the Integration, Dispatch, or Events map. In addition, each unit must be previously associated with a dispatch group and have some of its attributes completed.
In some system installations, service units may be classified by police type (activity and sector). In these environments, the SQL_PMERJ_Setores.sql query must be run for the police type to be available in the system, allowing police cars to be assigned. For more information, contact your account manager.
This section provides step-by-step instructions on how to register and configure service units. For detailled information on creating and managing assets and organizational queries, see Chapter 3: Organization -> Assets -> Manage Assets and Chapter 3: Organization -> Organizational Queries.
1. Access the Organization module.
2. Select Manage Assets from the Assets option on the menu.
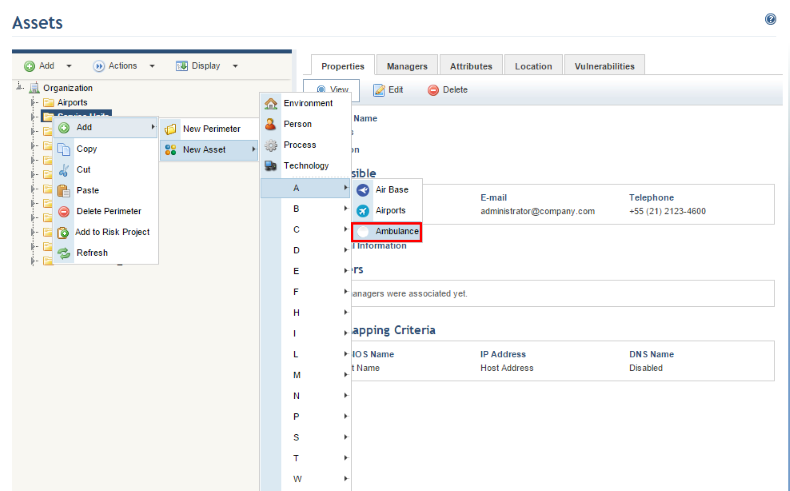
3. In the Assets section, right-click the perimeter in which you want to create an asset, click Add, select the New Asset option, and select one of the following asset types specific to service units: Ambulance, Civil Police Car, Federal Police Car, Fire Truck, Highway Police Car, Military Police Car, Police Escorts, and SAMU Ambulance (see figure below). These types are provided with the installation of the Dispatch solution and should not be edited nor deleted.
Note: Custom asset types can be selected when creating an asset for a service unit. However, for assets of custom types to be displayed on the map, in addition to creating the type in the Object Types section of the Administration module, you must also configure its pop-up template and icon in the MapQueriesConfig.xml file, which can be found in the CCM installation folder. To do so, open the CCM/APP_DATA/ file and make the appropriate changes. For more information on these configurations, see Appendix -> Layers for the Integration Map -> How to Configure an Icon for a Layer and How to Configure a Pop-Up Template for a Layer.
The system displays the new asset in the organizational structure, where you can enter a new name for it.
4. Enter a name for the asset using up to 400 characters and, when finished, press Enter.
The system displays a success message.
Note: Some attributes specific to service units are available by default with the installation of the Dispatch solution. These are applied only to default asset types for service units and are listed as fields in the Attributes tab of each asset, together with any custom attributes created in the Objects and Attributes section of the Administration module.
The following steps explain how to complete the default attributes for service units. These fields will not be available for assets of custom types created in the Object Types section of the Administration module. For information on how to complete custom attributes, see Chapter 17: Administration -> Customizations -> Objects and Attributes -> How to Create an Attribute for an Object (Except Events).
5. Click the Attributes tab to view and edit the values of the asset attributes.
6. The Assignment field displays the internal identifier of the assignment of people in the police car and should not be edited. This field will only be available if the feature to assign service units is enabled.
7. In the Dispatch Group or Dispatch BPM field, select the dispatch group with which the unit will be associated.
Note: All groups of people will be listed, but only those with the "IsDispatchGroup" tag in their additional information will be displayed in the Dispatch solution.
8. The Date of Location Update field indicates the date when the location of the asset was last updated. The date and time respects the following format: mm/dd/yyyy hh:mm tt. This field will be automatically completed for assets that have a GPS device integrated with the system.
9. The Dispatch field is read-only and displays information on the dispatch request associated with the unit.
10. In the Equipment field, enter information on the equipment items that are in the service unit. For example, 2 oxygen masks and one stretcher.
11. In the Garrison field, enter information on each person who is currently in the service unit, such as their names or security numbers. In installations where the feature to assign service units is not enabled, this field should only be completed once, when the service unit is created. To prevent error, any changes to it should be made through the Edit Garrison feature in the Service Units tab (or Police Cars tab, depending on your installation) of the map in the Dispatch solution. If the assignment feature is available, this field should not be completed and the garrison must be edited through the Police Car Assignment section of the Dispatch solution.
12. If a radio communication system is available in the service unit, in the Radio field, enter its extension number.
13. The People Assigned field is read-only and displays information on the people assigned to the unit. This field will only be available if the feature to assign police cars is enabled.
14. The Reason for Removal field displays the reason provided for units that are out of service. This field should not be edited and will only be available if the feature to assign service units is enable.
15. The Status field displays a numerical value that indicates the status of the service unit and should not be edited. In installations without the feature to assign service units, the statuses and the numbers that represent them are: Available - 0, En Route - 1, On Site - 2, and Unavailable - 3. In installations where this feature is available, the values are: Available - 0, Assigned - 1, Out of Service - 3, Temporary Removal - 4.
IMPORTANT! If the feature to assign service units is enabled, when creating the asset, the status should be completed with the value Out of Service - 3 so that people can be assigned to the service unit. After that, this field should not be manually completed or edited. Once all the necessary configurations for service units are in place, the system will automatically update the status of the service unit with the corresponding numerical value. Any changes to this field may lead to error in the system.
16. In the Registration Number field, enter the identifier that is used to monitor the location of the service unit. This field should only be completed if a tracking service is integrated with the system. By default, the registration number is comprised of the GPS provider ID, a dash, and the equipment ID, which can be the serial number of a device. For example, if the values provided for the following variables are GPSProviderID: 1000 and EquipmentGPSUnitID: A682567, the registration number would be 1000-A682567. To customize the format of the registration number, get in touch with your account manager.
Note: Each asset must have a defined location in order to be displayed on the map. The location can be manually provided and updated through the Location tab of the asset or, if a GPS tracking service is integrated with the system, the real-time locations of service units can be automatically updated in the system, using the registration number provided in the field above. If a tracking service is not integrated with the system, the location displayed for each unit will be the static information entered in the Location tab of each asset.
Should a location be manually provided for an asset and the Registration Number field also be completed, the system will use the later location. For more information on how to integrate a tracking service with the system, contact your account manager.
17. If a telephone device is available in the service unit, in the Telephone field, enter the area code and the phone number of the device, separated by a space.
18. If the asset belongs to a subgroup of the main group, use the Subgroup field to identify it.
Note: All groups of people will be listed, but only those with the "IsDispatchGroup" tag in their additional information will be displayed in the Dispatch solution.
19. When finished, click Save at the end of the page. If you want to quit the operation, click Cancel.
The system displays a success message.
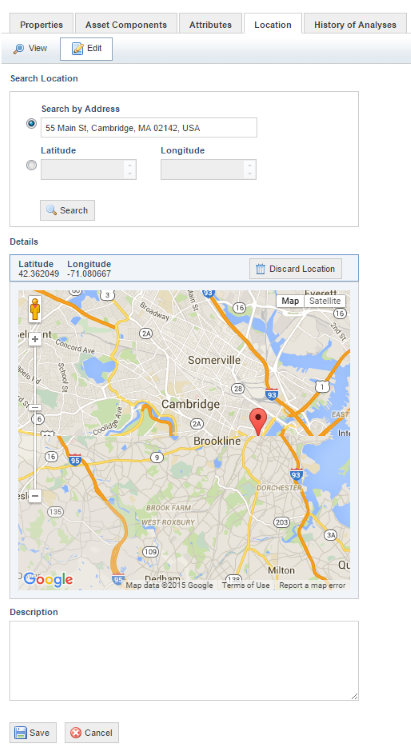
20. To manually provide a location for the asset, click the Location tab, and then click Edit.
21. If you want to search the location by address, select the Search by Address option and enter the address information where the service unit is located in the selected field.
22. Click the correct option that appears on the dropdown menu. The latitude and longitude appear by default on the top part of the map (see figure below).
23. If you want to search the location by coordinates, select the Latitude / Longitude option.
24. In the Latitude field, enter the latitude of the location where the asset is located using a number between -90 and 90 with up to 6 decimal places.
25. In the Longitude field, enter the longitude of the location where the asset is located using a number between -180 and 180 with up to 6 decimal places.
26. Click Search to view the coordinates entered in the Latitude and Longitude fields.
27. In the Description field, enter any pertinent information on the location of the asset using up to 1,000 characters.
Note: Another way to indicate the location of an asset
is by dragging the red pin ( ) to the desired location. The
corresponding coordinates will automatically be updated.
) to the desired location. The
corresponding coordinates will automatically be updated.
28. When finished, click Save. If you want to quit the operation, click Cancel.
The system displays a success message. After a location is provided for the asset, an organizational query to assets must then be created, so it can be used as a data source for a map layer.
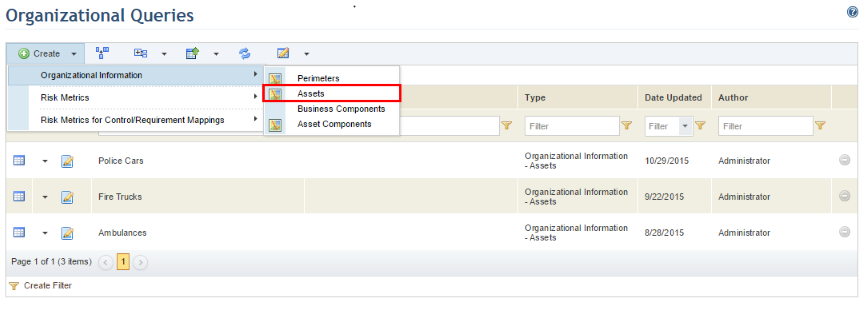
29. In the Organization module, click List Queries from the Queries section.
30. In the Organizational Queries section, click Create.
31. Select the Organizational Information option and then select the Assets option from the list that appears (see figure below).
The system displays the Scope step in the wizard for creating queries, where the assets to be queried can be selected (see figure below).
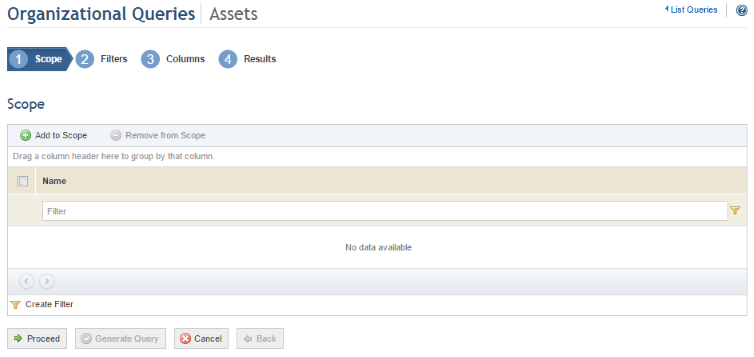
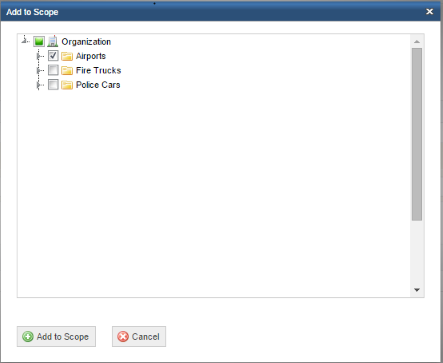
32. Click Add to Scope to select the assets that will be included in the scope of the query.
The system displays the assets registered in the Organization module.
33.
Click Expand ( ) to view the complete structure.
34. Select the assets you want to include in the scope by marking the checkboxes next to each and, when finished, click Add to Scope (see figure below). If you want to quit the operation, click Cancel.
35. To remove an asset from the scope, mark the checkbox next to it and click Remove from Scope.
36. When finished, click Proceed to continue creating the query. If you want to quit the operation, click Cancel.
When Proceed is clicked, the system displays the Filters step in the wizard for creating the query, where the filters to be used can be selected, which will reduce the information used to display the results (see figure below).
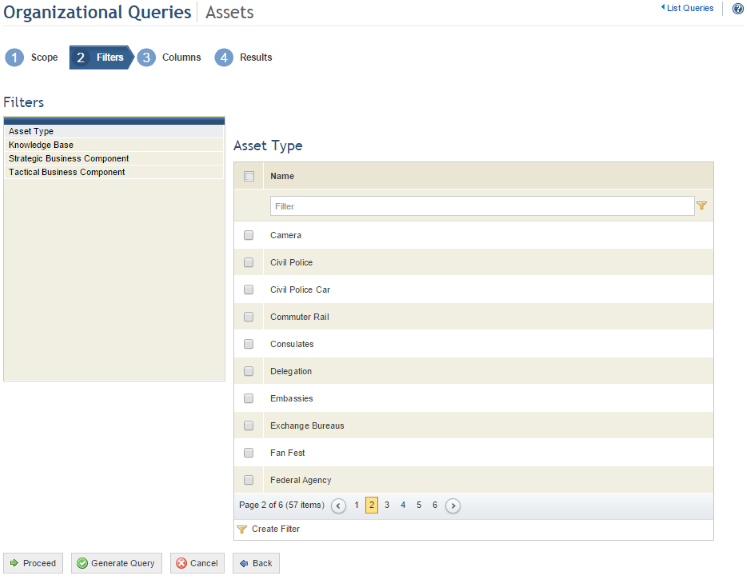
37. Select the Asset Type filter option on the left and mark the checkboxes next to the asset types you want to be displayed on the map. It is important that you filter the query by only the asset types specific to the service units added to the scope of the query. If assets from other types are included, an error may occur and affect the query results.
38. After selecting the filters, click Proceed to continue creating the query. If you want to cancel query creation, click Cancel. To return to the previous step, click Back.
When Proceed is clicked, the system displays the Columns step, where the columns to be displayed in the query results can be selected (see figure below).
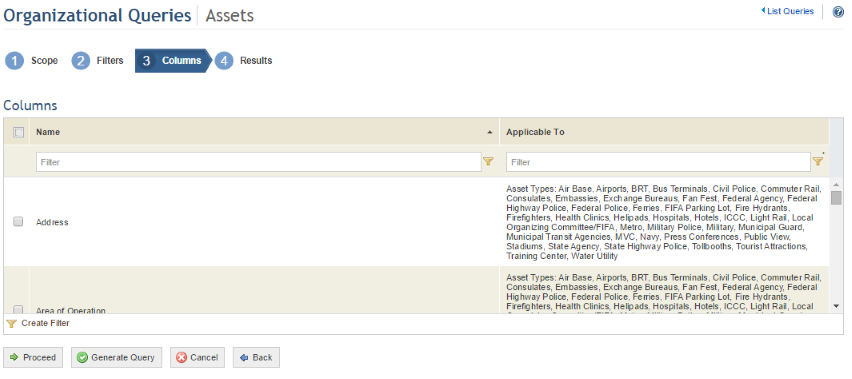
39. Select the columns to be included in the query by marking the checkboxes next to each. The Applicable To column indicates which asset types the attribute applies to. The following columns must be included in the query results: Asset ID (ID), Asset Type, Date of Location Update, Dispatch, Dispatch Group (or Dispatch BPM), Equipment, Garrison, Latitude, Longitude, Mobile, Name, Radio, Registration Number, and Status. If the feature to assign service units is enabled, the following columns must also be included: Assignment, Reason for Removal, People Assigned, and Subgroup.
Note: Attributes created for assets in the Administration module are available as column options. However, for them to be displayed on the map, in addition to being included in the query, they also need to be configured in the pop-up template for the service unit layer. For more information, see Appendix -> Layers for the Integration Map -> How to Configure a Pop-Up Template for a Layer.
40. When finished, click Proceed or Generate Query to continue to the next step in the wizard for creating the query. If you want to cancel query creation, click Cancel. To return to the previous step at any point during this wizard, click Back.
The system displays the results of the query (see figure below).
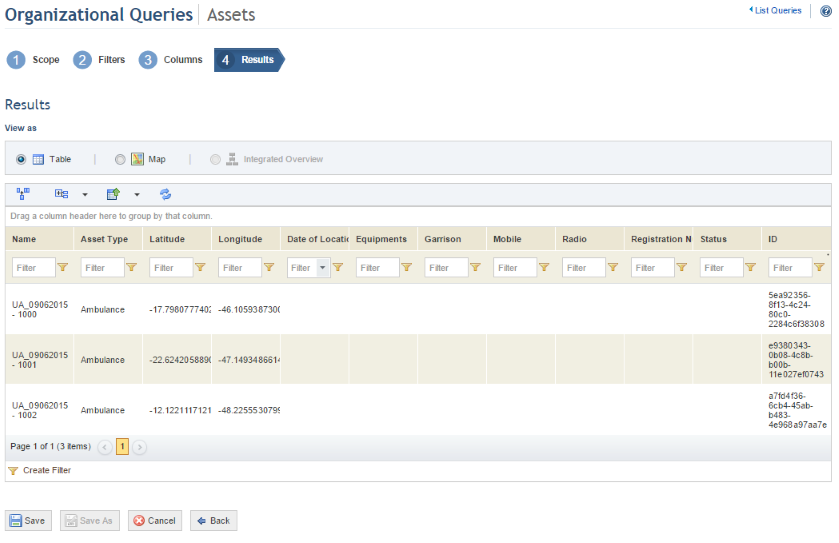
41. Select the format in which you want the query results to be displayed by marking the Table option to view the results listed in a table or the Map option to view the assets plotted on a map.
Note: If the table option is selected, any assets included in the query that do not have a defined location will be displayed in the Dispatch Requests and Service Units tabs of the Manage Dispatches section of the Dispatch solution, but will not be plotted on the map. If assets without a location are included in the query and the query is saved in the map format, in addition to not being displayed on the map, they also won’t be displayed in these tabs.
42. Click Save to save the query data. If you do not want to save the query, click Cancel. To return to the previous step, click Back.
The system displays a window where the name and description for the query can be entered (see figure below).
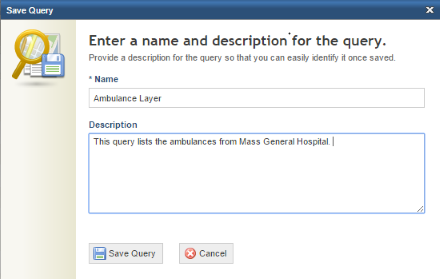
43. In the Name field, enter a name to identify the query, using up to 50 characters. Note that its name must be the same as the one configured for the layer of service units in the MapQueriesConfig.xml file, which can be found in the CCM installation folder.
IMPORTANT! Although queries may be created under the same name, to avoid errors it is recommended that, for installations that are integrated with a tracking service, unique names be created for each.
44. In the Description field, enter the main characteristics of the query, using up to 4,000 characters.
45. When finished, click Save Query. If you want to quit the operation, click Cancel.
The system displays a success message. Once the query is saved, it must be configured as a layer in the QueryLayer node of the XML file for layers. Keep in mind that, if the system is integrated with a GPS service, the QueriesCacheServer parameter must be completed with the URL of the Modulo Integration Service so that units can be plotted in each layer. For details on each parameter used to configure a layer, see Appendix -> Layers for the Integration Map -> How to Configure a Query Layer.
Note: Keep in mind that you will only be able to view on the map the service units included in the queries of which you are the author, editor, or an audience member. For this reason, it is necessary for the people who need access to the service unit layers to be assigned as query editors or audience members. Likewise, the dispatch groups responsible for managing service units must have permission to the query, or the dispatchers will not be able to view the service units. In addition to permission to the query, specific permissions are also required to access each solution and to navigate through their sections.
46.
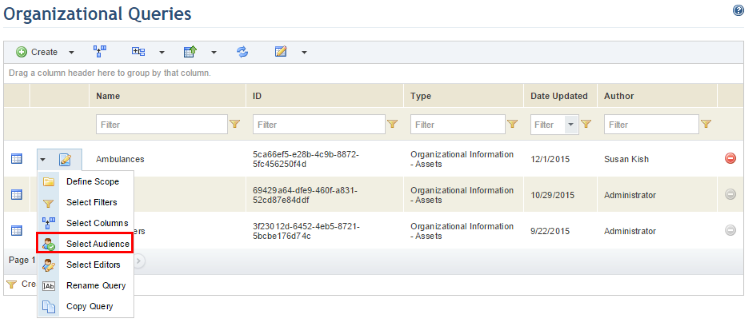
To select the audience for the query, access the main list of queries from the
Organization module and, in the Organizational Queries section,
click Edit ( ) next to the query with the audience
you want to define, and select the Select Audience option from the
drop-down list that appears (see figure below).
) next to the query with the audience
you want to define, and select the Select Audience option from the
drop-down list that appears (see figure below).
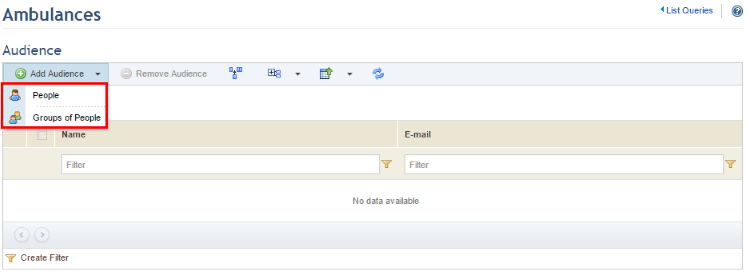
The system displays a screen where you can select the people and groups who will be able to view the query in the Home module and in this section (if they have permission to access it), and also view the query layer in the map of the Integration module and the Dispatch and Events solutions.
47. Click Add Audience and select People or Groups of People (see figure below).
48. In the window that appears, select the people or groups of people you want to include in the audience of the query and click Add (see figure below).
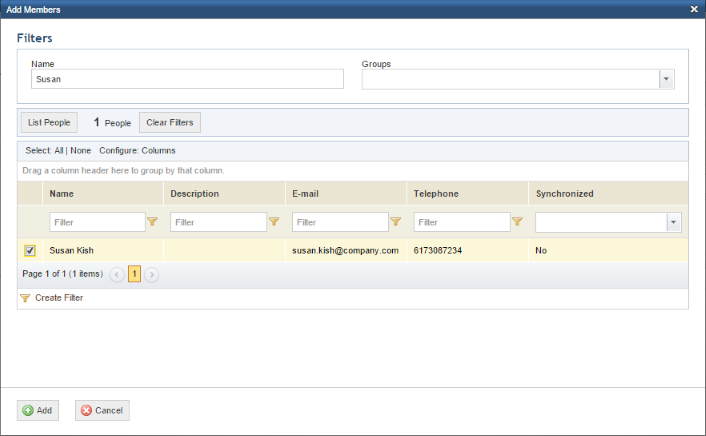
The system displays a success message.
49. To remove a person or group from the audience, select the checkbox next to their name and click Remove Audience.
The system displays a success message.
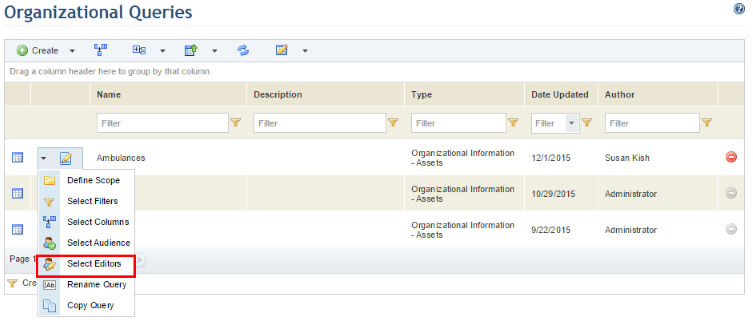
50.
To select editors for the query, access the Organizational Queries
section, click Edit () next to the query for which you want
to select editors, and select the Select Editors option from the
drop-down list that appears (see figure below).
When the Select Editors option is chosen, the system displays a screen where you can select the people and groups who will be able to edit the query, receiving the same permissions to it as the author.
51. Click Add Editors and select People or Groups of People (see figure below).
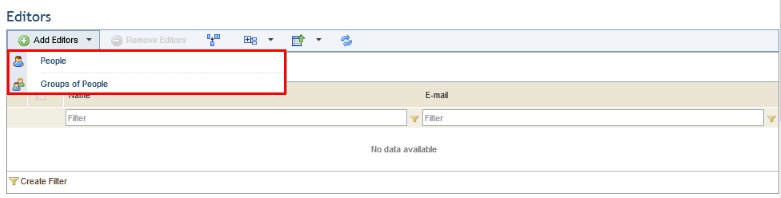
52. In the window that appears, select the people or groups you want to assign as editors of the query and then click Add (see figure below).
The system displays a success message.
53. To remove a person or group from the list of editors, select the checkbox next to their name and click Remove Editors.
The system displays a success message.